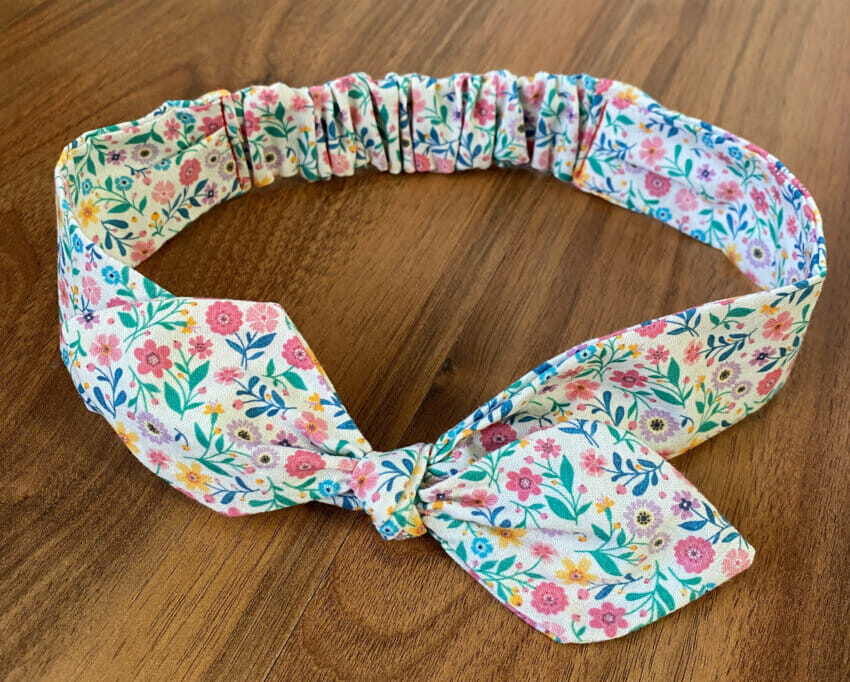
Follow this quick tutorial to learn how to make a knotted bow headband with woven cotton fabric. You can make your headband in any size you want in less than 30 minutes.
These knotted headbands are made of cotton fabric and have a small elasticated piece in the back. They are soft and comfortable to wear, and perfect for any occasion.
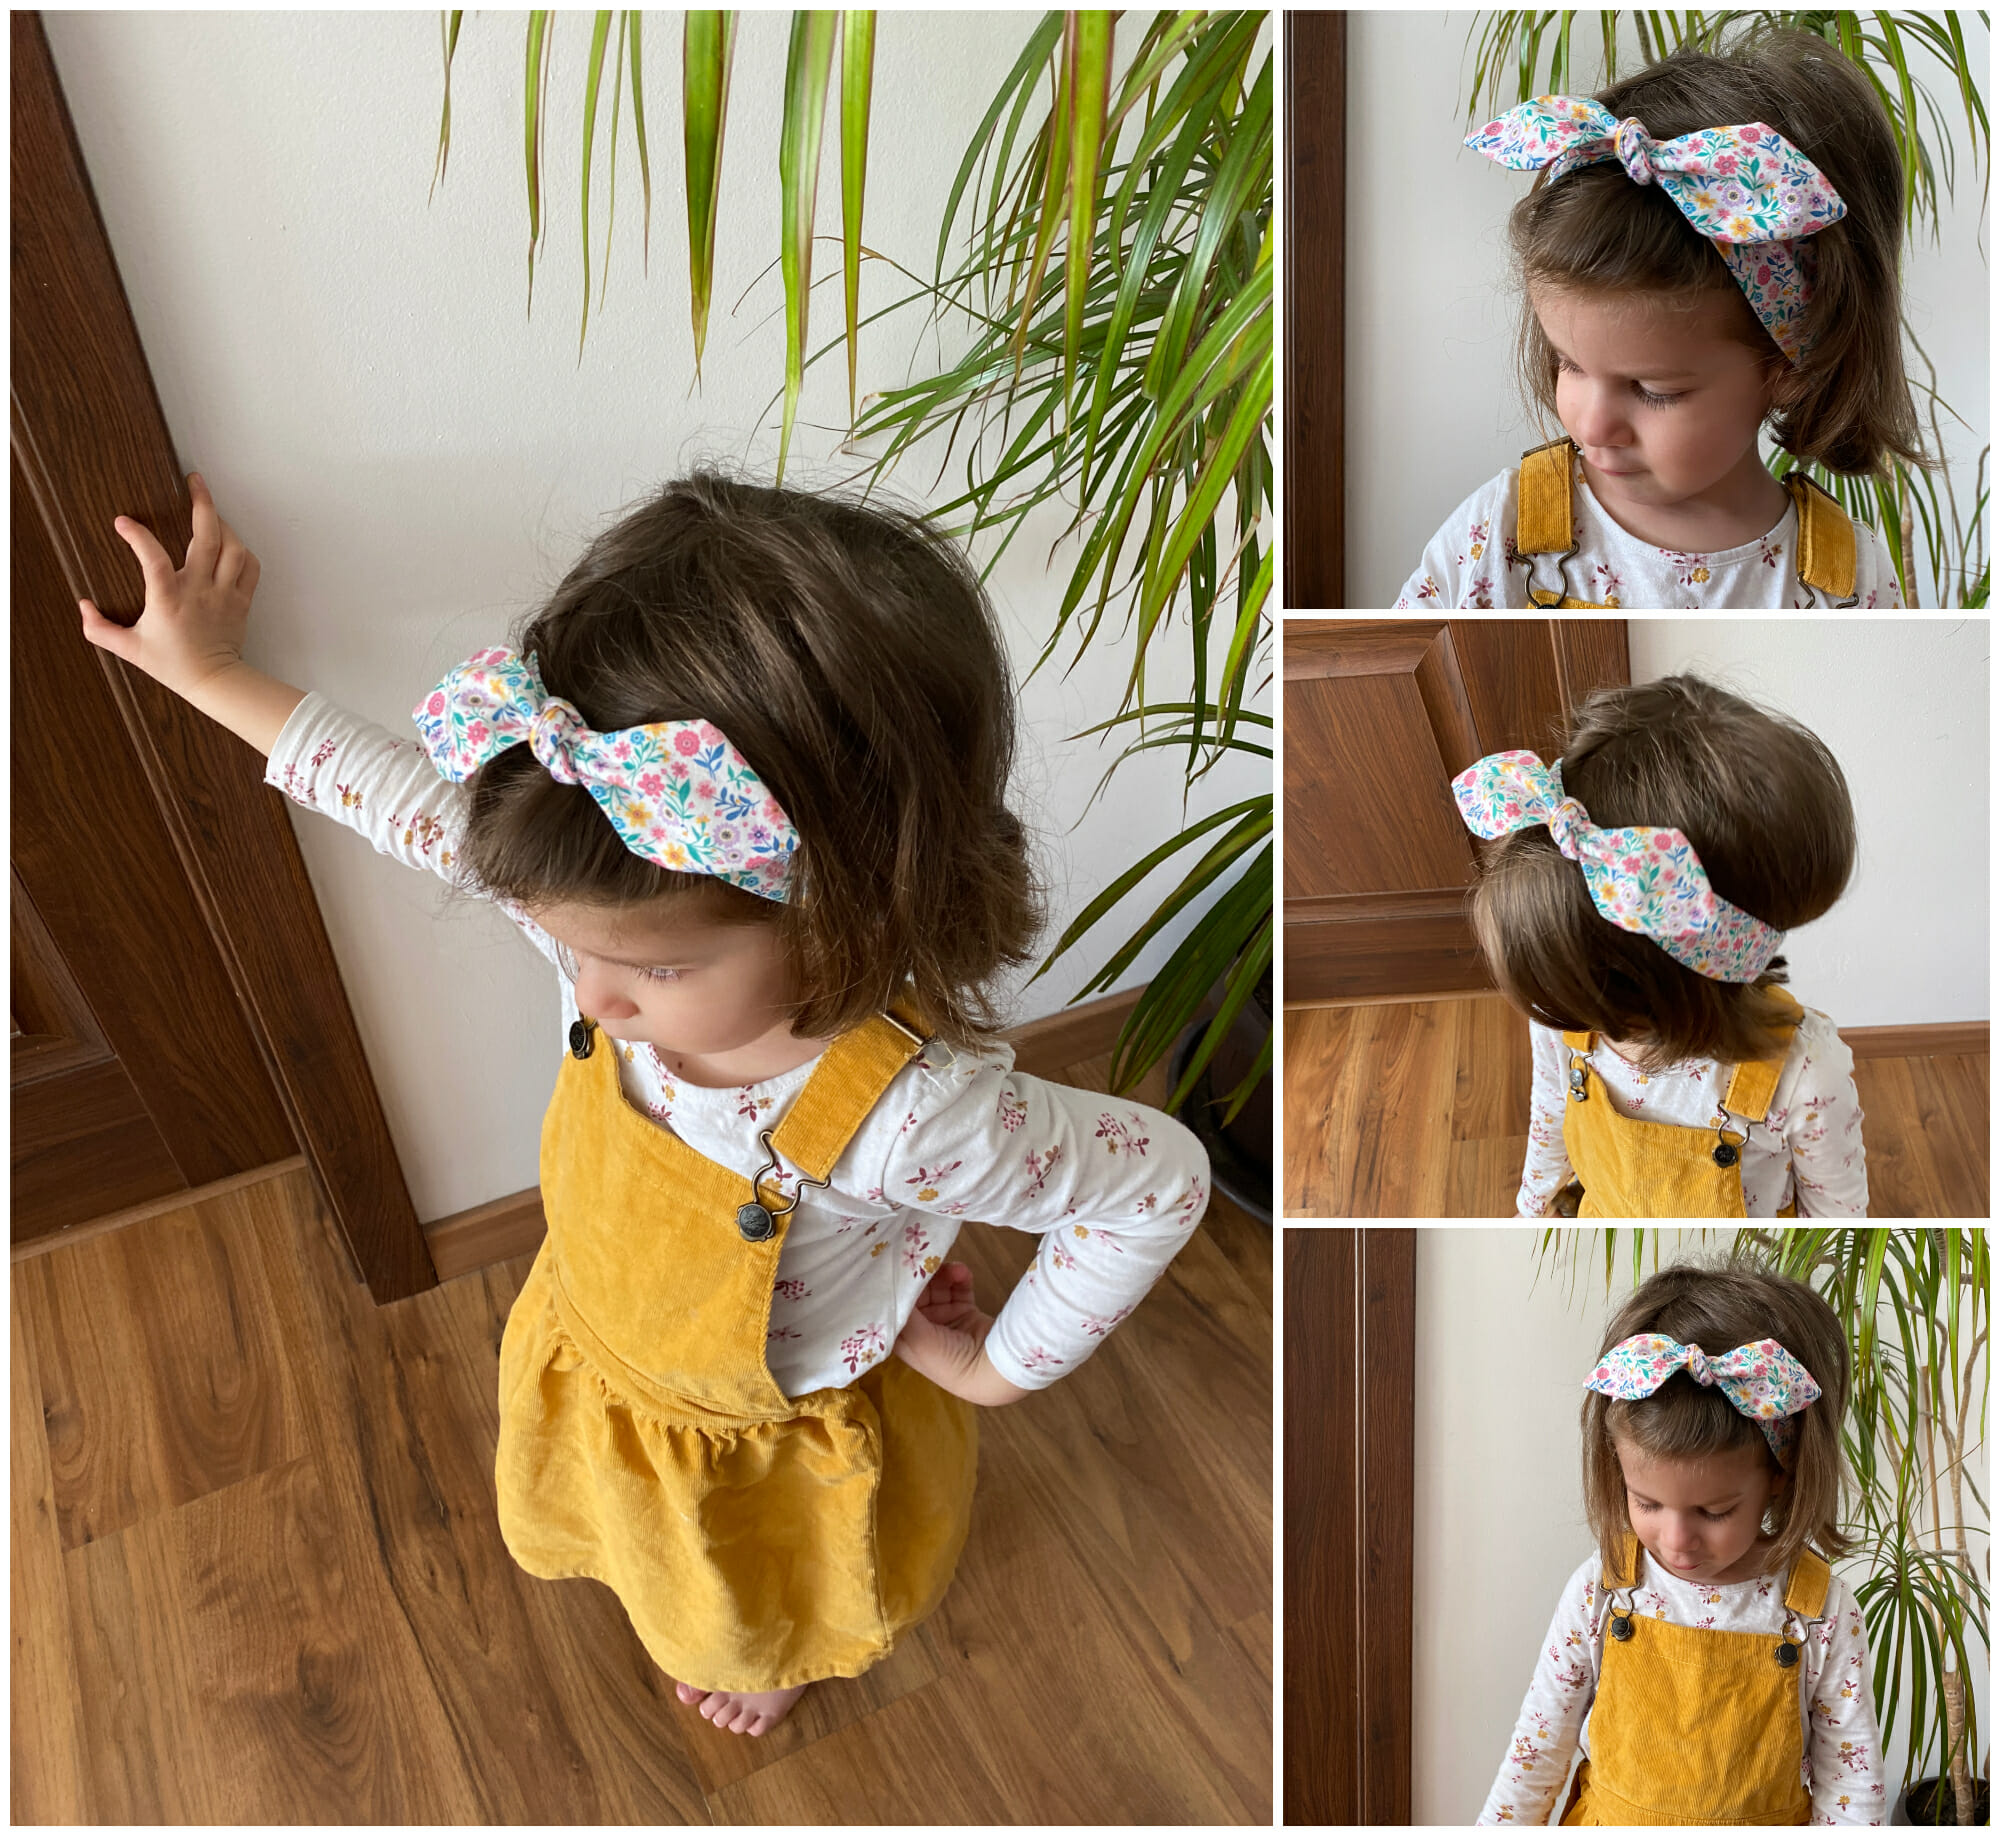
I made a few for my daughter because we’re in the process of growing out her bangs and I’m trying to keep the hair out of her eyes (she does not wear clips!). I figured out that a pretty headband should do the trick. One can only hope!
DIY knotted headband tutorial
Cute headbands make great gifts for girls, especially since you get to choose the fabric! You can make them even if you don’t know the measurements of the recipient.
Besides, this pattern doesn’t require much fabric (you’ll get away with 1/4 yard), and you might be able to use some of your fabric scraps – all the more if you’re making a reversible version.
Related: Looking for a fun and educational activity for your little ones? Try this free maze generator for kids – customizable mazes that will entertain and engage young minds!
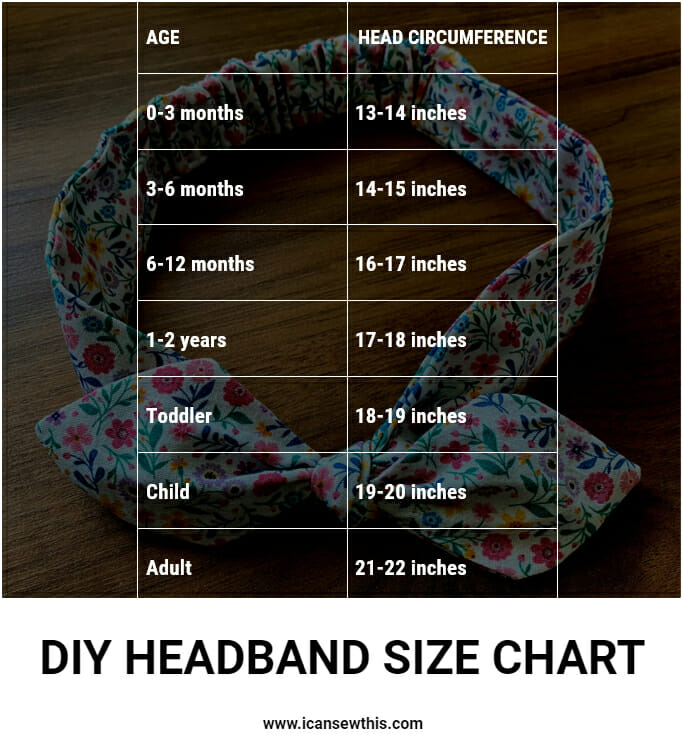
It’s simple and easy – the head circumference is the one and only measurement that counts here, the only thing that determines if a headband will fit.
Ideally, you want to make sure your headband is not too snug or tight – just comfortable enough. In my experience with these woven knotted headbands, the ideal finished size is close to (less than or equal to) the head circumference.
If you’re wondering why it’s because the elastic piece at the back adds some grip but not too much so that it won’t hurt your head.
Anyway, the beauty of these knotted headbands is that you have wiggle room. You can retie the knot to make them longer or shorter and therefore get a better fit.
How to make the knotted headband in any size you want
In this tutorial, I’ve included a free PDF pattern for the knotted bow headband in size 4 (19″ head circumference).
However, you can easily resize the pattern and make the headband longer or shorter, as you need.

For instance, the finished size of the headband presented here is 1 5/8 inches in width and 19 inches in circumference (when not stretched).
Related: The best headbands I’ve made so far. DIY tutorial
I made it for my almost 4-year-old daughter who has a head circumference of 19.6 inches. This is the headband that she likes and uses the most, so I use it as a reference for all future headbands.
As I said earlier, the finished size of the headband should generally be equal to the head circumference.
So, if I want to make a headband for my 11-year-old daughter (21.6 inches head circumference) all I have to do is add 1.3 inches to the pattern (i.e. to the length of each of the 4 larger fabric pieces). The 10” by 1 3/4” rectangle that we use for the elastic part in the back remains unchanged.
This is how I came to this result:
- 21.6 – 19 = 2.6 inches – the difference between the desired headband length and the existing headband pattern (no need to add seam allowances, they are included in the original pattern)
- 2.6 / 2 = 1.3 inches – measurement to add to each of the larger headband pieces
Similarly, if I want to make the headband for me (head circumference 22.8 inches), I’ll just add 1.9 inches to the pattern.
But what if I want to make this headband for a baby?
Well, it’s still simple. Instead of adding inches, you’ll have to subtract some. Check the headband size chart guide, and let’s pretend you need to make the knotted headband for a 17” head circumference. You’ll have to subtract 1” from each of the longer pattern pieces of the headband – the rest remains the same.
Here is a DIY headband size chart for your reference below.
Related: How to sew tulle scrunchies
Sewing supplies – free knotted bow headband pattern
- Knotted headband pattern – free PDF download below (size 4 or 19″ head circumference)
- Cotton fabric
- 1” wide elastic
- Scissors
- Iron
- Safety pin
- Matching thread
- Sewing Pins
Information about the free PDF pattern
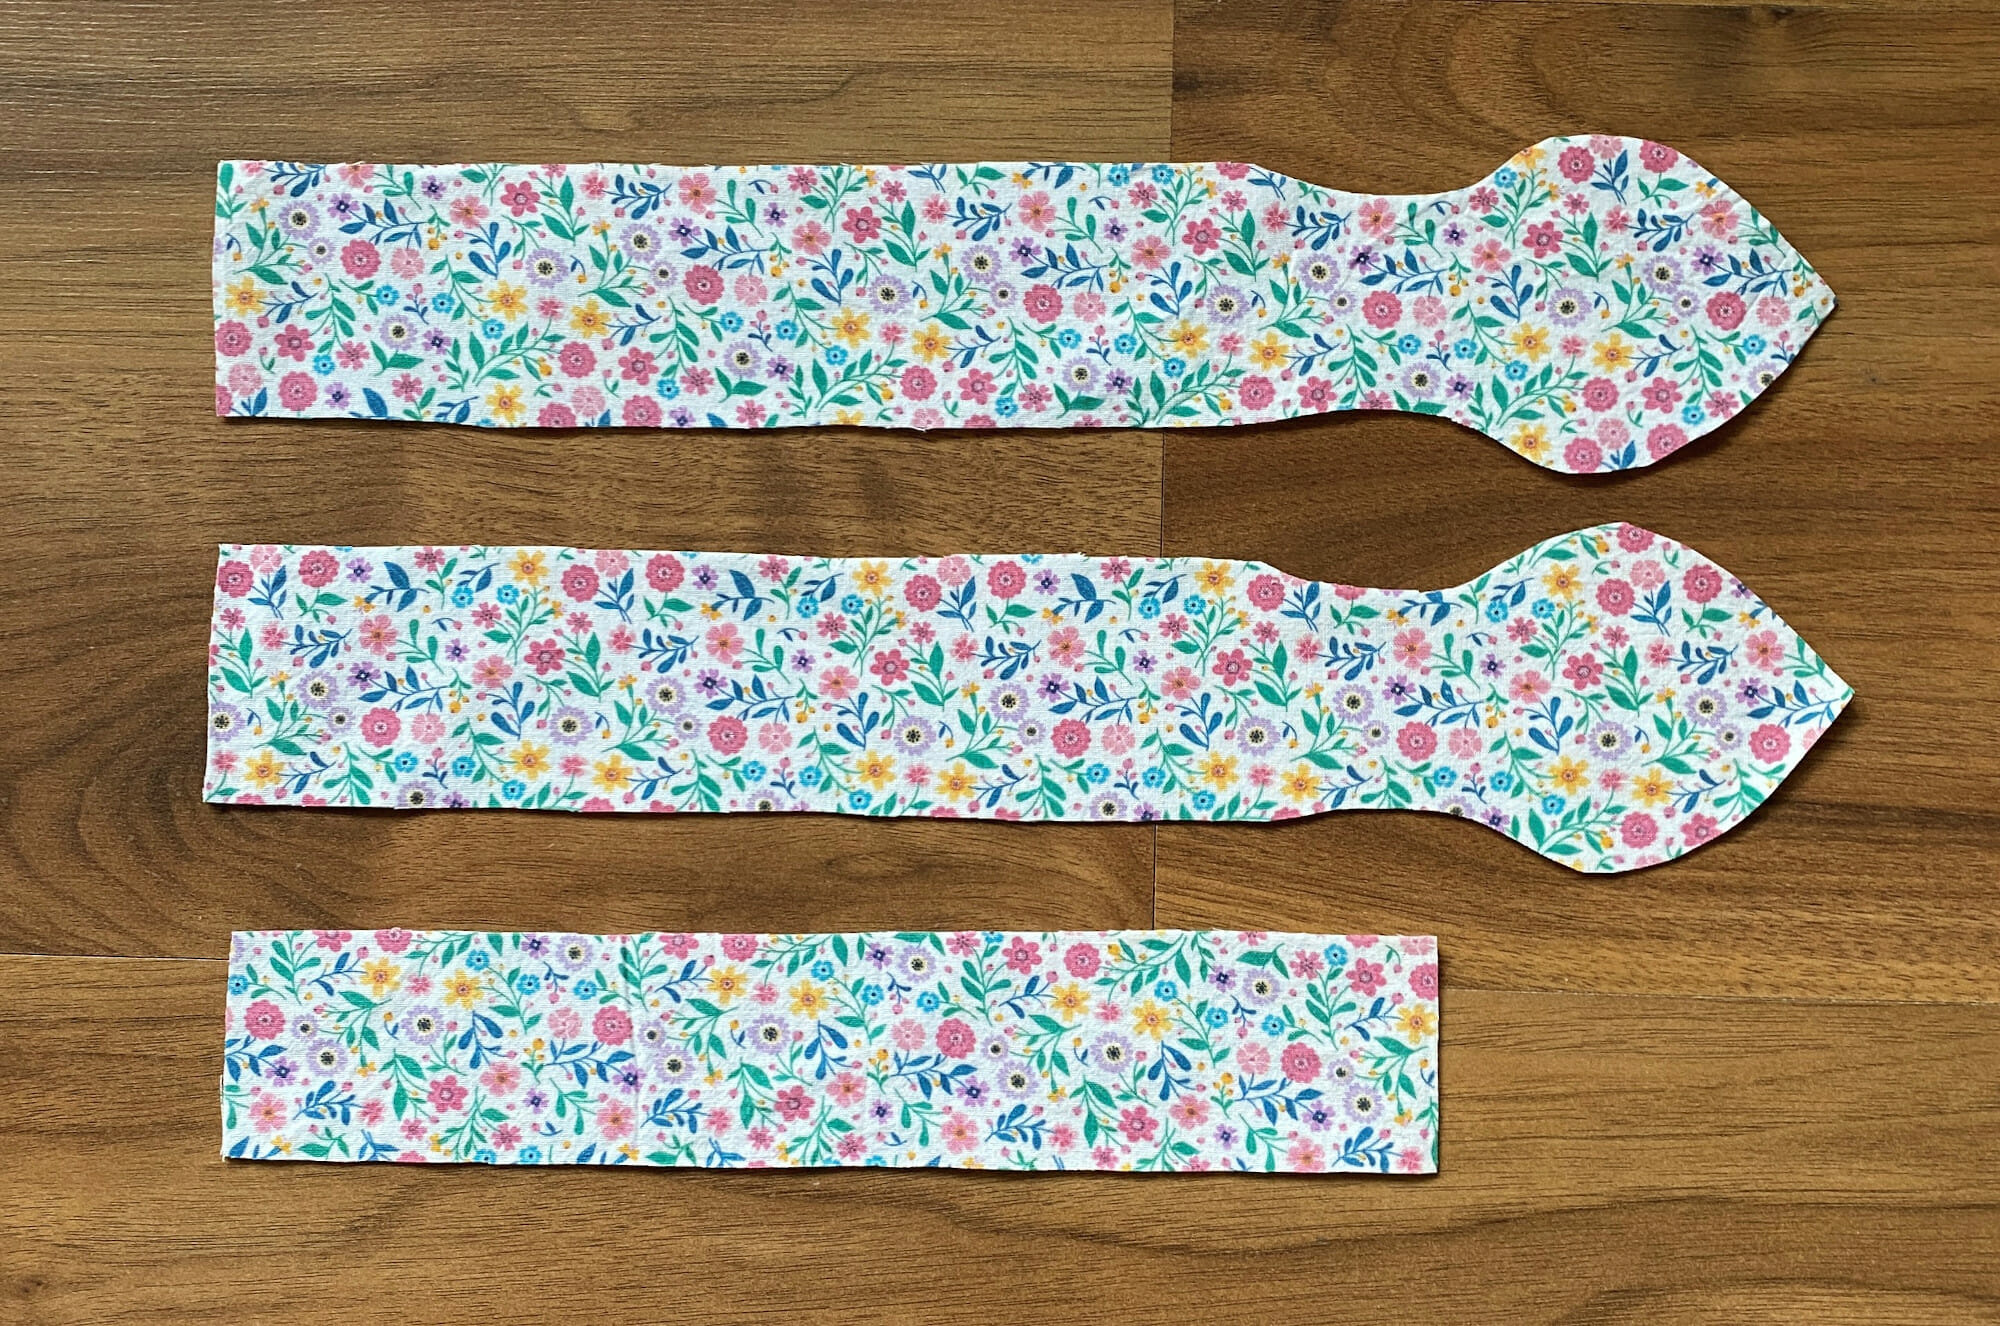
The first page of the pattern (size 4) contains two pattern pieces – you have to join them on the dotted line to obtain one pattern piece that is 13 inches long. You’ll use this long pattern piece to cut 4 fabric pieces in total (2 mirrored pairs). These will be the fixed part of the headband that ties with a bow.
The second page of the pattern contains one pattern piece that will become the elasticated part in the back. I’ve written on the second page that this piece is 10” x 1 ¾” – however, when you print it at 100%, it is slightly smaller than that (9 ¾” long) because I made a mistake in measuring. You can still use the pattern piece as-is – the error does not affect the final result.
Learn how to sew this cute headband in 5 simple steps.
Step 1 – Cut the fabric pieces
Place the long pattern piece on the fold of the fabric and cut around it. You should cut along the fold as well – the fabric is on fold only because I want to cut two mirror pieces. Do this twice, so you end up with 4 pattern pieces, and 2 mirrored pairs.
Then cut 2 rectangles, each measuring 1 3/4 inches x 10 inches.

You’ll also need a 5” piece of 1-inch wide elastic.
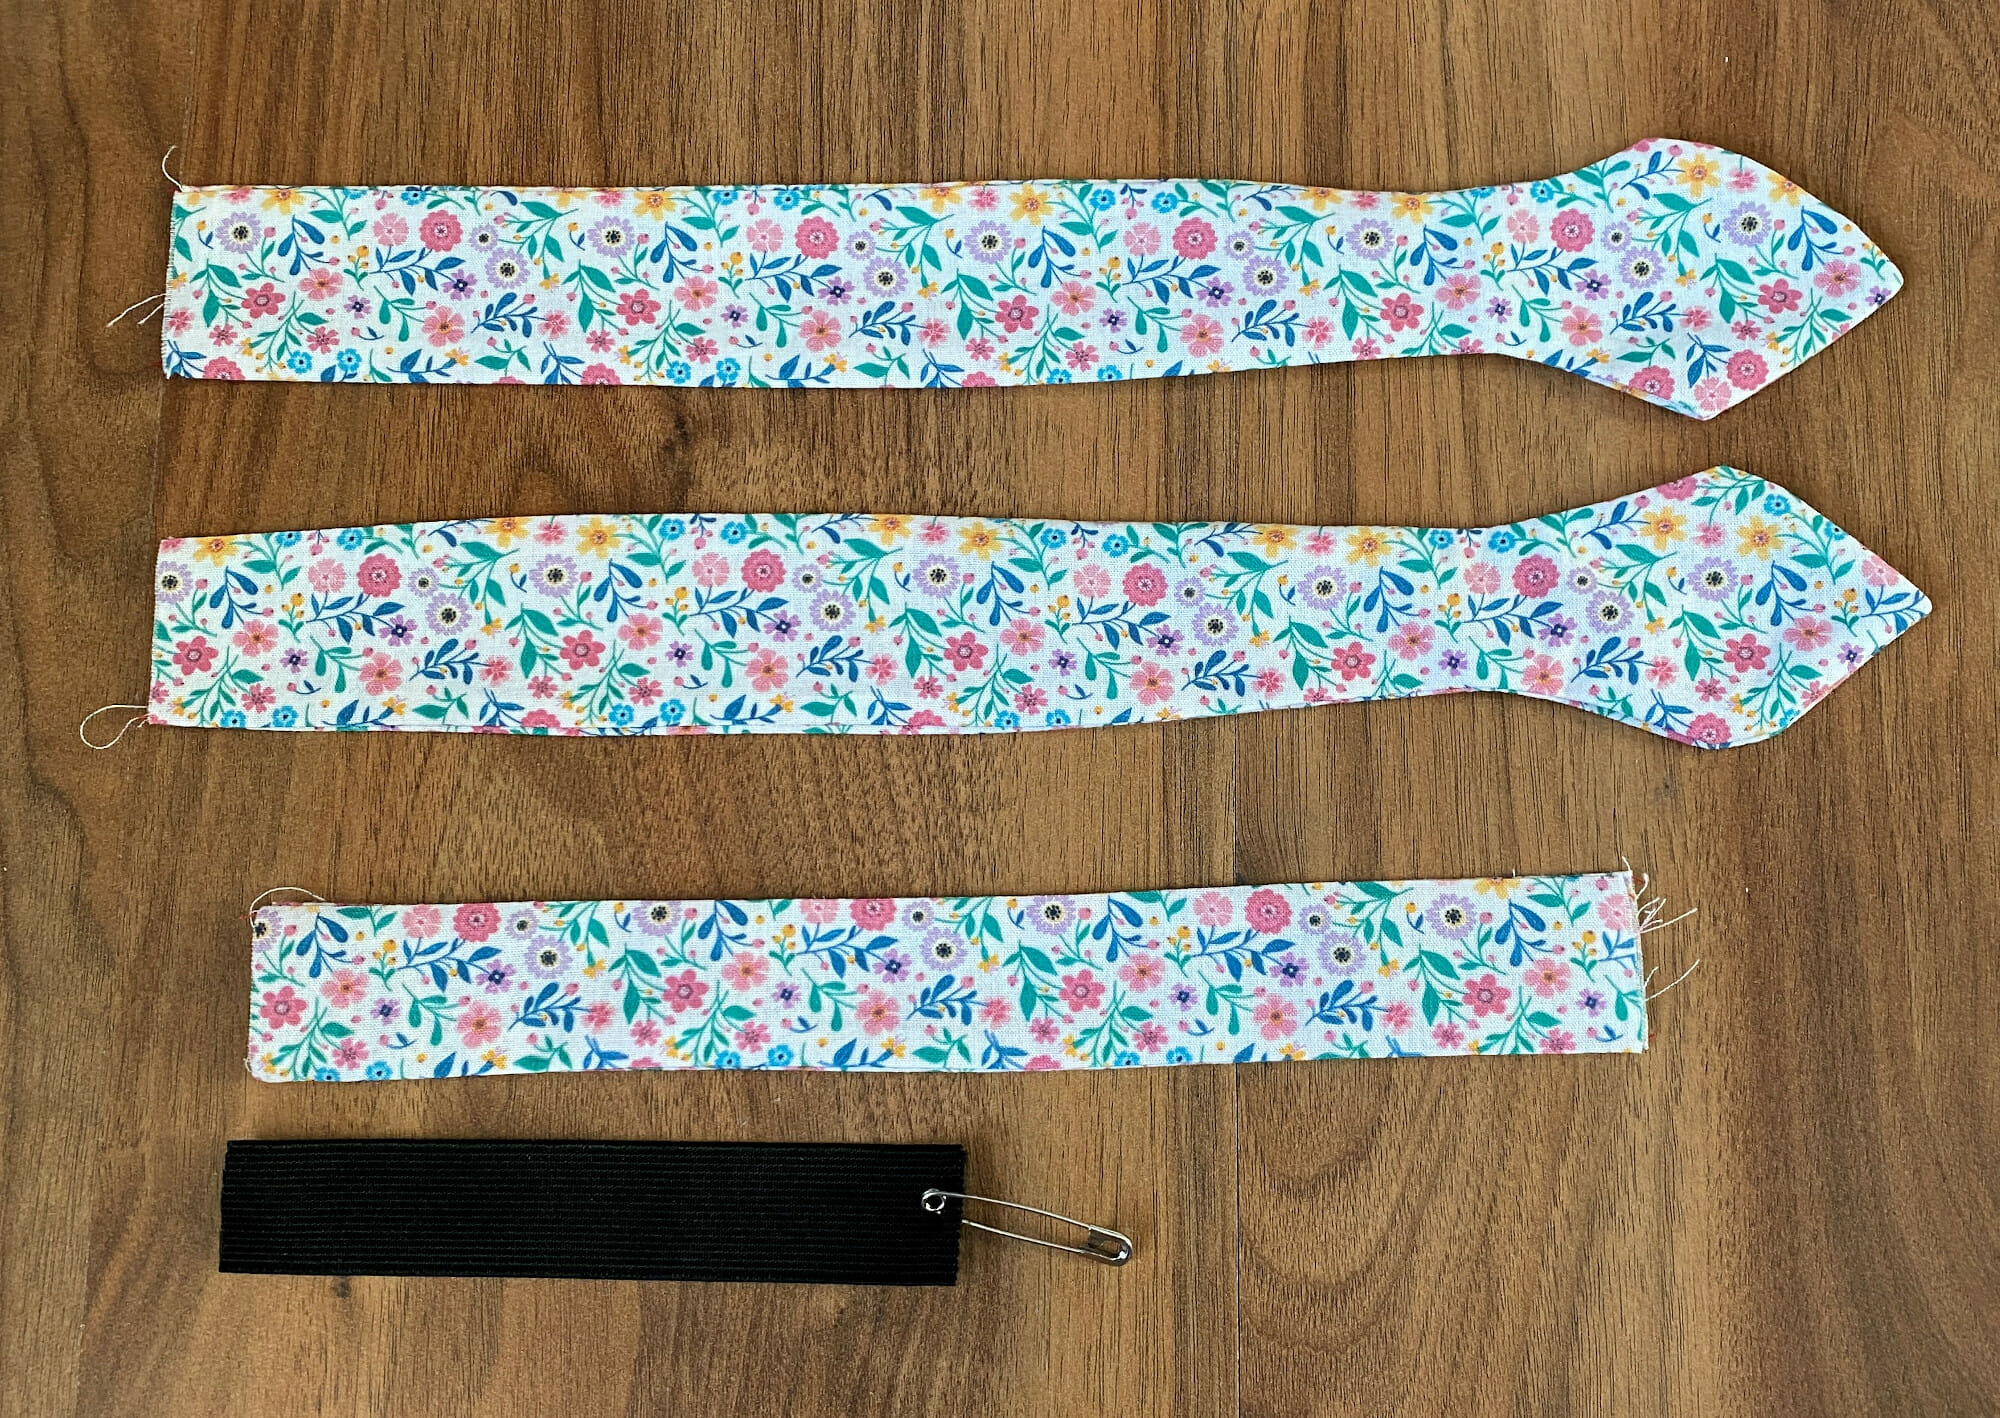
In the picture below there are 6 pattern pieces in total (3 mirrored pairs). This is all you need to make this knotted headband.
Step 2 – Sew the long headband pieces
Put two of the long pieces right sides together and sew all the way around, using a 1/4” seam allowance. Leave the short ends unsewn to turn the headband right side out. Repeat for the other two long pieces.
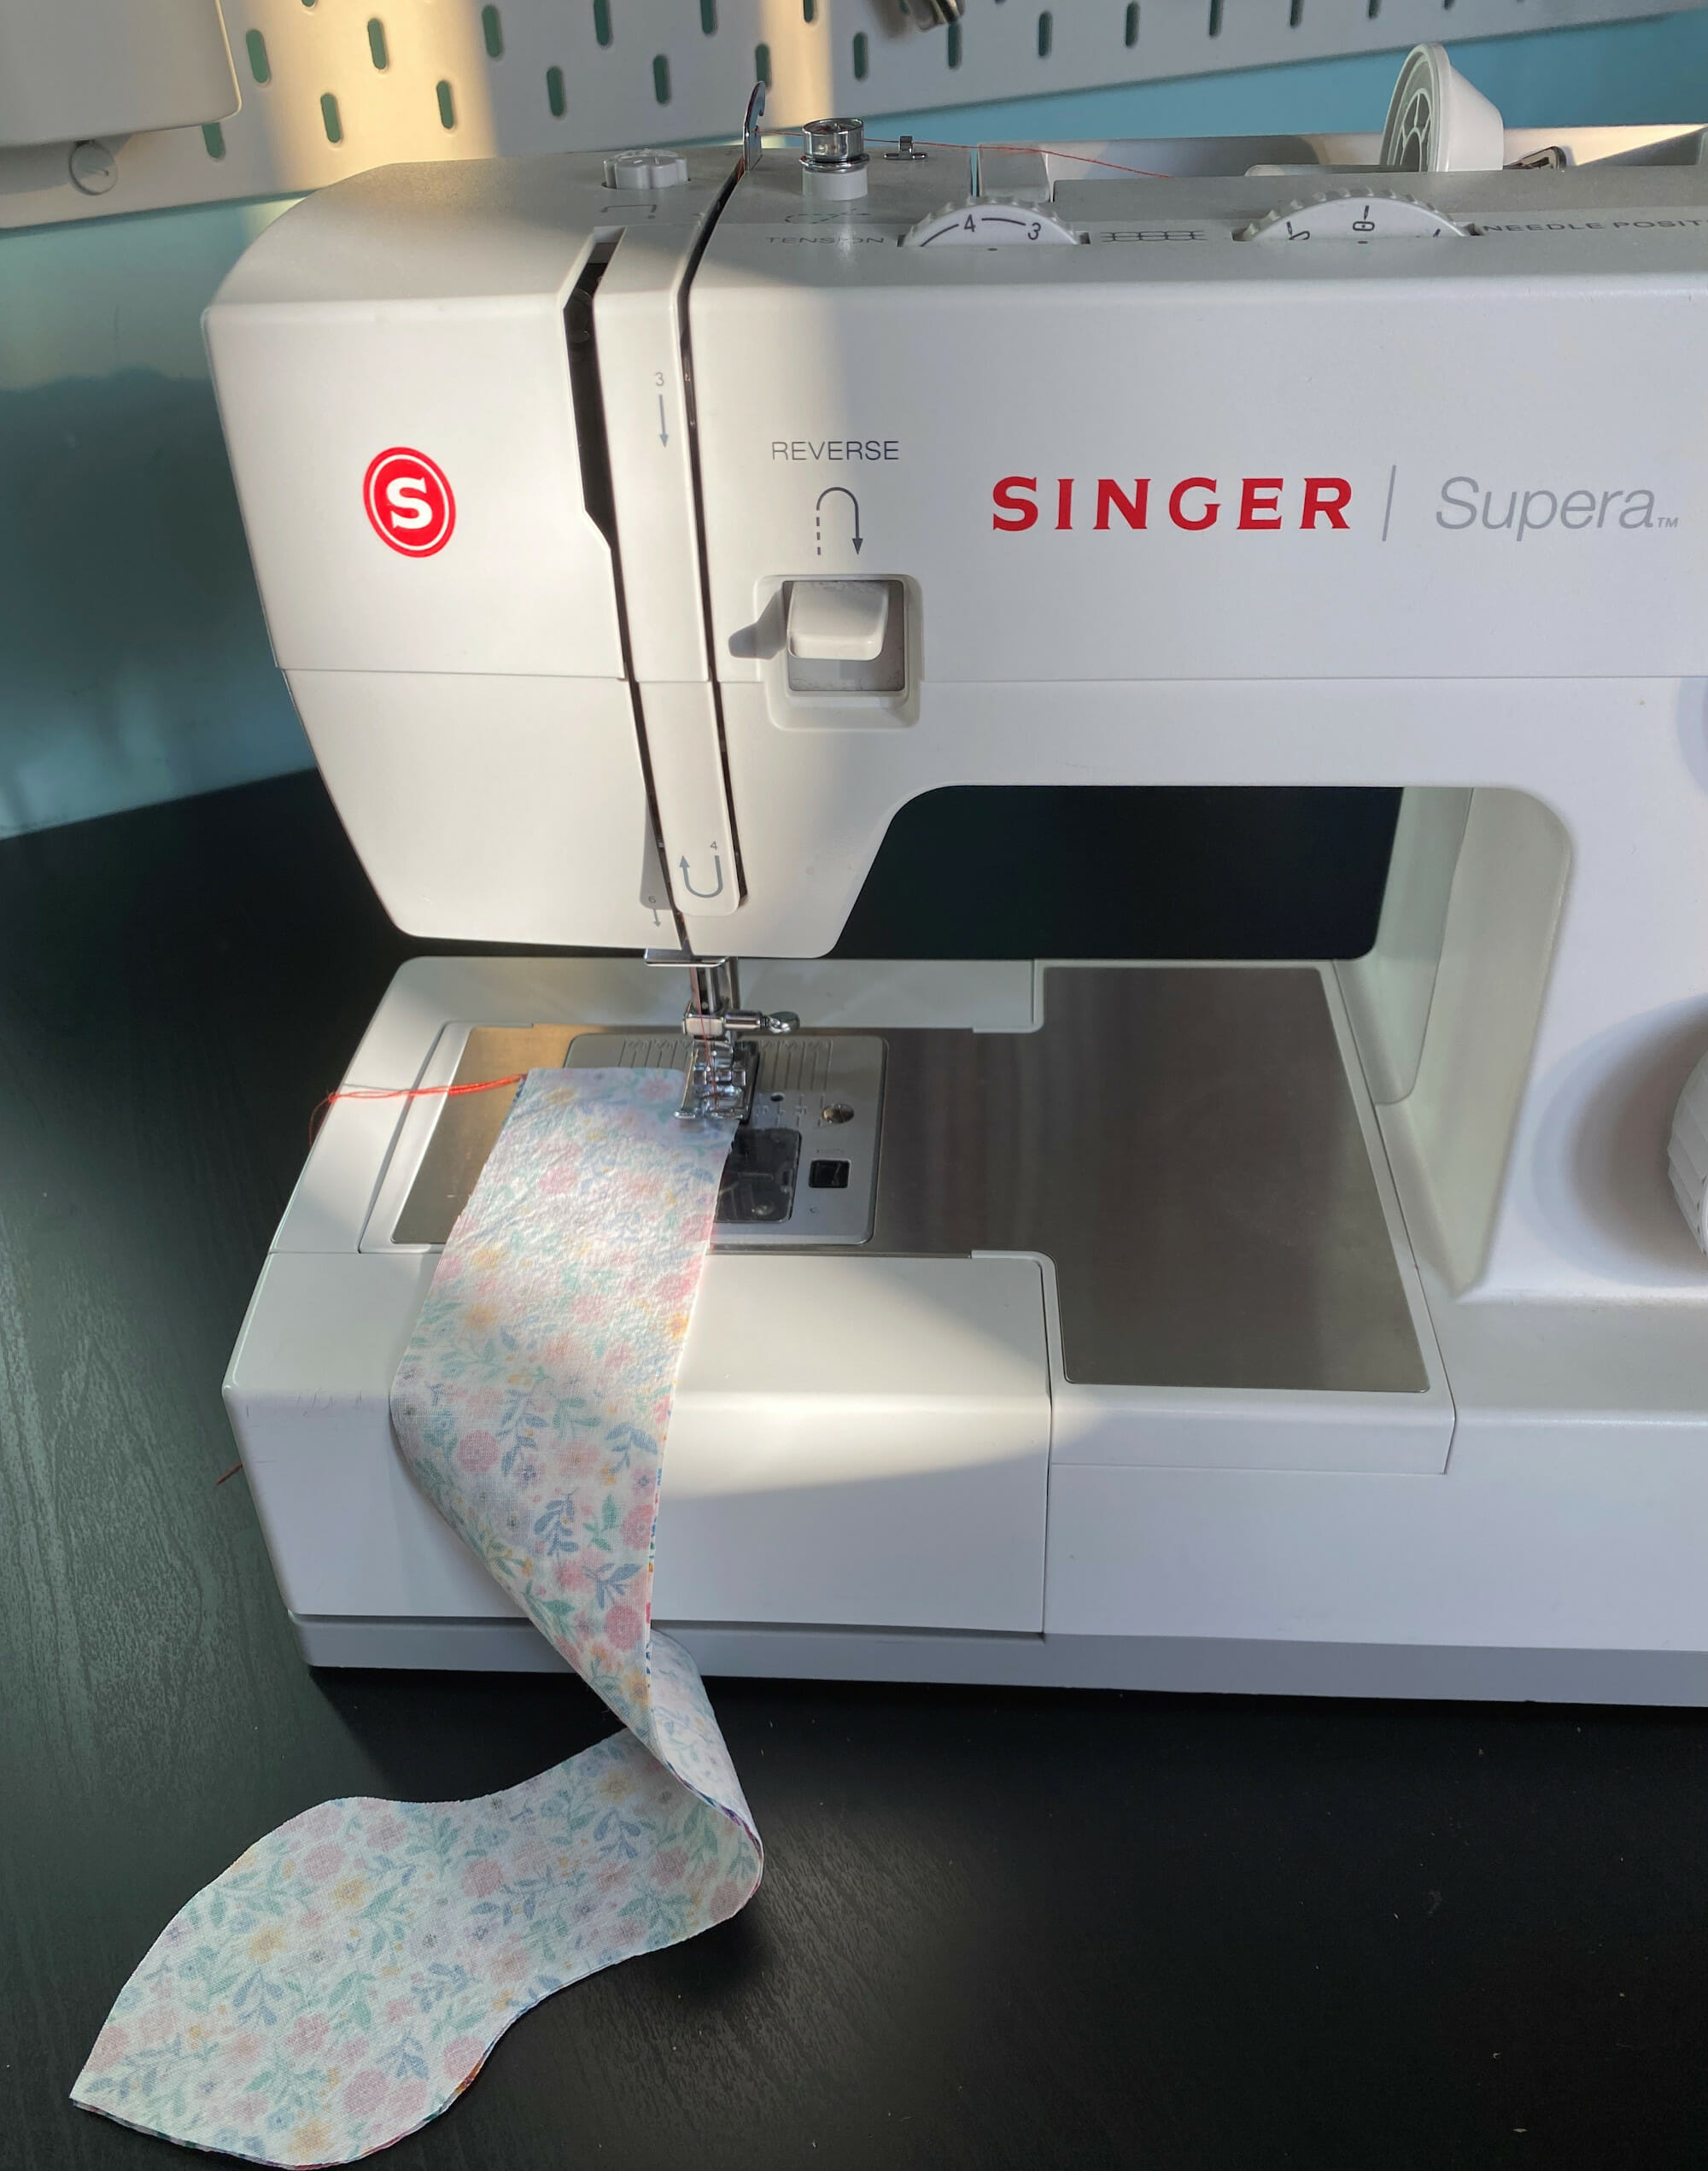
Next, sew the long edges of the rectangle piece. Always backstitch to reinforce the seams.

After this step, you should have three headband pieces as shown in the photo above.
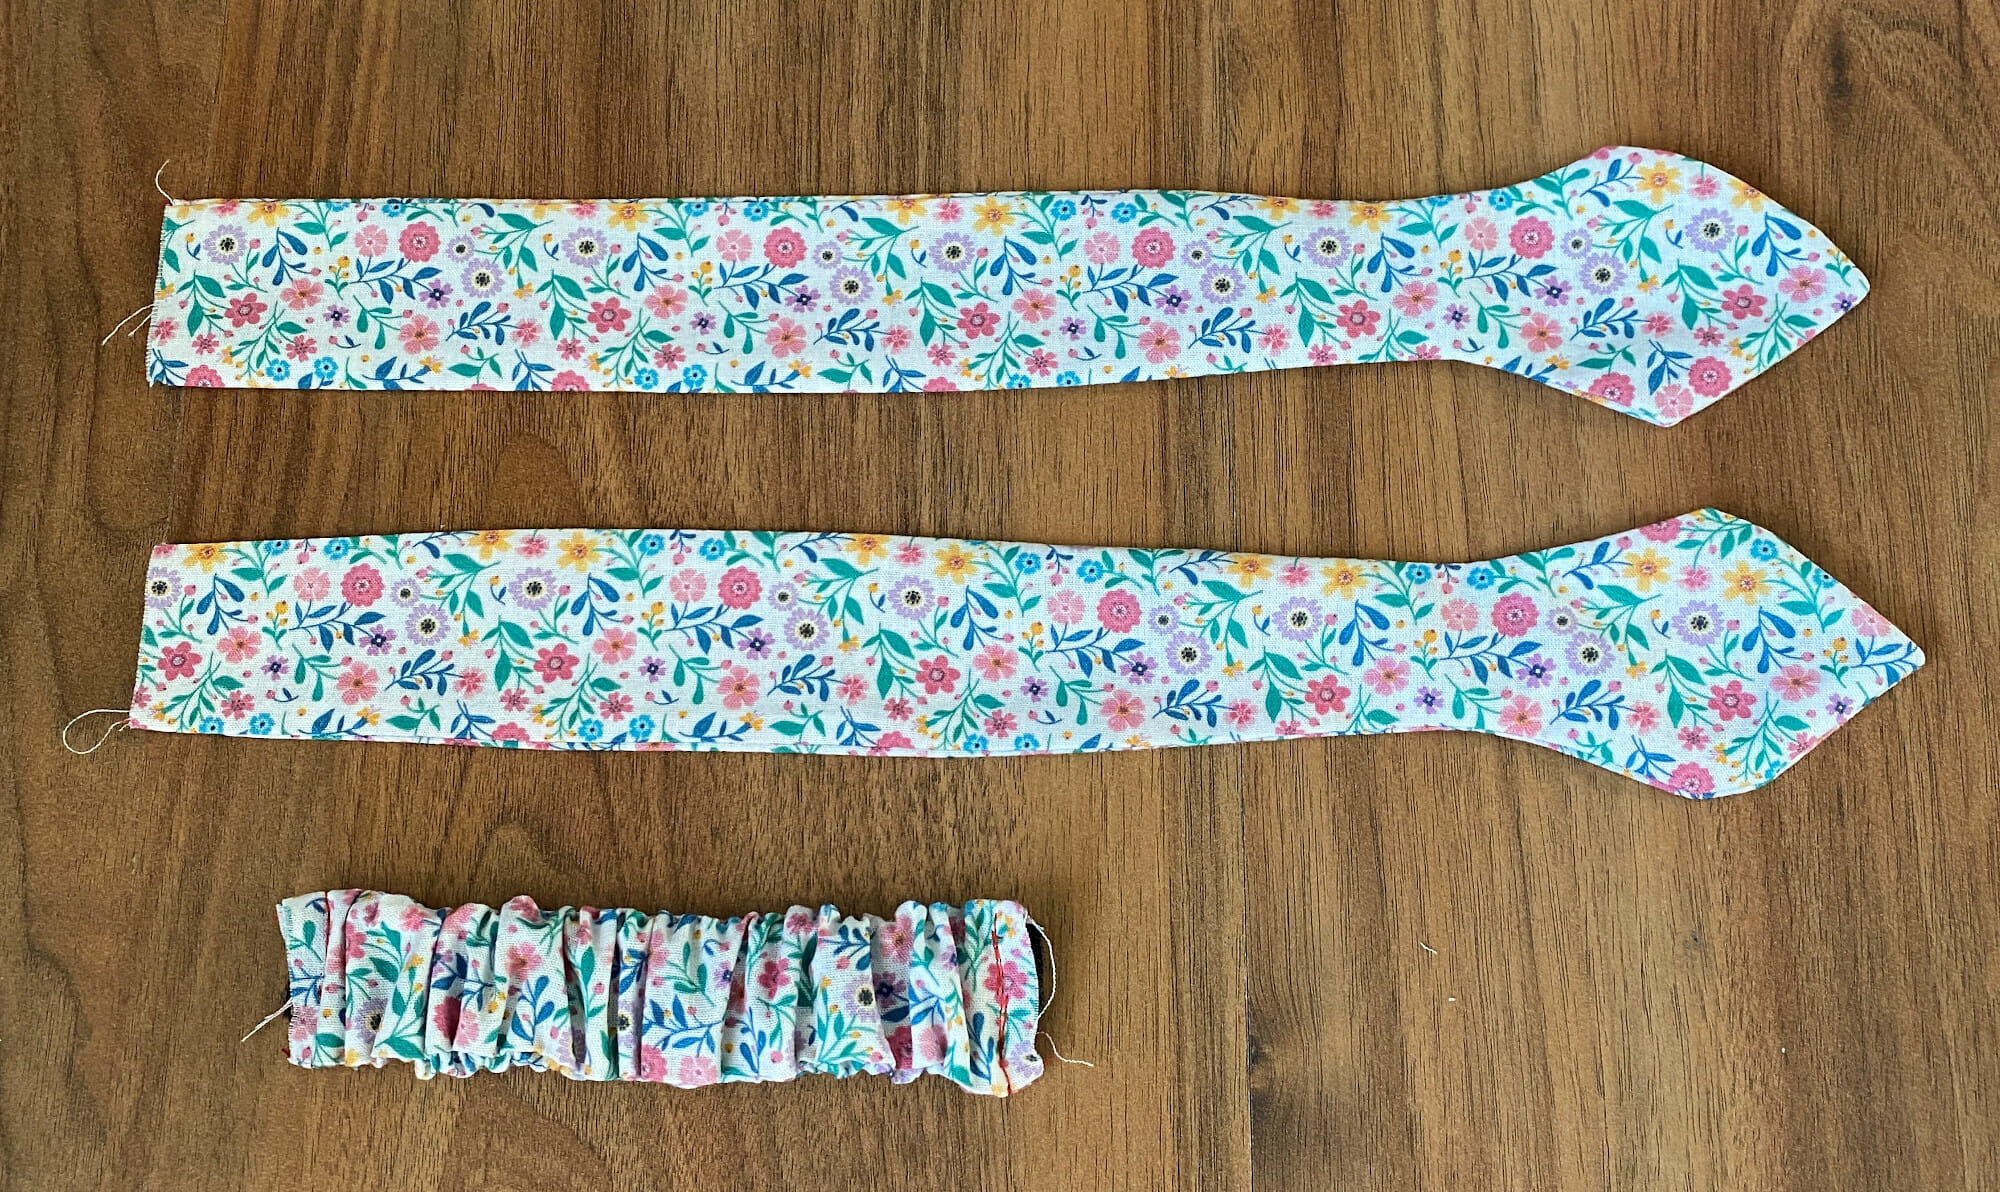
Step 3 – Turn the headband pieces right side out
For the long pieces, I successfully use a chopstick to push the fabric out, for the small rectangle a safety pin will work.
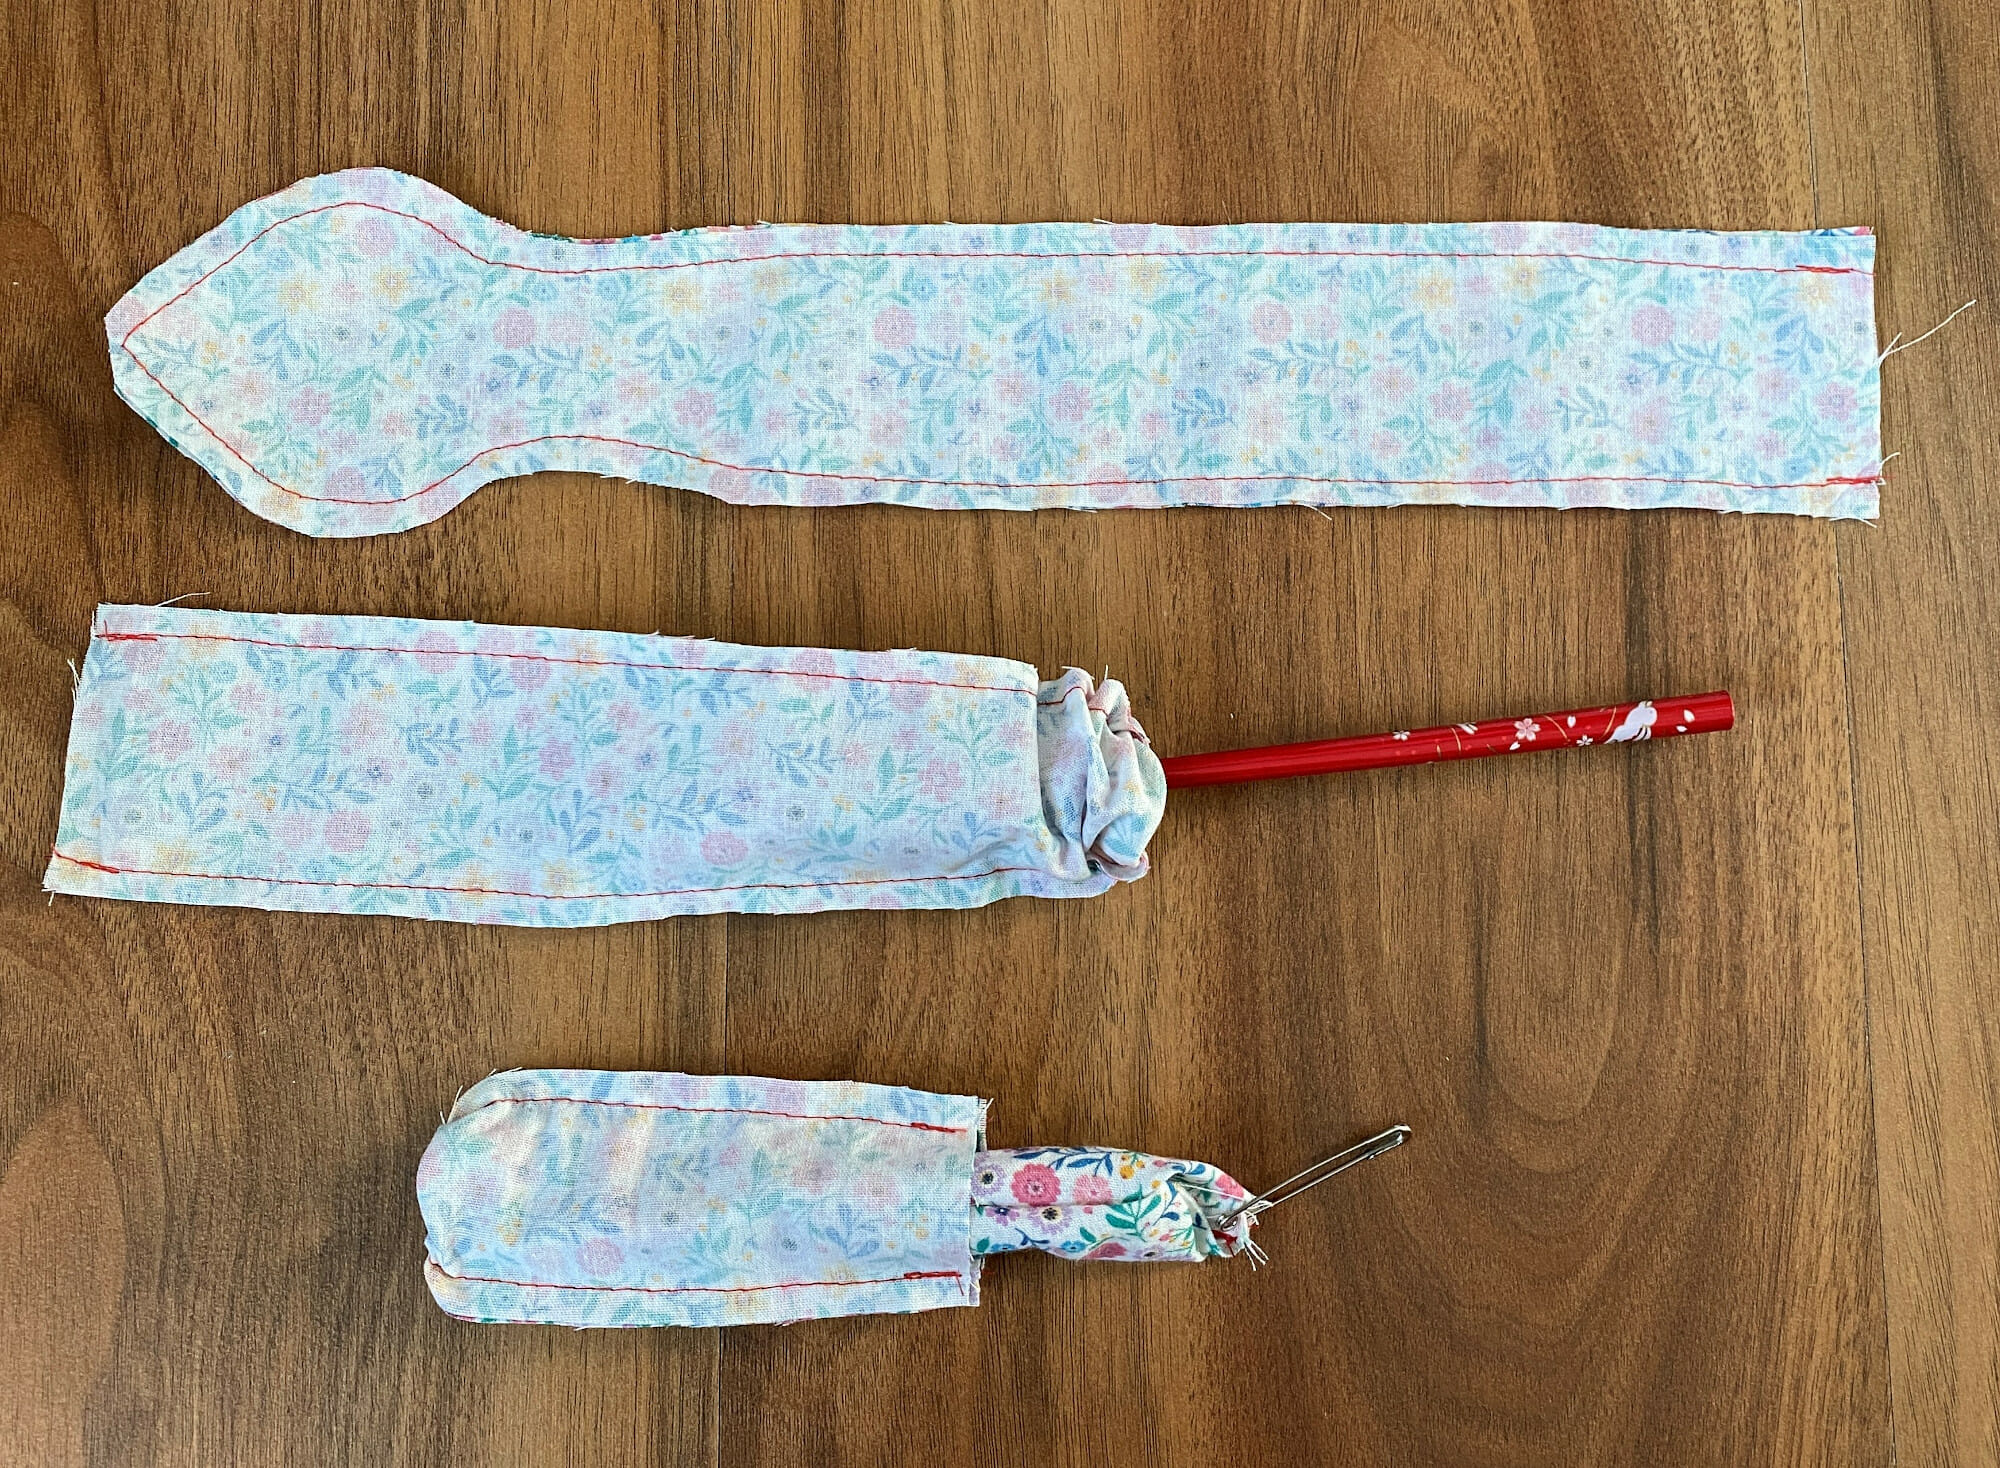
Use that purple thang (or a chopstick, or a dull pencil) to push out the corners and smooth the curves around the bows’ ends.
Next, iron the headband pieces to make the edge seams lay flat and nice.
Step 4 – Prepare the elastic section
Cut a 5″ long piece of elastic. I used 1-inch wide elastic here.
The goal is to make an elasticated fabric tube. So, use a safety pin to insert the elastic inside the tube, then sew the elastic across both ends of the fabric piece.
Step 5 – Finish the headband
Enclose the raw edges of the long headband pieces by turning the ends in approx. 1/2 inches.
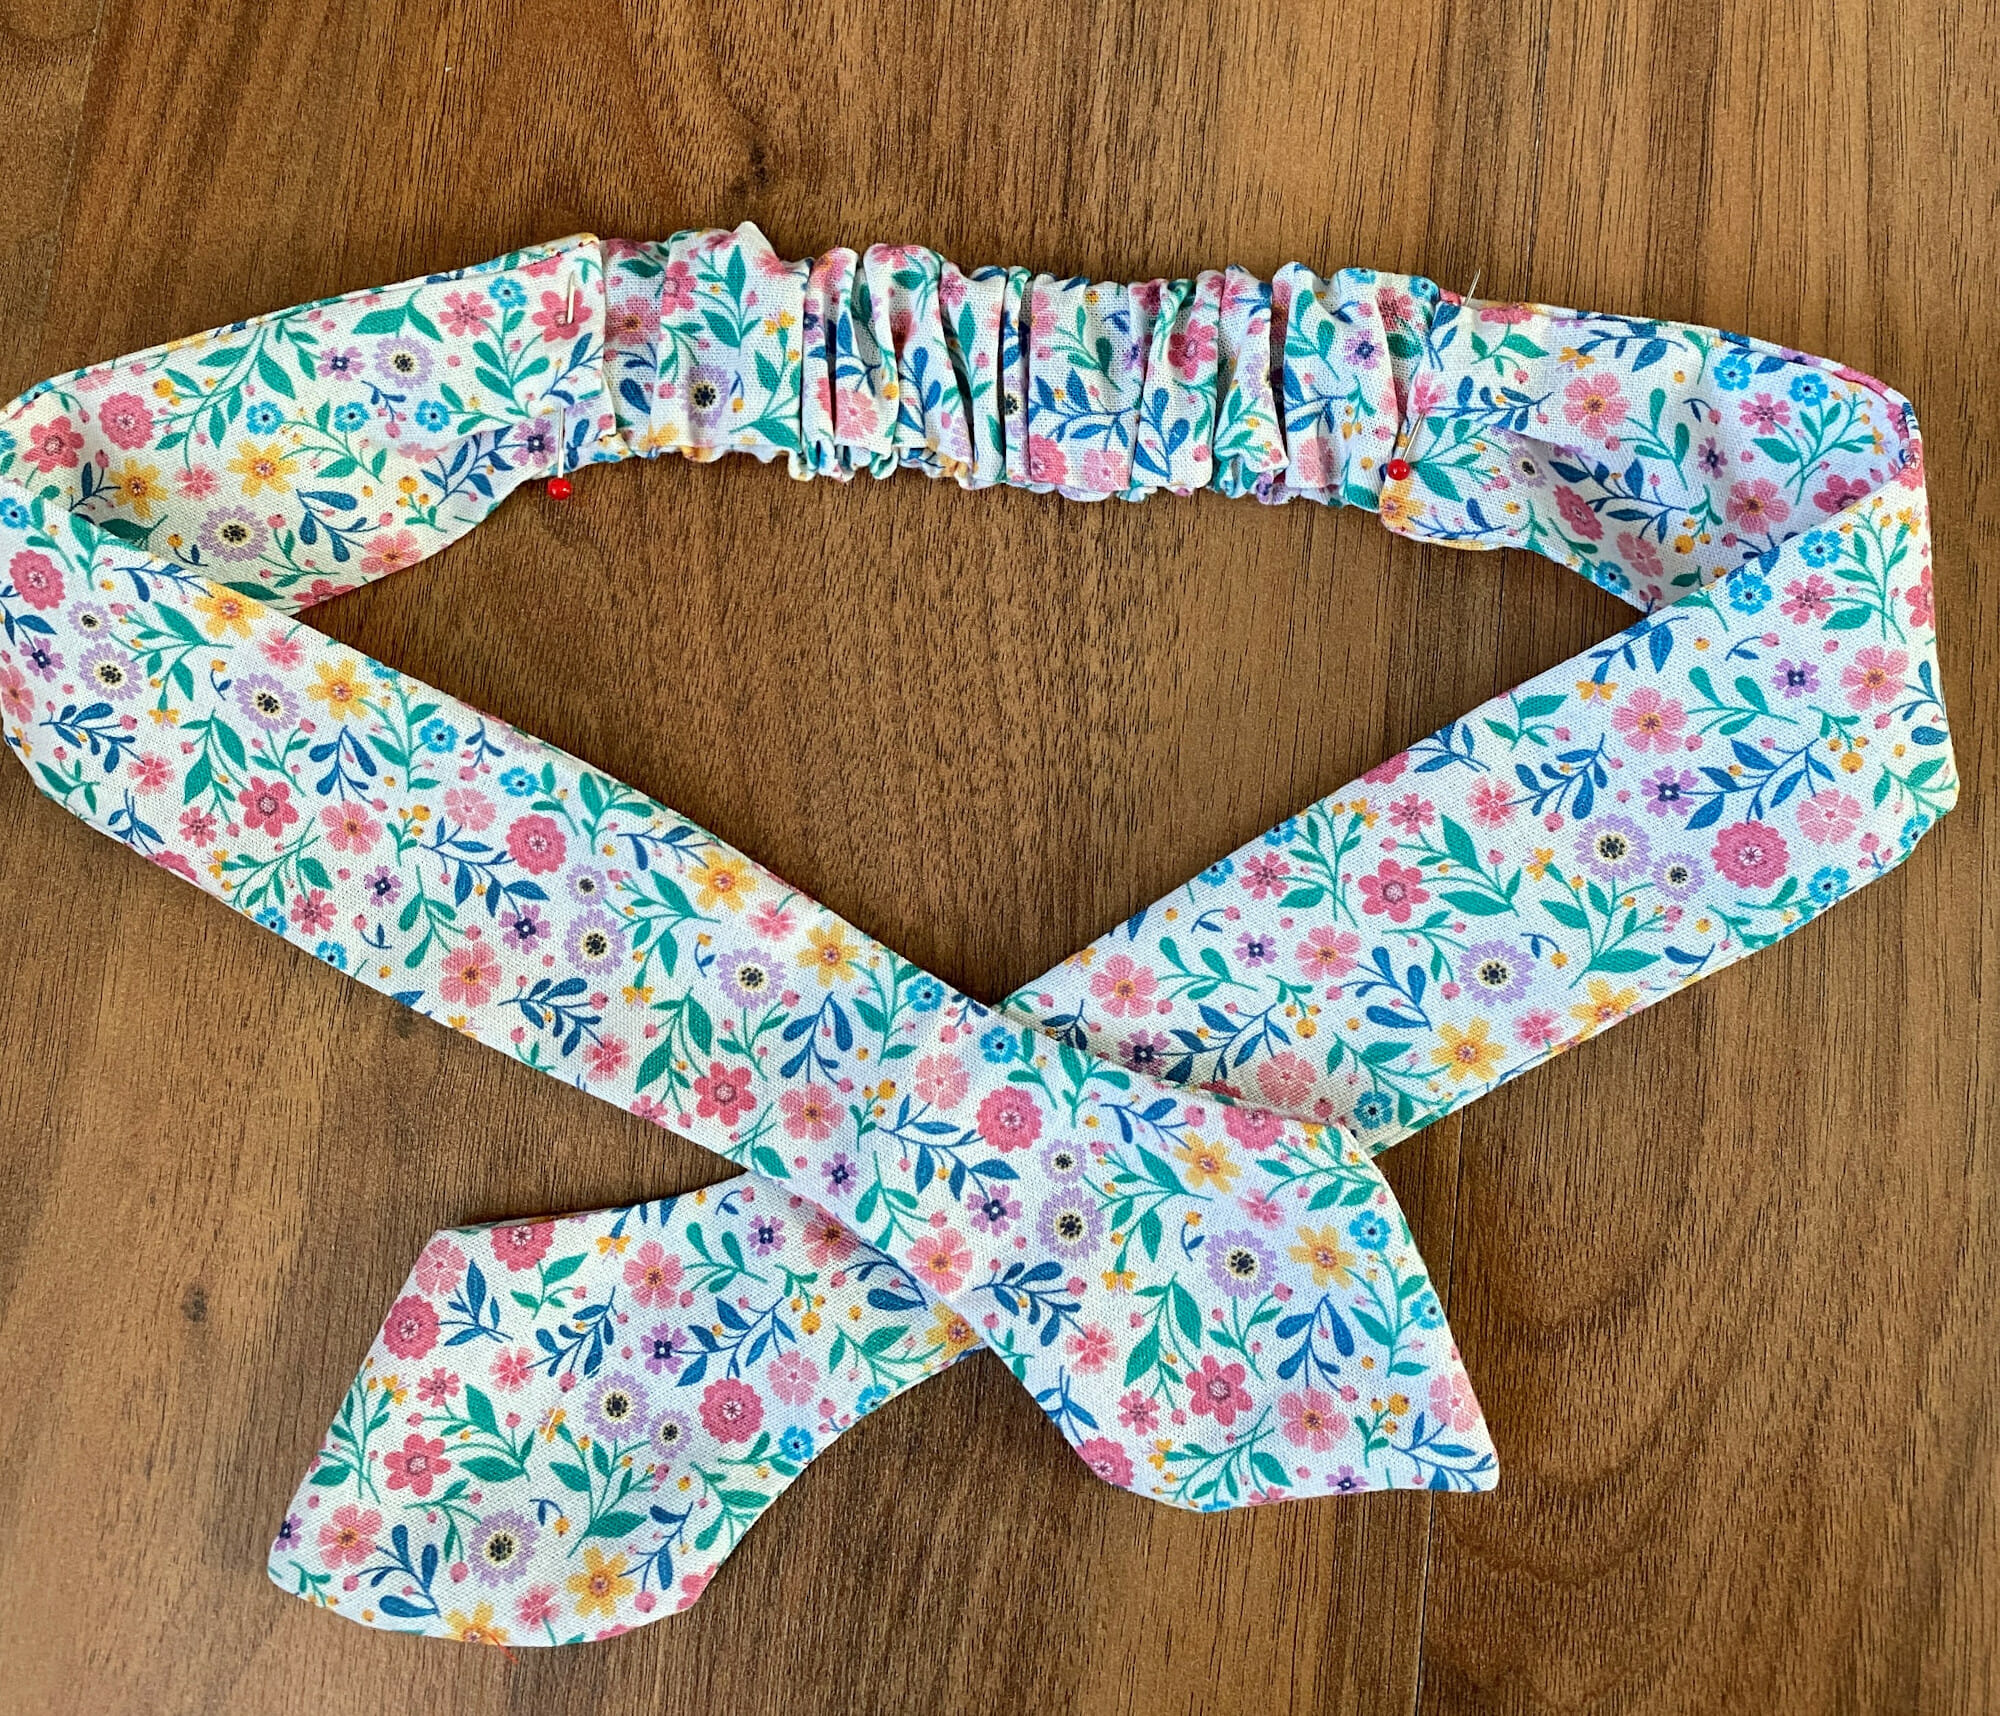
After that, tuck one end of the elasticated tube into the opening of one of the larger headband pieces.
Because the opening of the latter is a bit wider, you’ll have to make a small pleat in its middle so the two edges match up (see the photo below).
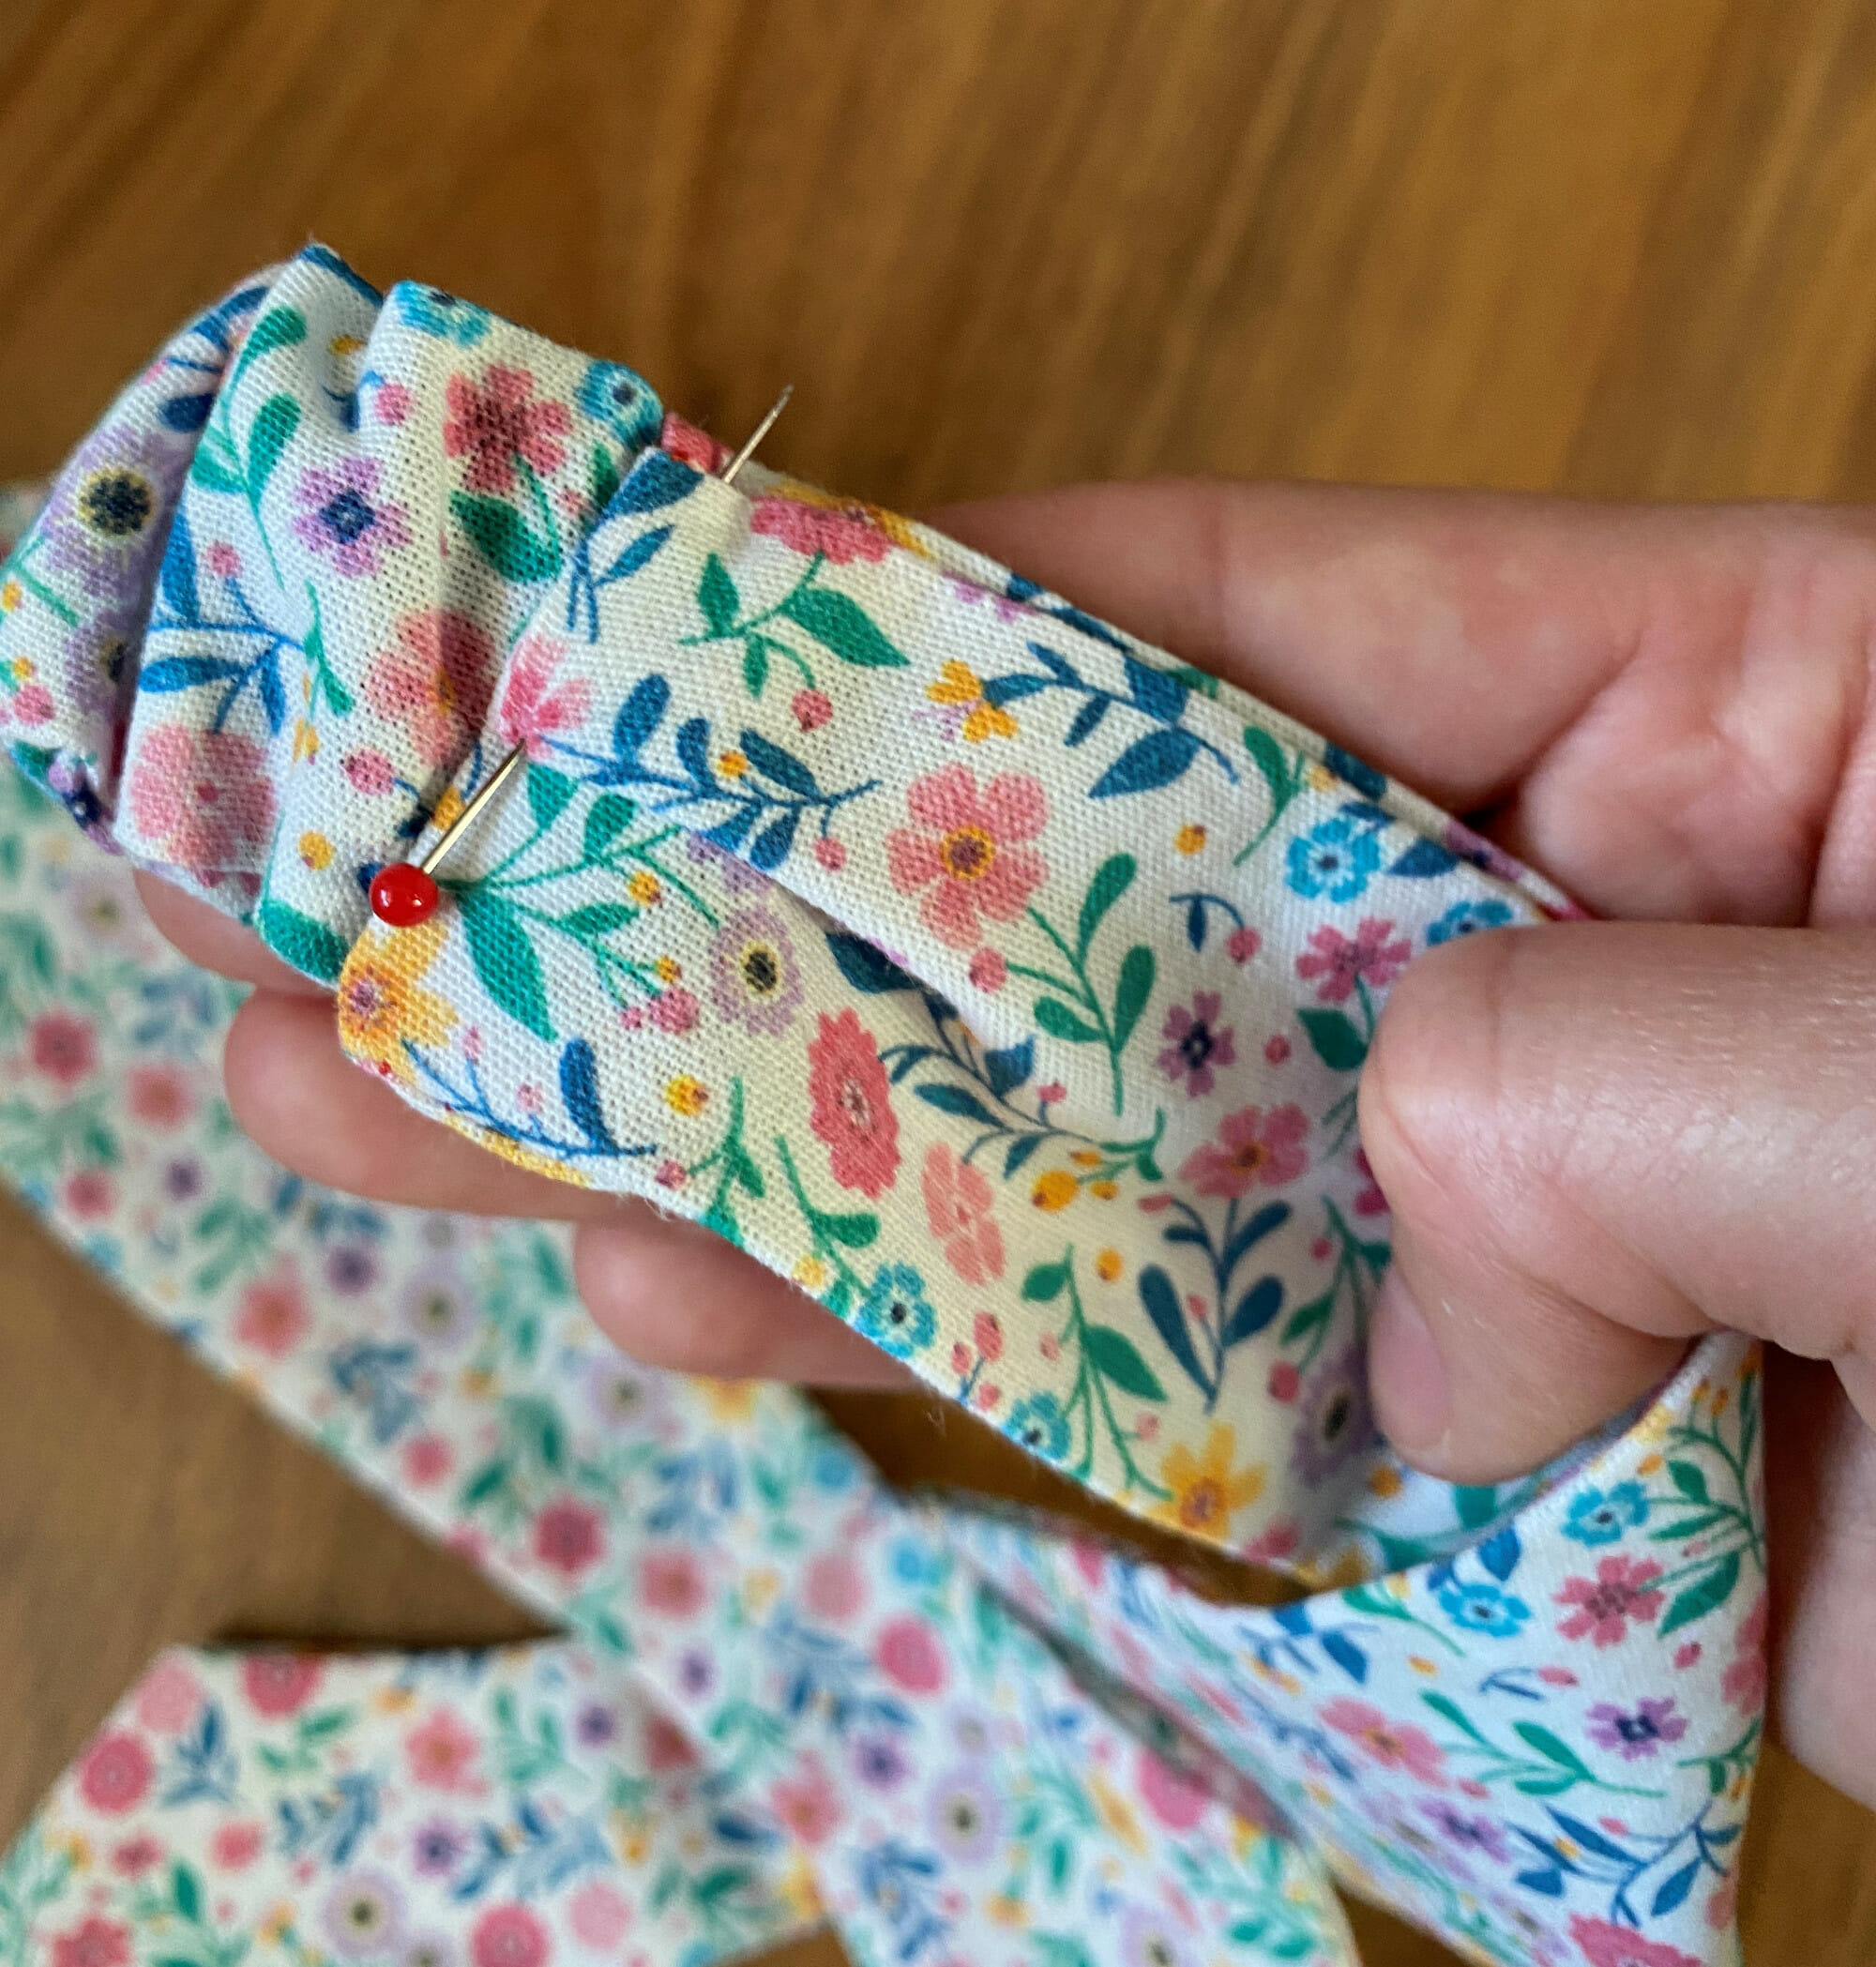
Pin and sew across the overlapped ends to secure the headband – remember to backstitch at the beginning and end. Now repeat for the other side.

Good to know: use a longer stitch length (think 3.5) in case you’ll need to adjust the headband’s size – it will be much easier to unpick the seam.
Finally, tie the headband into a knot, and that’s all! This is such a cute fashion hair accessory that you can whip up in no time. I hope you enjoyed this fun little project!
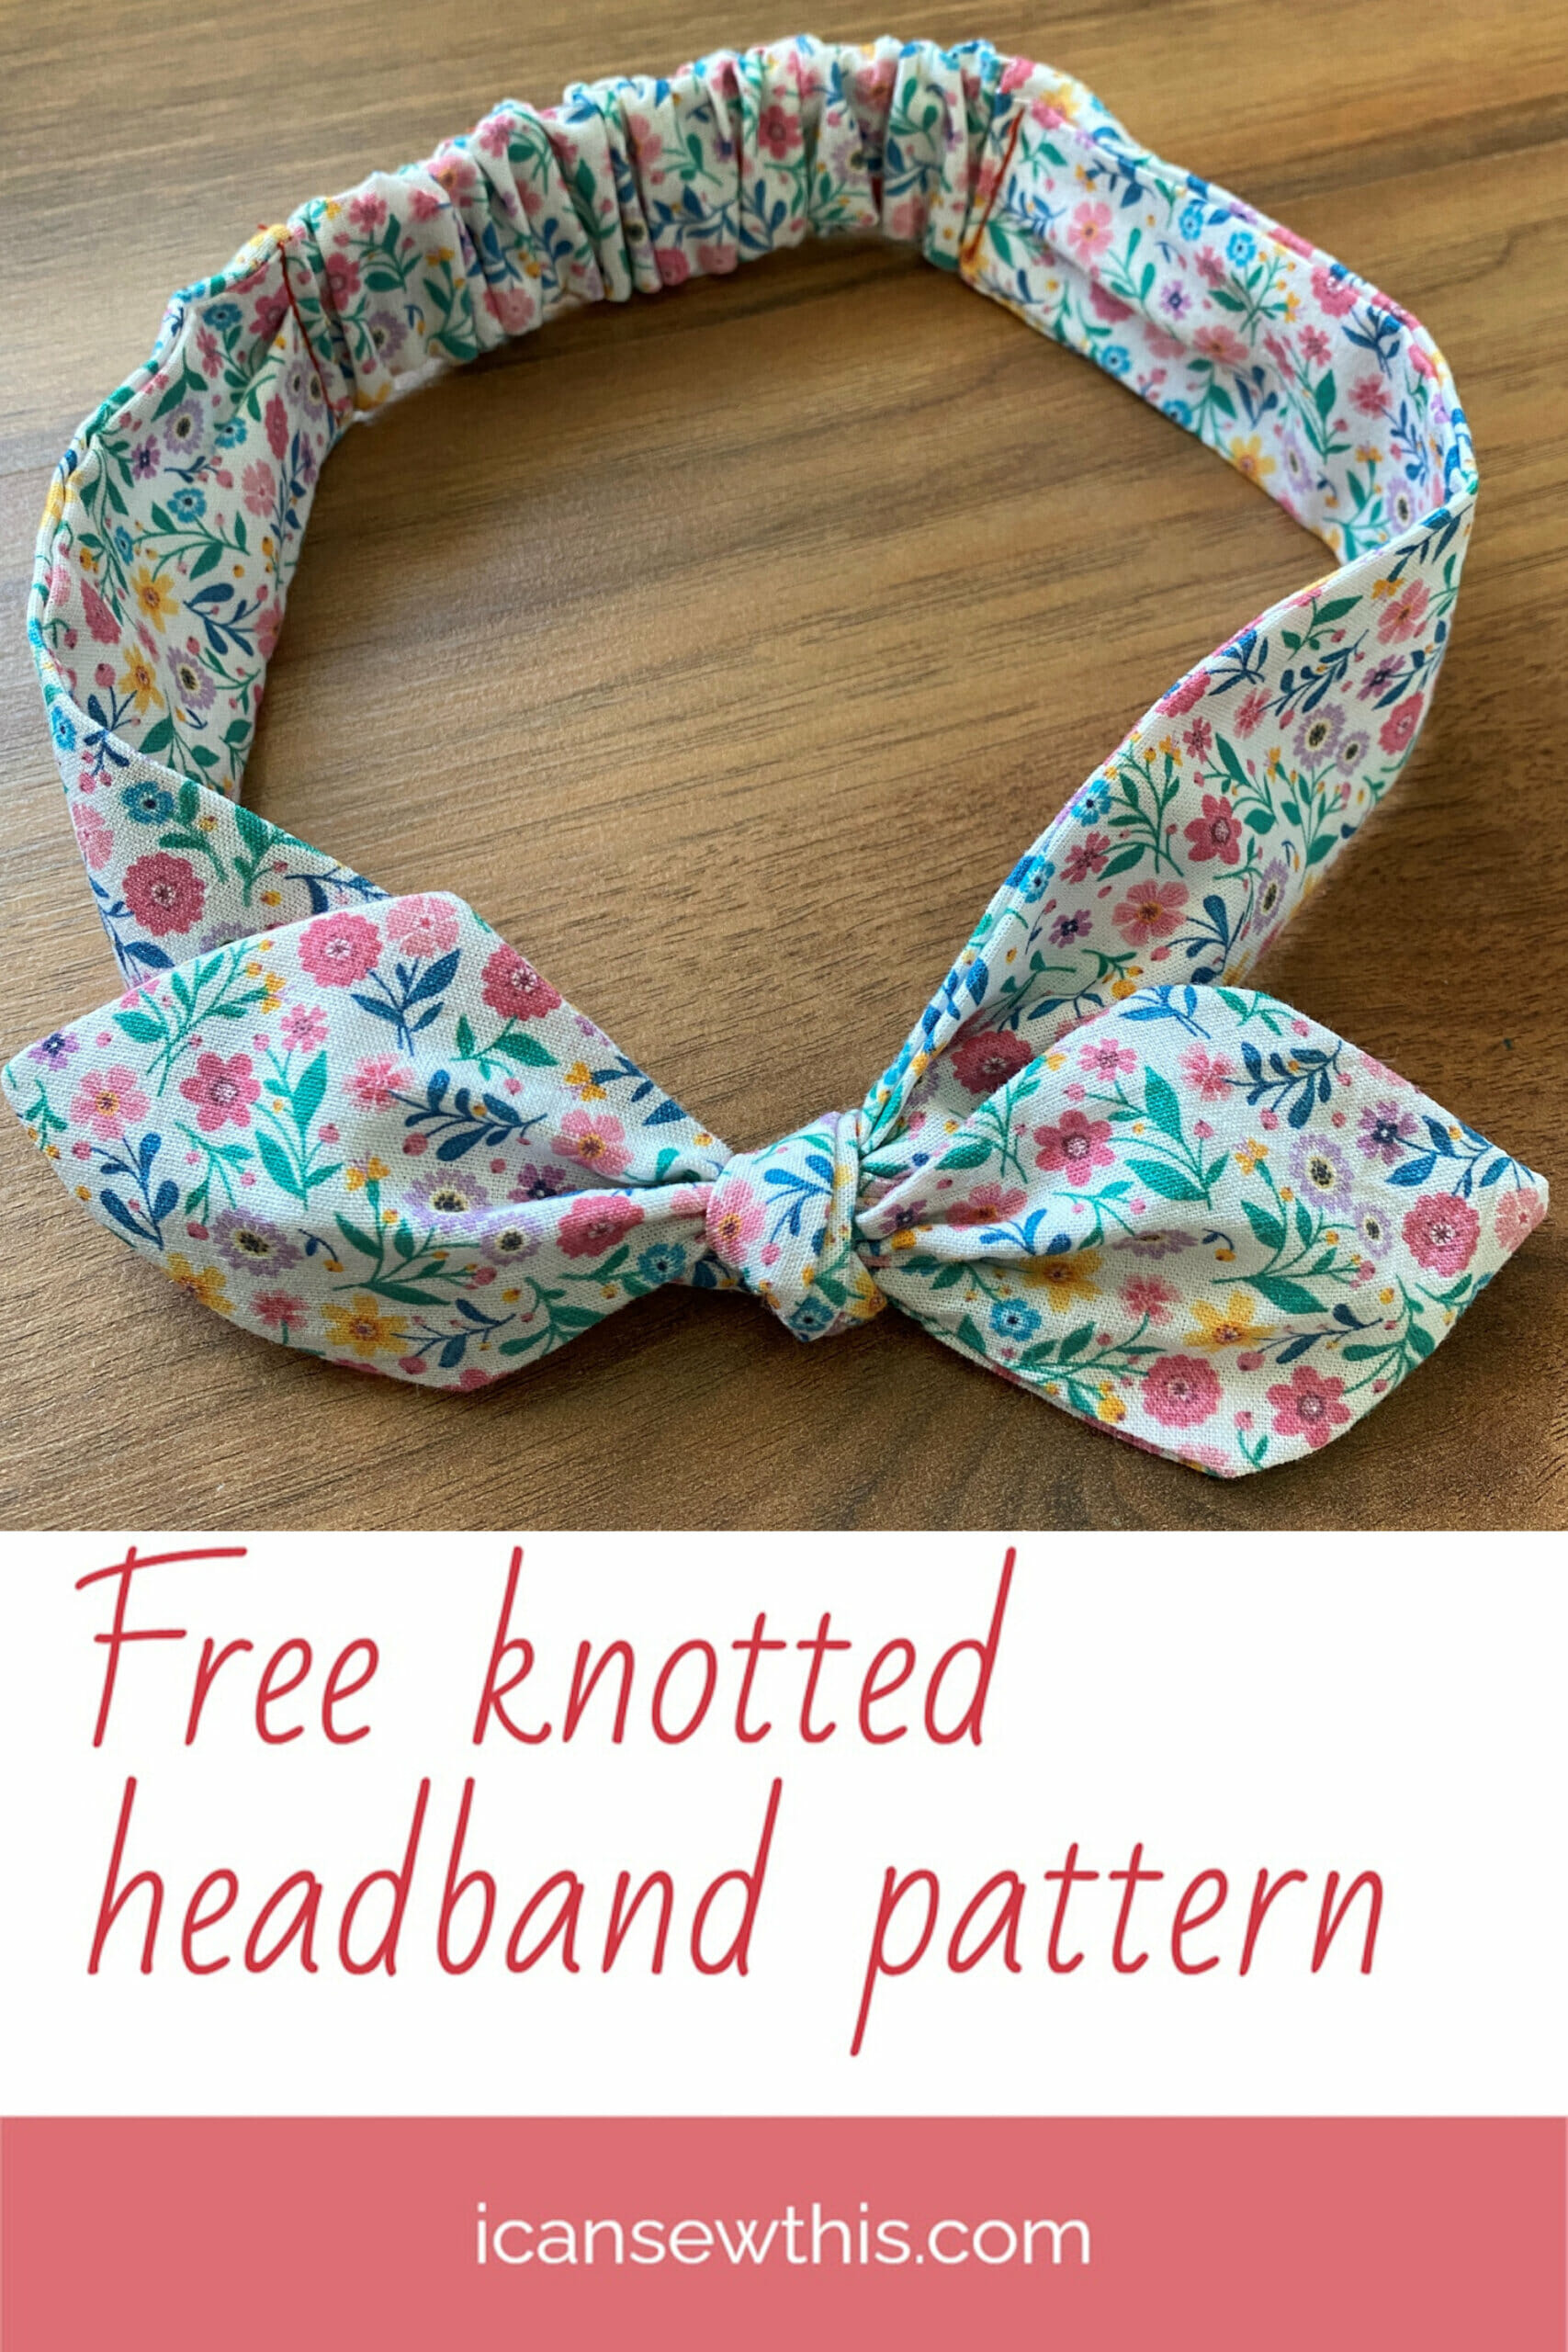
Free knotted headband pattern & tutorial

If you make headbands using this pattern, I’d love to hear from you! Share your finished version on my Facebook page or tag me on Instagram @icansewthis.


Would you suggest making this narrower for a newborn? One inch seems like it might be too wide. (I can make the adjustment, but don’t have a way to see how it would fit beforehand.)
Hey Carrie,
I think it’s a great idea to make it a bit smaller for a newborn. I adjusted this same pattern for a 4 month old baby (link here https://icansewthis.com/diy-baby-christening-dress/ to see a pic) but I never got around to posting the tutorial, unfortunately.
This knotted headband pattern is fabulous! Just what I needed for a stylish and practical accessory. Can’t wait to try it out.
I followed the instructions to get the free pattern for this headband. I received an email saying that I have signed up for your newsletters, but have not yet received the pattern. I have tried this 3 times. What else do I need to do?
I do not see anything to were I can download the pattern for the knotted headband
Hi Connie,
Right under the “Sewing supplies” section, you’ll find a pink box where you can enter your email to subscribe. After confirming your subscription, the pattern will be sent immediately to your inbox. Thank you!
Hi Violet,
I have tried downloading the pattern as well and I’ve never seen the pattern it just keeps asking me to add my email etc.
Please Advise!
Michele
love this pattern. reading the question and answer part I FINALLY understand the joining of the 2 patterns on the 1st page to get 13 ins. I hope thats right. I made it and I couldn’t tie it around my cat!!!!! it was so small. thanks again!!!!
Hi Cecilia,
Your comment gave me a good laugh! I can totally see how it might have been frustrating at the time though. So, to clear things up, the headband will have two parts that measure 13 inches each, plus an elasticated section in the middle that’s around 5 inches long. That makes a total of 31 inches, which should give you enough room to tie a cute bow. Anyway, I’ll update the pattern soon to make it more reliable and avoid any misunderstanding. Thank you for reaching out!
Do you really cut them on the fold? Then wouldn’t you have 4 long double ended pieces?
Hi Christina,
I’m not a native speaker so I sometimes struggle to get my message across. I will try to rewrite that phrase from my tutorial, to make things clear. In this picture https://static.icansewthis.com/2021/03/knotted-headband-DIY-2.jpg there are 6 pattern pieces in total, and 3 mirrored pairs. That’s all you need to make this headband.
Love this headband, but I am unable to get the pattern to load. I have tried two different emails and tried two different web browsers. Do you have another way to get the pattern?
Hi,
Thank you for reaching out and I’m sorry it didn’t work as expected. I think the email might have gotten into the spam folder, so it’s worth checking there. You should receive the free pattern immediately after confirming your subscription to the newsletter. I hope this helps!
Hi,
I have checked my spam folder and tried signing up with different emails. When I am trying to sign up there is a little grey dot that seems like it is loading, but no matter how long I wait it doesn’t load/times me out. Is there another way to get the pattern?
Hi,
I’m sorry about that, I think it was a technical issue and it should be fine now. Can you please try again?
merci pour le patron et votre tuto tres clair,
je vais en realiser pour mes petites filles,
je ne suis pas doue en informatique, pour vous envoyer le resultats……
encore merci et bonne journee
Nathalie,
Ton commentaire est ravissant, merci beaucoup! Je te souhaite le meilleur à toi et ta famille!
Luv your fabric choice!😍Where did you find such a cute floral print?
Thank you, Margie! I bought it from a local fabric store here in Romania. I just checked the selvage – it says Mon Cotonet, made in Spain, 100% cotton. I’m almost sure it’s discontinued by now, I bought it quite a while ago.
How do I get to the instructions sheet so that I can print it?
How do you tie the bow so it looks like that? I am so bad at tying anything. Thank you!
Hi Susan,
You have to tweak a bit the bow so it looks pretty. Just be patient and intentional about it, I’m sure you’ll make it work!
Hi there, i would really like to make this headband as i have fallen in love with it.
I just can’t seem to find the pattern, could someone help?
Hi Annie,
The link to the free pattern is in the Sewing supplies section – there’s a hyperlink on the “Knotted headband pattern – free PDF download”.
I’m glad you like this pattern, thank you so much!
Lovely pattern – would you mind if I used the bow pattern to make headbands to raise money for charity?
Hi Gemma,
Sure thing! I think it’s a most wonderful idea!
Happy sewing and best of wishes to you!
Violet
When making the size 4 headband what are the exact measurements for the longer pattern piece?
I cut out the pattern piece exactly as it printed and the finished product is so small I can hardly tie the bow. The smaller pattern piece is 10” long but how long should the longer piece be?
Hi Robin,
The first page of the document contains 2 pattern pieces – you have to join them on the dotted line to obtain one pattern piece that is 13 inches long.
Ok thank you. I thought that smaller piece was the elastic size. But to be clear- the longest piece is 13 ” long and the other piece is 10″ long? And 5″ for elastic?
Yes, that’s correct.
The longest piece – 13″, the elasticated piece in the back – 10″, and the elastic – 5″.
This headband is a perfect fit for my 4 year-old daughter. Besides, you can adjust the bow to make the headband a bit smaller or larger, if necessary.
Do you use braided or knitted elastic?
Can you add a 1” square to the pattern? For printing