Let’s be real for a second. If you sew, you probably have a thread problem. It starts innocent enough with a few basic colors. Then you need a specific shade of maroon for a project. Then a variety pack goes on sale. Before you know it, you’re looking at a chaotic drawer full of unraveled spools.
Tangled thread isn’t just annoying to look at; it actually ruins your supplies and wastes your sewing time. Dust weakens fibers, sunlight fades vibrant colors, and unraveled bobbins turn into a massive nest that takes twenty minutes to detangle.
If you are ready to reclaim your sewing space and protect your stash, you need a system that actually works for your workflow. Here is a breakdown of the absolute best thread storage solutions, ranging from budget-friendly DIY ideas to beautiful display pieces, plus the pro tips you need to keep your thread in perfect condition.
Why proper thread storage actually matters
Before dumping your spools into a new container, it helps to understand what you are protecting your thread from. Thread is surprisingly delicate.
- Dust accumulation: Dust acts like tiny sandpaper grains. When dusty thread passes through your sewing machine tension disks and needle eye, it creates friction, leading to skipped stitches and frequent thread breakage.
- Sun damage: UV rays fade the gorgeous colors you spent money on and weaken the integrity of the fibers over time.
- The tangle factor: When loose ends unravel, they twist around neighboring spools. Pulling one spool out can cause a chain reaction of knots.
Choosing the right storage solution keeps your sewing room organized and extends the shelf life of your supplies.
The best thread storage solutions for every sewing space
Every sewist works differently. Some people want to see every color they own at a glance, while others prefer a minimalist, clutter-free workspace. Here are the top ways to organize your collection.
1. Clear plastic storage boxes
If you want low-maintenance, portable protection, clear plastic storage cases are the gold standard. These are specifically molded boxes with built-in plastic pegs to hold individual spools.
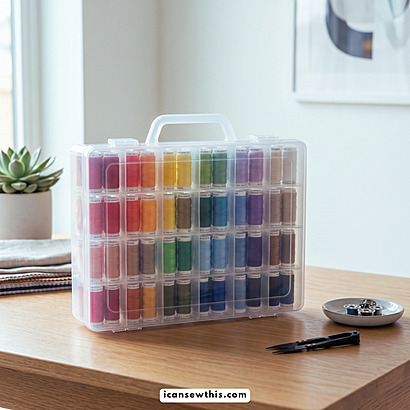
- Pros: They are completely dust-proof and keep thread safe from spills. Because they are clear, you can see exactly what colors you have before you even open the lid. They are also incredibly easy to stack on shelves or pack up if you travel to sewing classes.
- Cons: They take up table or shelf space and have fixed peg sizes, meaning chunky serger cones or oversized topstitching spools won’t fit.
2. Wall-mounted wooden racks
The classic wooden thread rack is a staple in many sewing rooms for a reason. These grid-style boards feature rows of angled wooden pegs that hold your spools out in the open.
- Pros: This option turns your thread stash into functional wall art. It keeps your desk completely clear and lets you grab the exact color you need in a single second.
- Cons: Because the thread is completely exposed, dust will settle on it over time. If your sewing room gets a lot of direct sunlight, your thread will be at risk of fading.
3. Customizable pegboard systems
If you love a flexible workspace, a metal or wooden pegboard is an amazing DIY option. You can buy specific thread peg attachments or use long standard hooks to hold multiple spools of the same color family together.
- Pros: Highly customizable. As your stash grows or changes, you can move the pegs around. You can also mix and match thread storage with scissor hooks, ruler racks, and rotary cutter cups all on the same wall.
- Cons: Like the wooden racks, dust and sunlight remain a constant battle.
4. Drawer inserts
For the minimalists who want a clean, hidden storage system, drawers are the perfect choice. You can line shallow drawers with custom inserts for thread spools, or use tiered plastic spice liners.
- Pros: Total protection from dust and sunlight. Your room looks incredibly tidy because everything is tucked away out of sight.
- Cons: You need dedicated furniture with smooth drawer glides. It can also be harder to see your full inventory at a glance compared to a wall rack.
5. Drawer thread trays
If you don’t want to buy specialized furniture, you can adapt deep plastic bins or storage baskets using small grid dividers.
- Pros: Cheap, accessible, and fits inside existing closets or cabinets.
- Cons: Spools can roll around if the dividers aren’t snug, causing loose tails to tangle anyway.
Heavy-duty solutions for serger and overlocker cones
If you own a serger, you know standard thread holders don’t cut it. Serger cones are bulky, heavy, and take up a ton of physical space.
- Deep bins with dividers: Use inserts to keep the cones upright – it prevents them from tipping over like bowling pins.
- Extra-wide wall racks: Some brands manufacture wooden wall racks specifically designed with wider spacing between the pegs to accommodate the flared bases of overlocker cones.
- Hanging shoe organizers: An over-the-door clear pocket shoe organizer is a fantastic hack for serger cones. You can fit two to three cones in each pocket, keeping them off your desk and using empty vertical door space.
Smart DIY hacks for budget-friendly organization
You don’t need to spend a fortune on specialized craft furniture to get organized. Here are some clever, inexpensive DIY thread storage ideas using items you might already have around the house.
The golf tee frame
Take an old, sturdy picture frame, remove the glass, and cut a piece of plywood to fit inside. Drill small holes spaced evenly across the wood, pop a drop of wood glue on the end of wooden golf tees, and push them into the holes. Paint the whole thing to match your room, and you have a gorgeous, custom thread rack for pennies.
Toe separators for bobbins
Those cheap foam toe separators used for pedicures are the perfect size for holding bobbins. Pop your wound bobbins into the slots to keep them from rolling around your drawers and unraveling.
Magnetic strips for metal bobbins
If you use a vintage sewing machine or a model that takes metal bobbins, mount a magnetic tool strip (the kind used for kitchen knives) to your wall or the edge of your desk. Your bobbins will snap right onto it, keeping them perfectly organized and easily accessible.
How to manage the bobbin nightmare
A thread storage system is only half the battle. You also have to deal with the matching bobbins. There is nothing worse than searching through a pile of blue bobbins trying to guess which one matches the exact spool you are using.
Bobbin buddies and clips
These are tiny, flexible plastic or silicone clamps that physically attach the bobbin to the top of its matching thread spool.
- Why they rock: Your bobbin and spool never get separated. When you grab a color, the bobbin is already right there with it.
- The downside: They make the spools taller, meaning they might no longer fit inside standard shallow plastic storage boxes.
Dedicated bobbin towers
These are stacked plastic wheels with slots for bobbins. They keep your bobbins organized by color family but separate from the main spools. It’s a great system if you like to pre-wind a bunch of neutral bobbins (like black, white, and grey) ahead of time.
Essential tips to maintain your thread collection
Once you choose a storage system, use these maintenance tips to keep your supplies in top-notch shape.
| Tip | What it does | How to do it |
| Secure the tails | Prevents giant tangles | Use soft silicone spool hugs, small pieces of medical tape, or tuck the thread into the built-in slit on the spool rim. |
| Sort by weight and type | Saves your machine | Group your heavy-duty topstitching thread, all-purpose polyester, and delicate machine embroidery cottons separately so you don’t grab the wrong one by accident. |
| Rotate your stash | Keeps thread fresh | Old thread dries out and snaps easily. Keep your newest spools toward the back and use up older stock first. |
| Test old thread | Prevents project frustration | Unwind a short length of thread and give it a sharp tug. If it snaps effortlessly with zero resistance, the fibers have degraded. Toss it out rather than risking it breaking mid-seam. |
Finding the right system for your workflow
The absolute best thread storage solution is the one you will actually maintain. If you hate opening boxes and putting things away in specific slots, a wall rack or an open pegboard will keep you organized. If you live in a dusty area or have curious pets who love playing with string, a sealed plastic box or a deep drawer insert is worth the extra step.
Take a look at your current stash, count your spools, and pick the method that fits your sewing space. Your future self will thank you next time you can find the exact color you need without detangling a single knot!
You might also like:
- Organizing sewing patterns: a beginner guide to stress-free storage
- Chic DIY jumpsuit sewing patterns for ultimate comfort
- Easy home sewing projects for beginners
Let’s keep in touch! You can find me on Facebook, Instagram, and Pinterest.
Related posts