Want to sew a comfy, stylish dress that looks great but takes hardly any time? This DIY frayed edges linen dress tutorial is the perfect weekend project—even if you’re just learning how to sew clothes for yourself. It’s seriously one of the easiest linen dresses you’ll ever make, and guess what? You can finish it in under an hour. Oh, and yes—it has pockets!
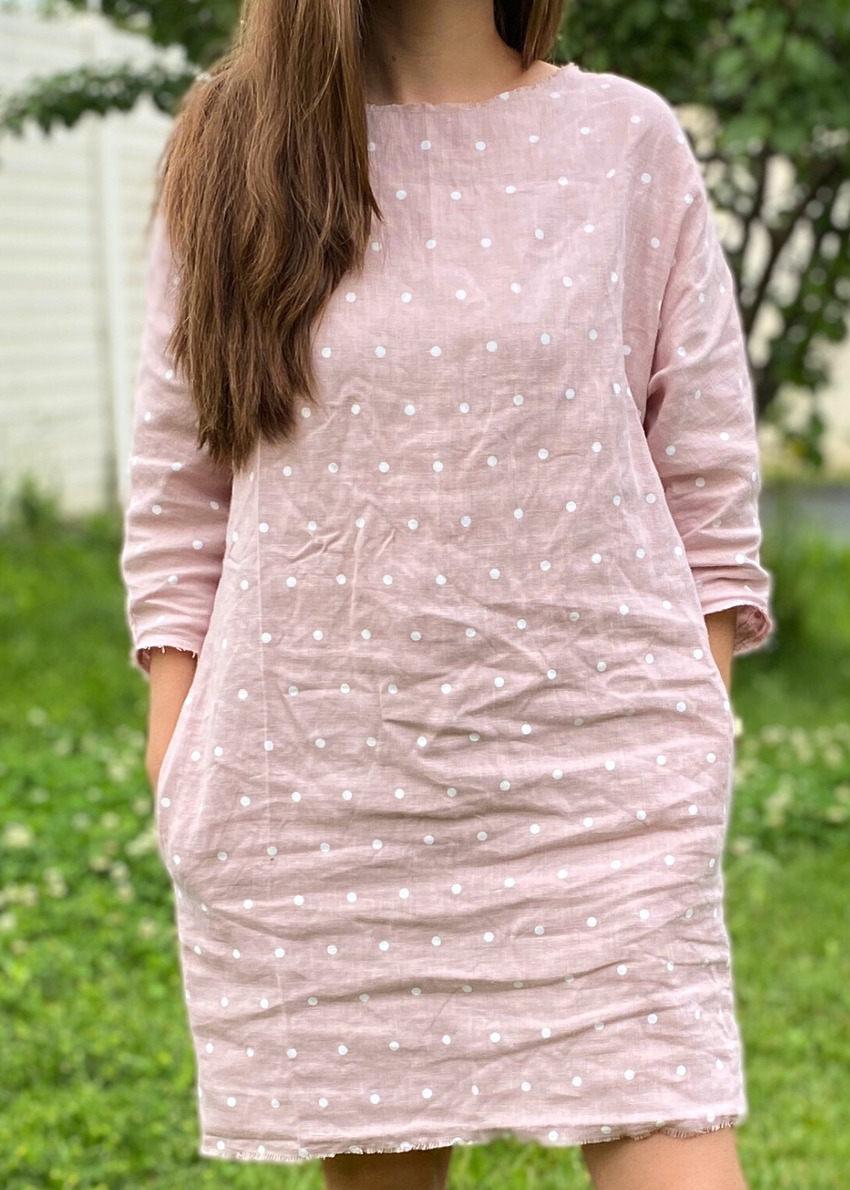
The lazy linen dress you’ll wear on repeat
I’m definitely a lazy sewist (no shame here!), but I’m ridiculously proud of this dress. It turned out so much better than I expected, and I absolutely love its clean, relaxed vibe. If you like the look of handmade minimalist linen clothing, this one’s for you.
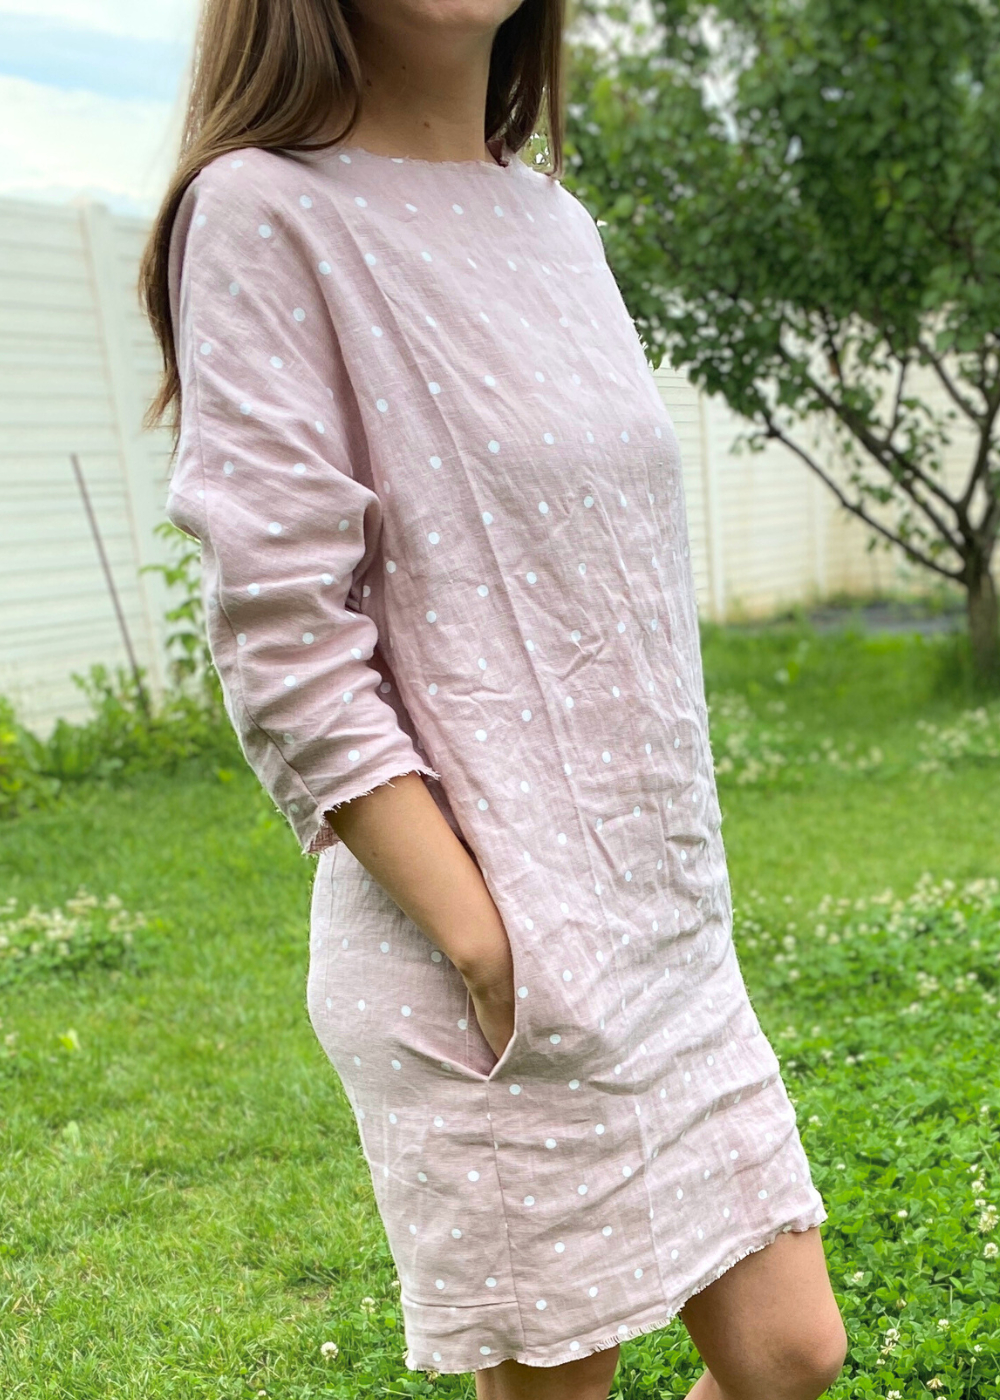
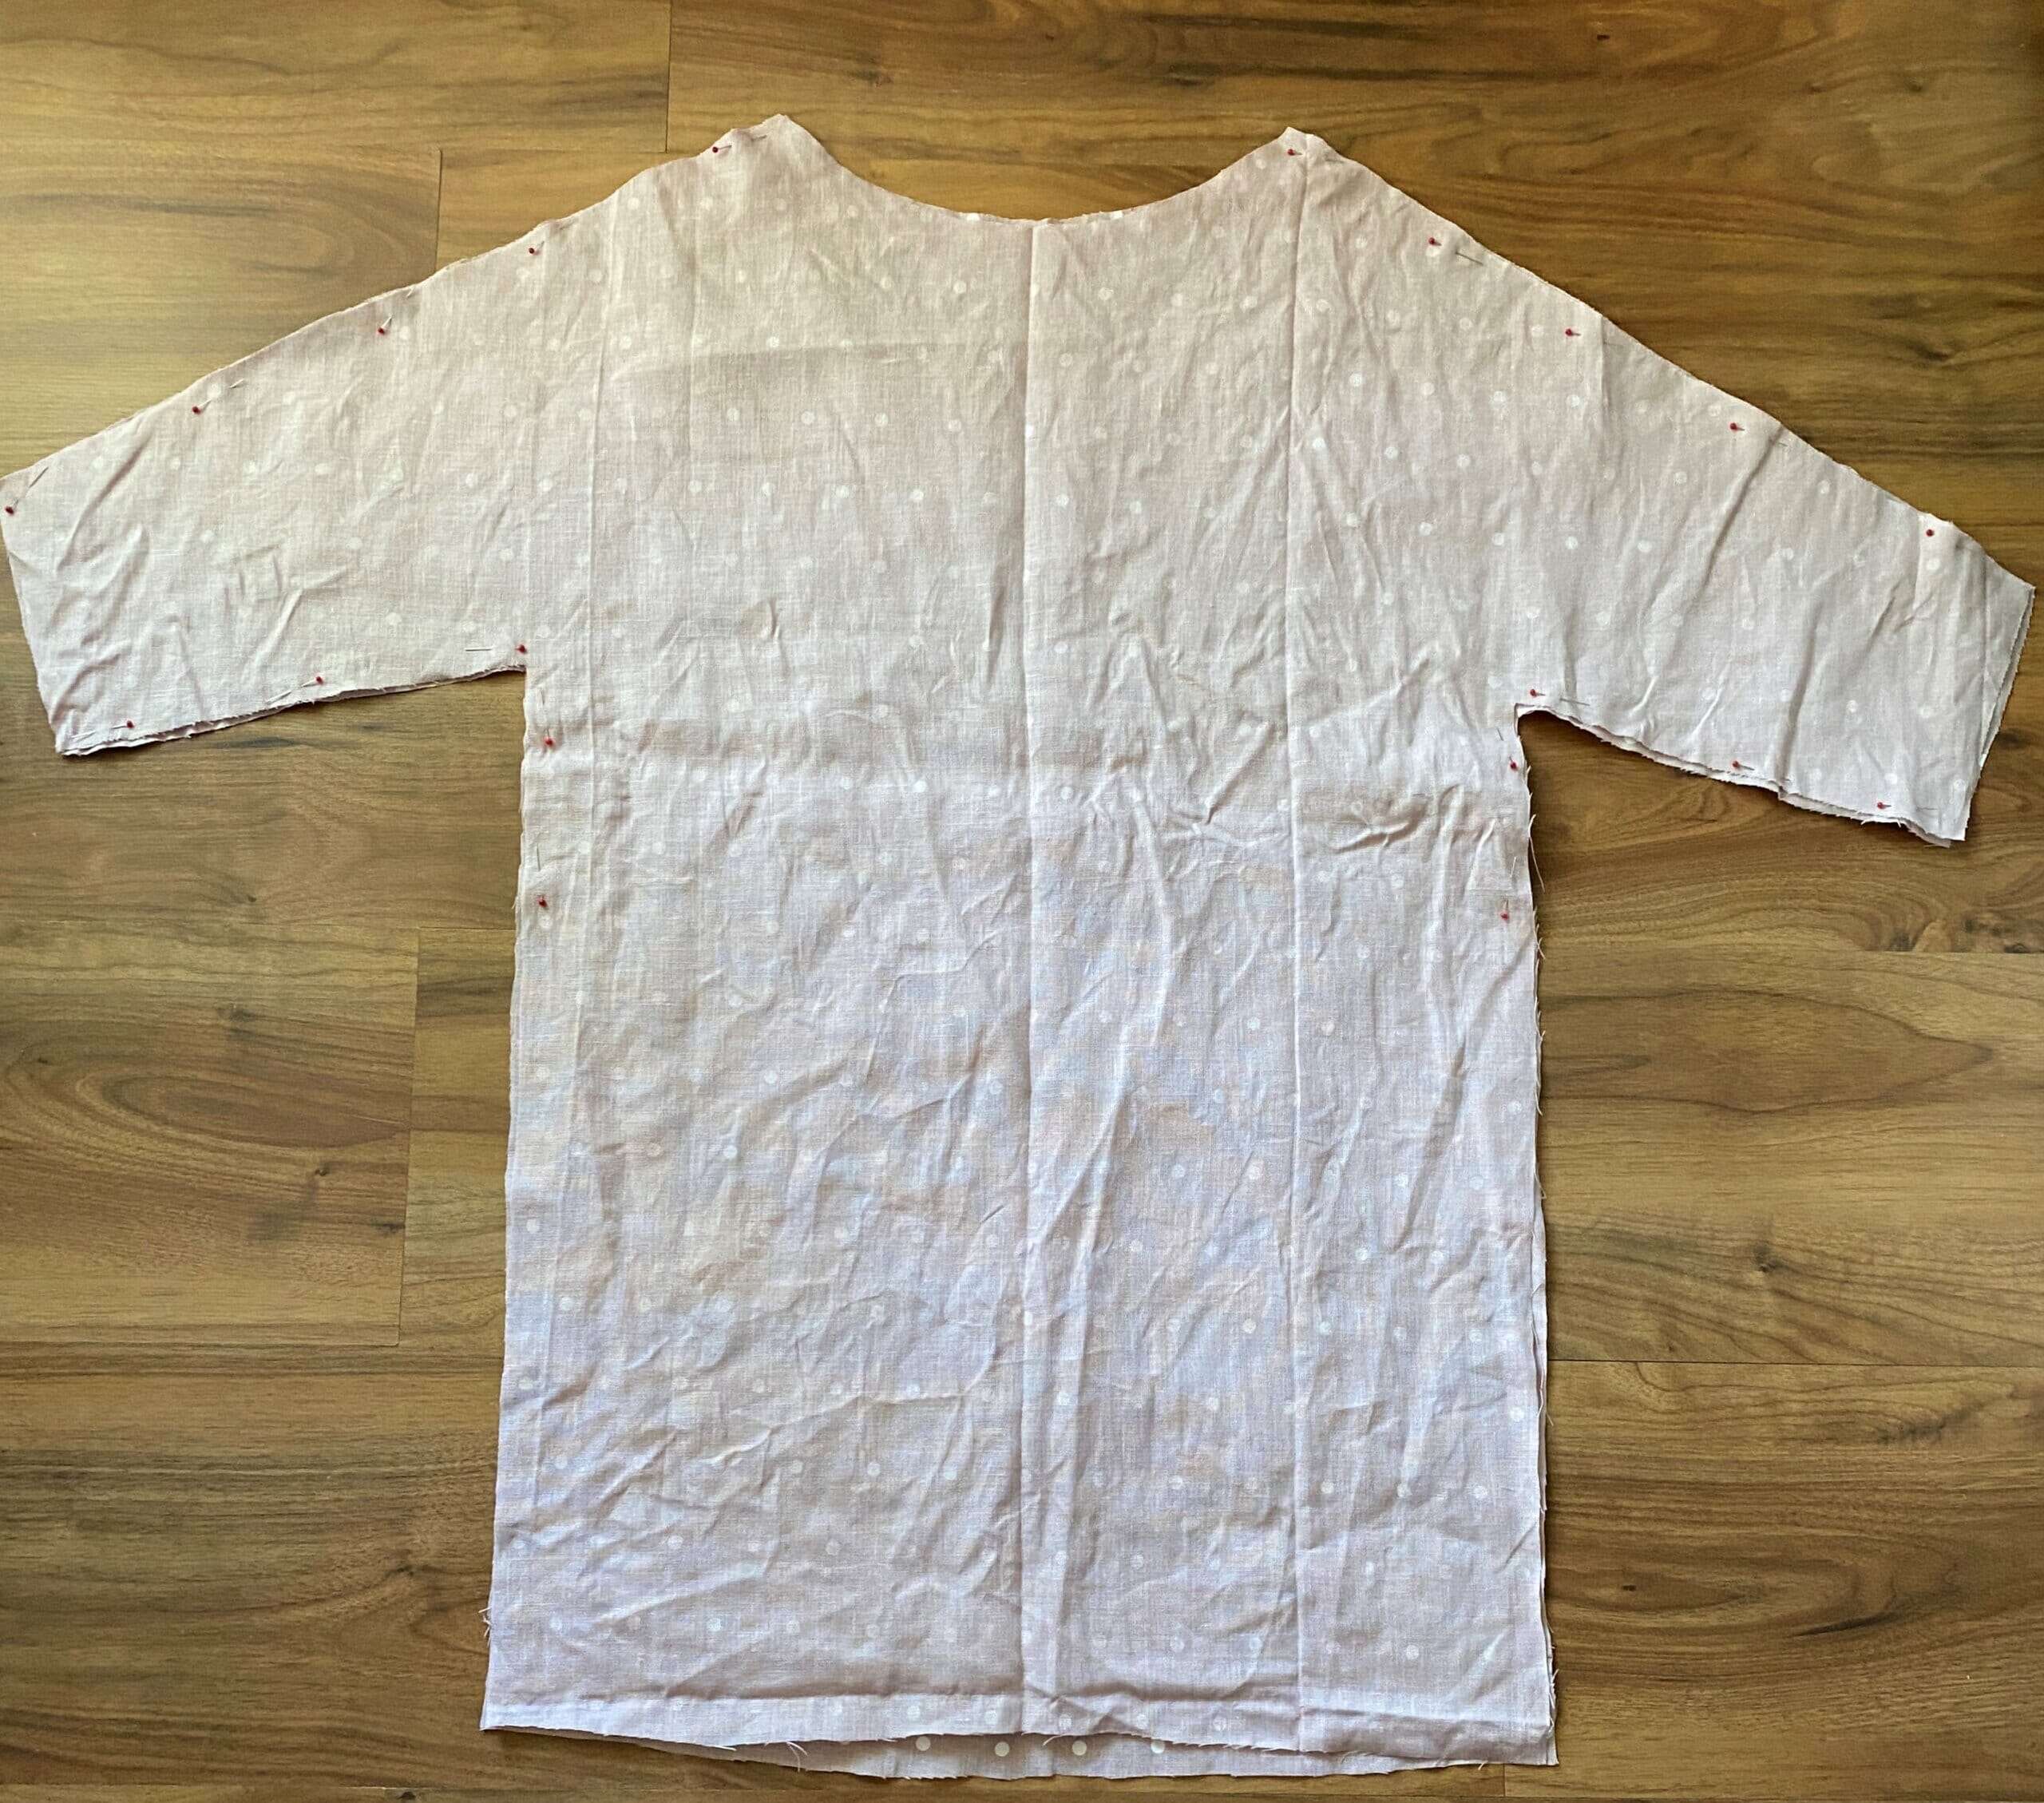
This easy pull-on linen dress has a relaxed fit that feels like a dream—super breathable, not clingy, but also not shapeless. The kind of dress you throw on in summer and don’t want to take off. It features a wide boat neckline, long sleeves, roomy side pockets (of course!), and an intentionally raw hem for that casual, effortless finish.
Beginner-friendly linen tunic dress sewing tutorial
Let me be honest: if you’re looking for a dress with darts, zippers, or buttons… this isn’t it. And that’s the best part! This dress is about keeping things simple and beginner-friendly—you won’t need a fancy pattern, just your measurements and a few basic sewing supplies.
Instead of spending time hemming, I went with raw, frayed edges to give the dress some texture and laid-back charm. Linen is perfect for this kind of look because it frays in such a pretty, natural way. Want to keep the fraying under control? Just run a straight stitch or a narrow zigzag around all the raw edges to stop them from unraveling too much.


If you’re into sewing with linen fabric for summer clothes, this is a great place to start.
How much fabric do you need for this frayed linen dress?
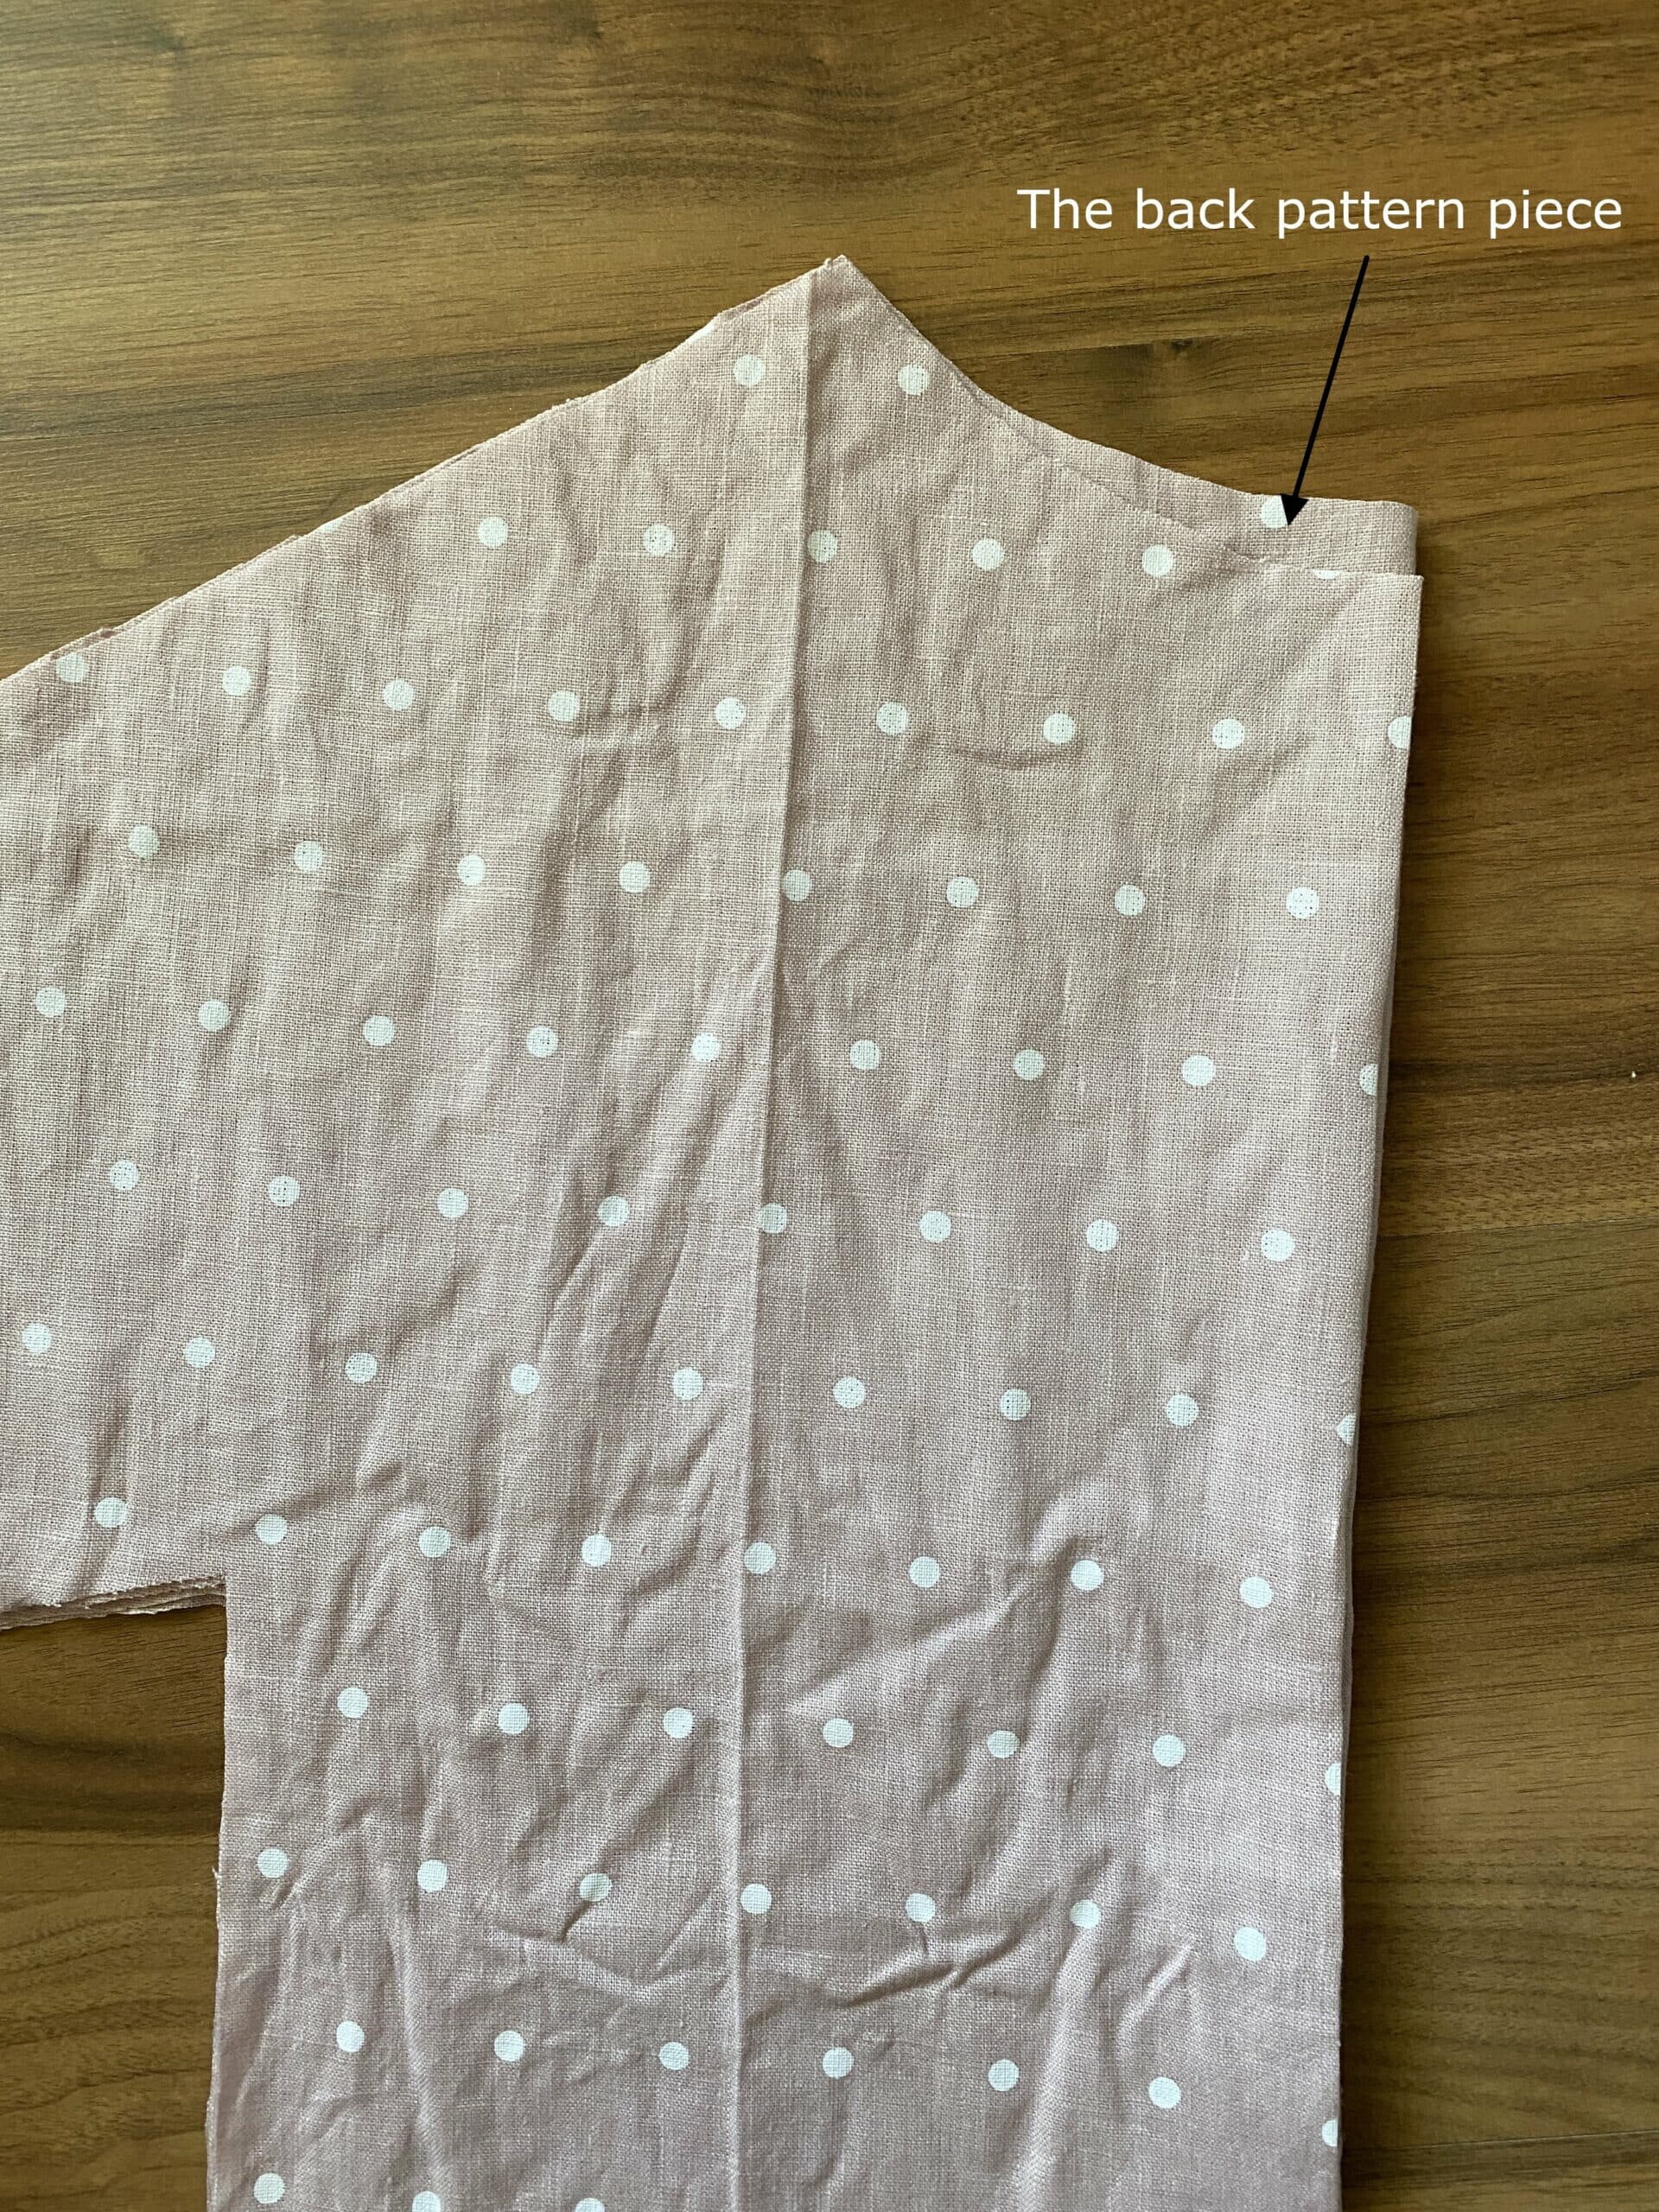
I used just 2 yards of linen to make a 33” long dress for myself—but I had to get a little creative with cutting out the back piece. If you don’t want to play fabric Tetris, I’d recommend using 2.5 to 3.5 yards of medium-weight linen, depending on your size and how long you want the dress to be.
Pro tip: make a quick muslin first
Before cutting into your linen, it’s a good idea to stitch up a quick muslin version using some cheap fabric. That way you can check the fit and tweak the shape if needed.
You can totally make this simple raw edge linen tunic dress in a single sitting. No lining, no fuss—just you, your sewing machine, and a soft piece of linen. I even filmed a quick video to show you how this dress looks in real life—check it out to see how it moves and fits.
How much fabric do you need to make this dress?
I got away with 2 yards of linen for my 33” long dress – but I had to scramble a bit for the back pattern piece, I did not have enough fabric. So I would recommend at least 2.5 yards to 3.5 yards, depending on your desired dress length.
Sewing supplies – Frayed edges linen dress tutorial
- free PDF pattern for the in-seam pockets – download below
- linen / lightweight denim
- sewing machine
- sewing machine needle
- matching thread
- sewing pins
- fabric scissors
Sew this super easy linen tunic dress – step by step!
Ready to make your own relaxed, breathable linen dress? No fancy pattern, no tricky techniques—just some soft linen fabric and a bit of your time. This easy boatneck tunic dress with frayed edges is perfect for beginners or lazy sewists (like me!).
Step 1 – Trace the front pattern directly onto the fabric
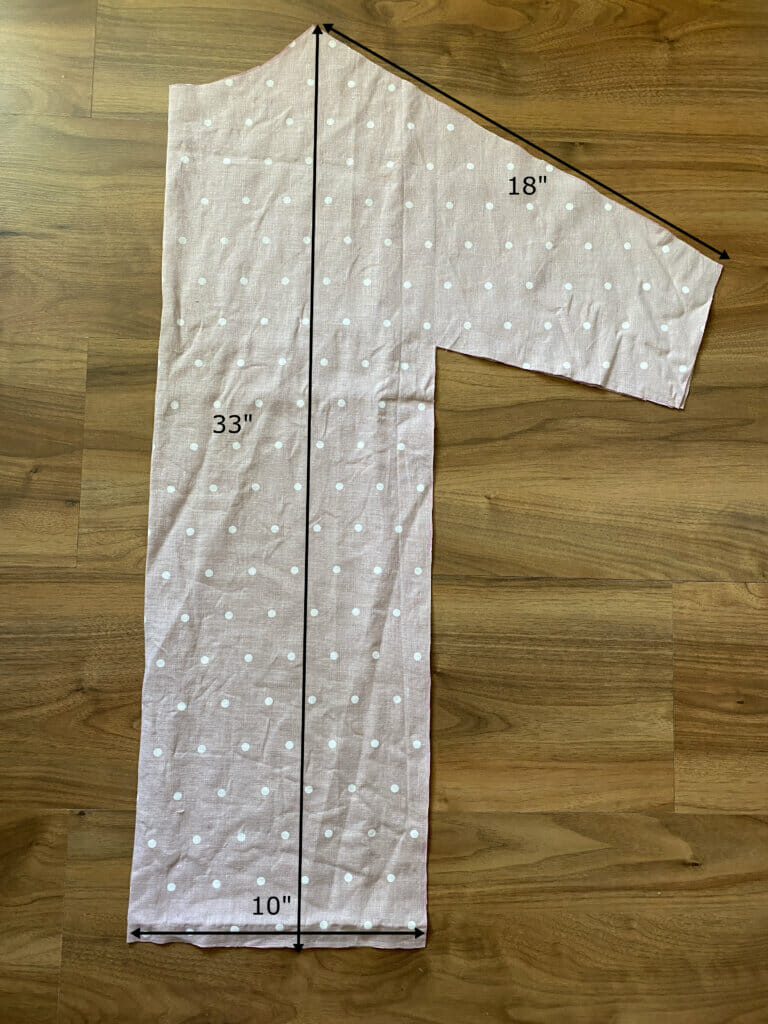
First things first—fold your fabric in half. You’re going to draw a big rectangle directly on the fabric. It’s easier than it sounds!
Here’s how to measure the rectangle:
- The short edge should be 1/4 of your hip measurement plus 1 inch for ease (or more if you want it looser).
- The long edge is the total dress length, from the top of your shoulder down to wherever you want the hem to fall.
If you’re more top-heavy or have a curvy bust, use your bust measurement instead of hips. The idea is to make sure the dress slips over your head and drapes nicely!
For example, my hips are 36″, so:
- (36 + 4) ÷ 4 = 10” for the short side
- I wanted my dress to be 33” long, so the long edge is 33”.
This gave me a rectangle that fits just right—no cling, no tight spots. It hits just above the knee and feels breezy without looking shapeless.

Why these measurements work
This dress has a straight cut—no shaping at the waist or hips. Both the front and back panels are the same width, so it’s super simple to sew.
I added 4 inches total (2″ on each side) to my hip measurement for comfort and ease of movement. If you want it even roomier, feel free to add 5″ or 6″ to your hip measurement per panel. That’s 10 to 12 inches total added ease.
Keep in mind: This is a tunic-style dress, so you’ll want to move easily—sit, stretch, maybe chase kids or climb stairs. Build in that ease!
Now let’s trace the neckline and sleeves
Take a woven top you already own that fits you nicely. Fold it in half and lay it on top of your folded fabric rectangle, aligning shoulder and center lines.
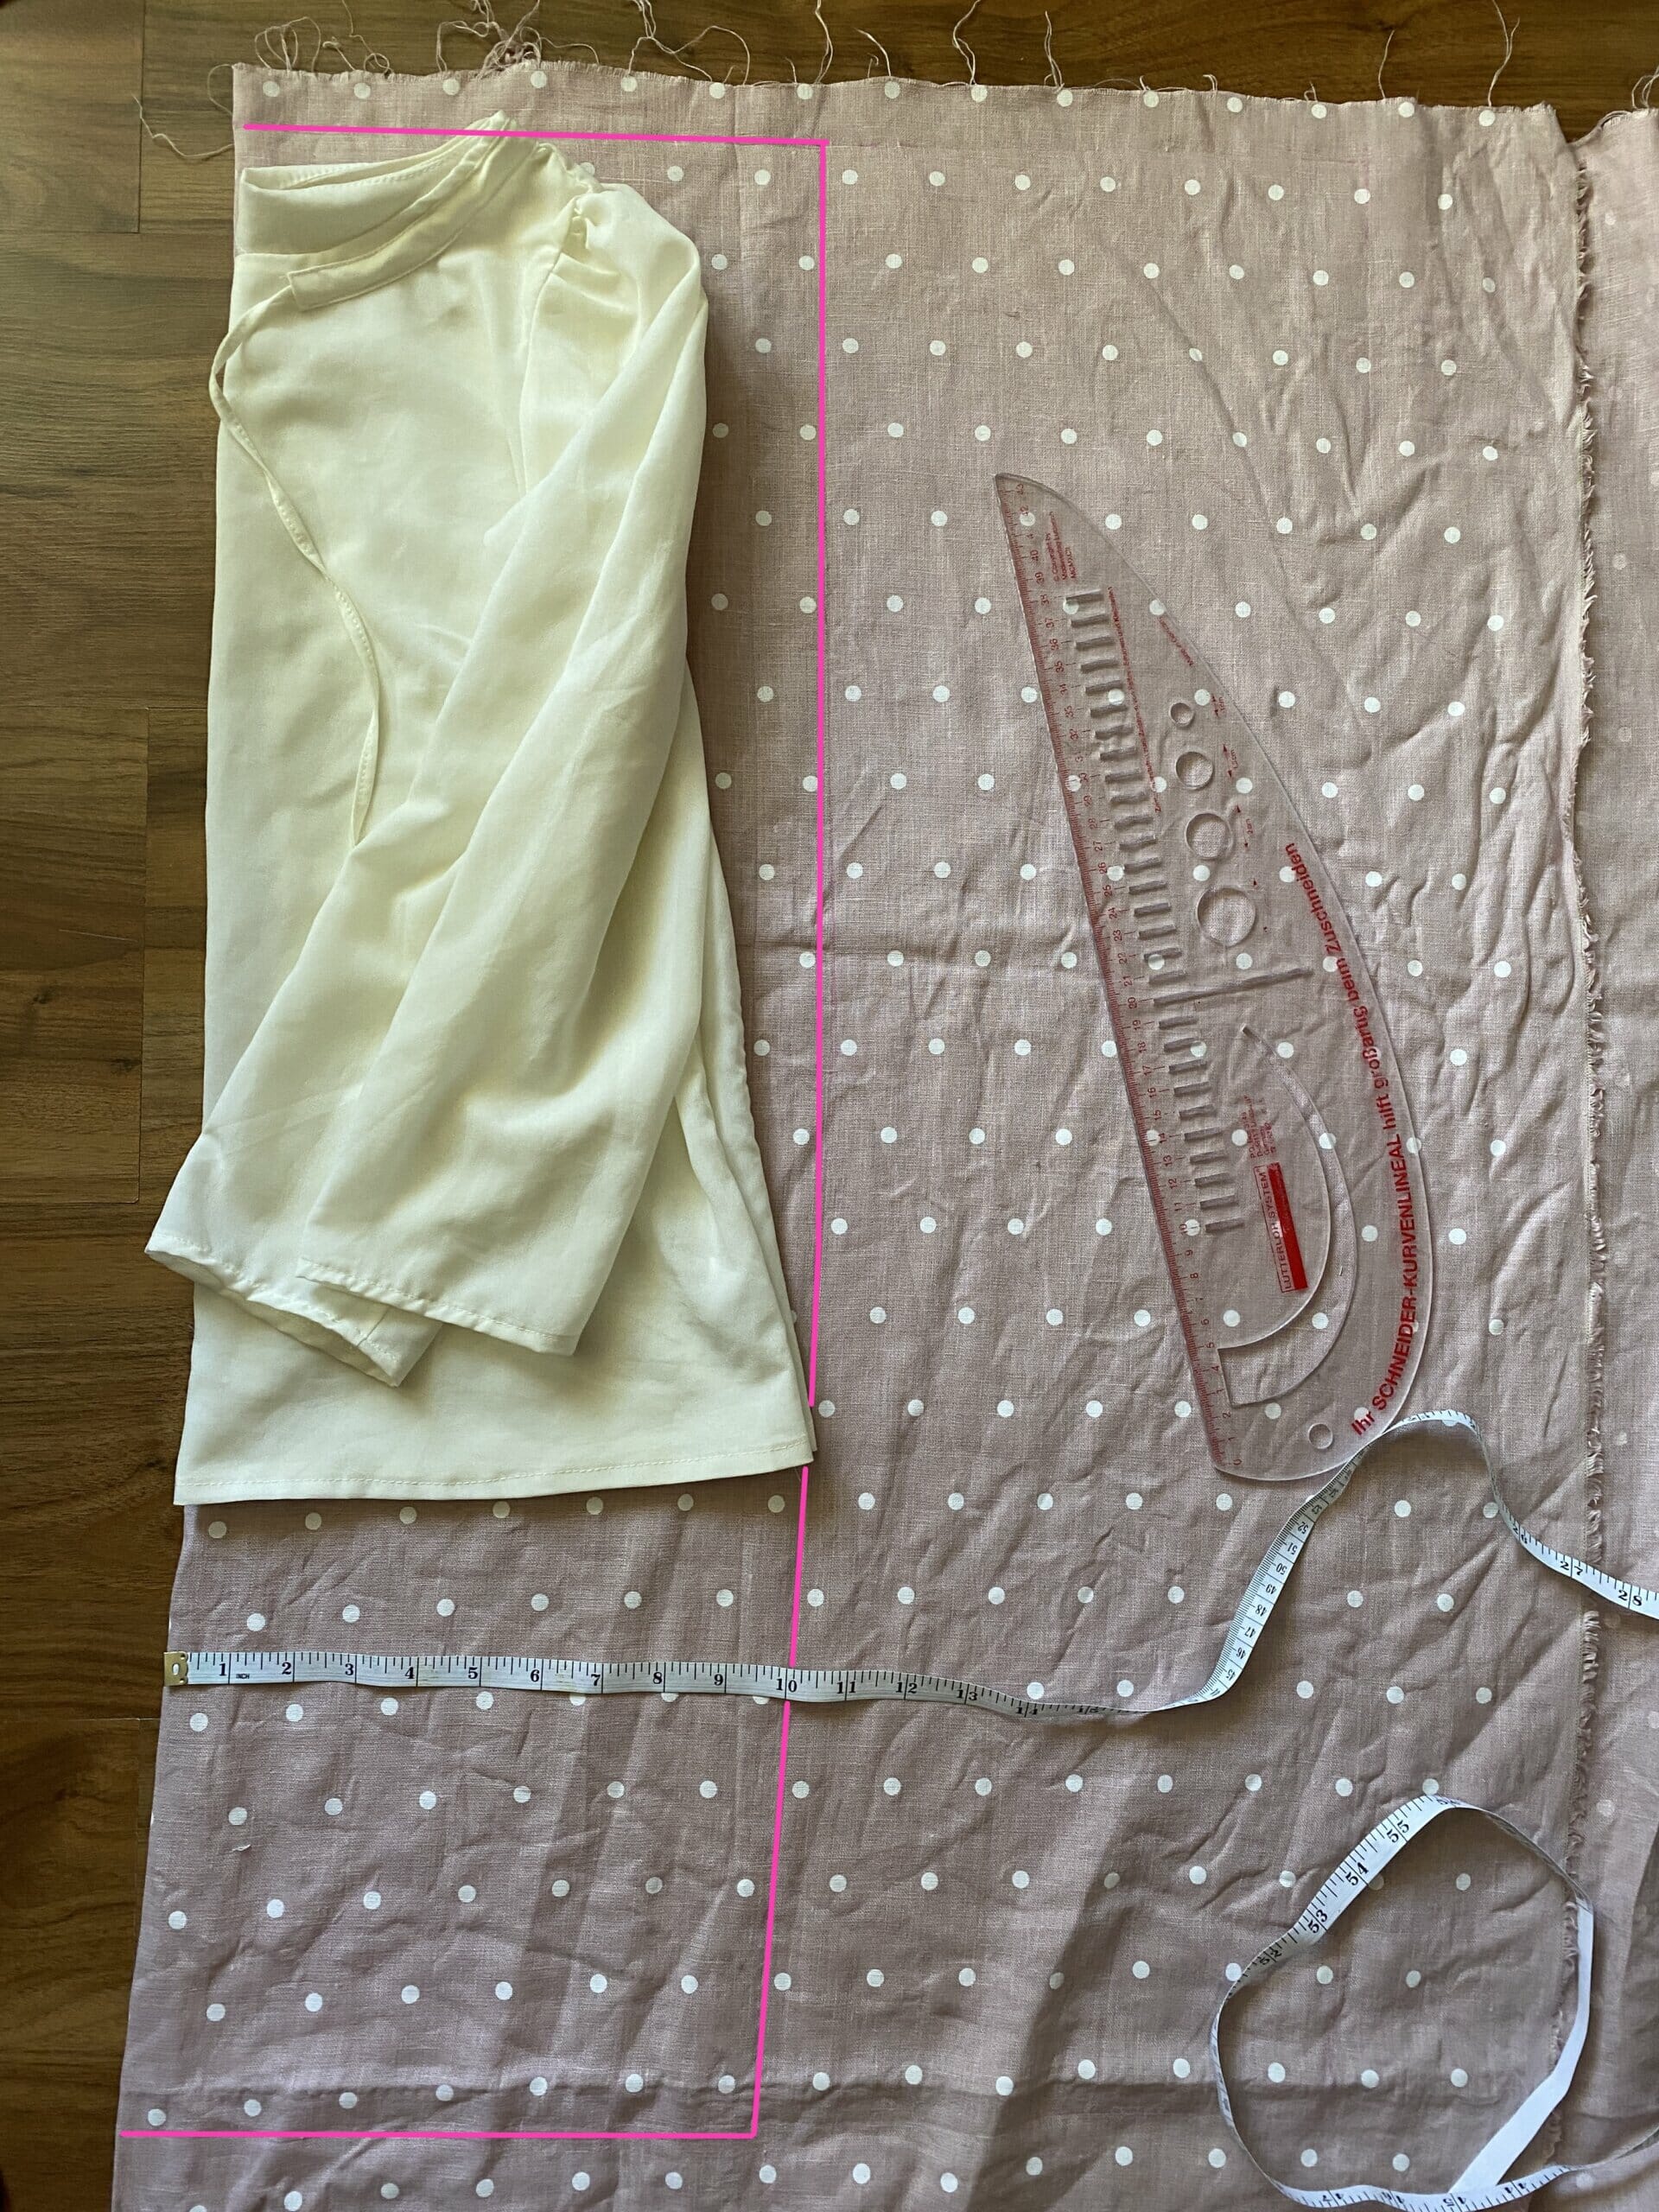
Trace the front neckline first.
If you want that lovely wide boatneck neckline, just widen the neckline slightly and extend the shoulder points to include seam allowance.
Mark the shoulder slope.
Most shoulders aren’t perfectly straight, so make sure you mimic the slant from your top—it helps with fit!
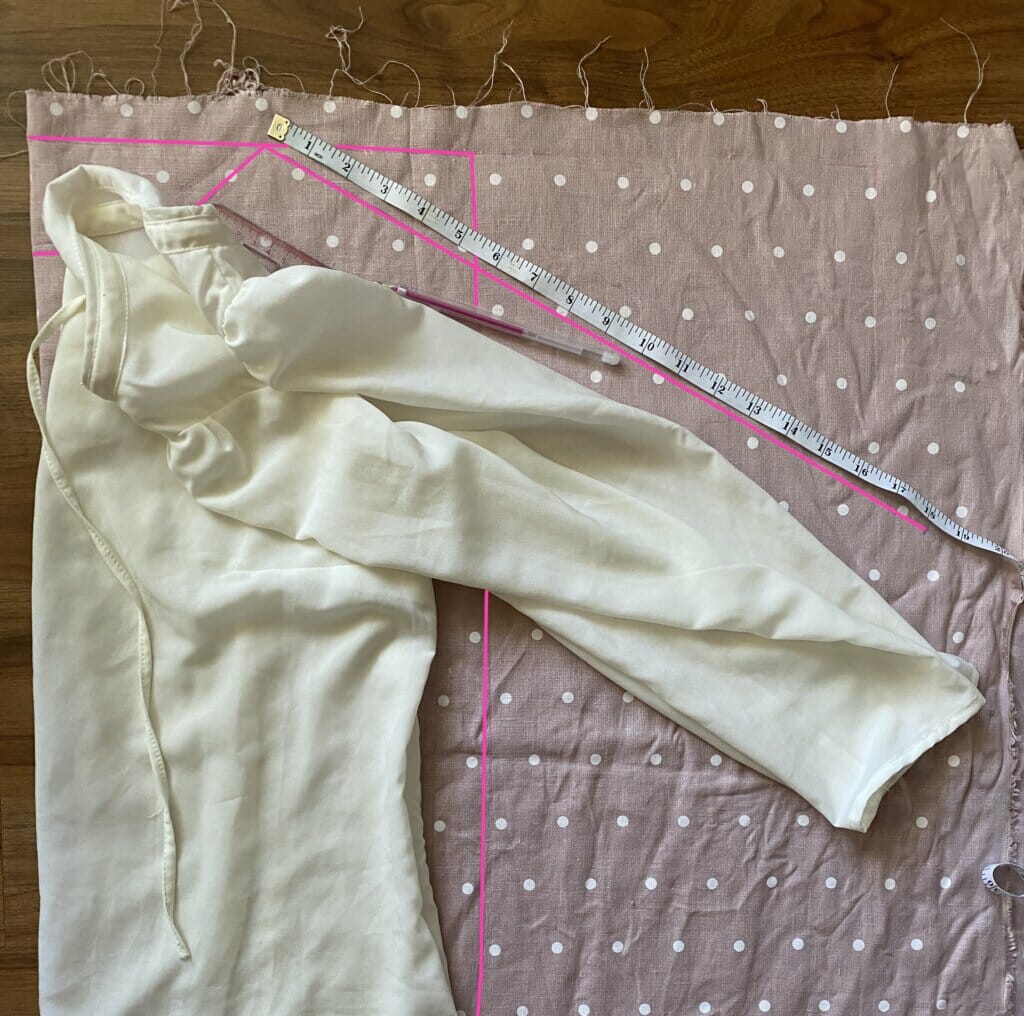
Draw the sleeve extension.
For my linen dress, I made the sleeve about 18” long from the shoulder point. You can make yours longer or shorter depending on the look you’re going for.
Shape the underarm seam.
Use the same top to trace the underarm curve, but make it roomier than usual. This dress is meant to be comfortable! The sleeve outline should meet the edge of your original rectangle—no weird angles or narrowing.
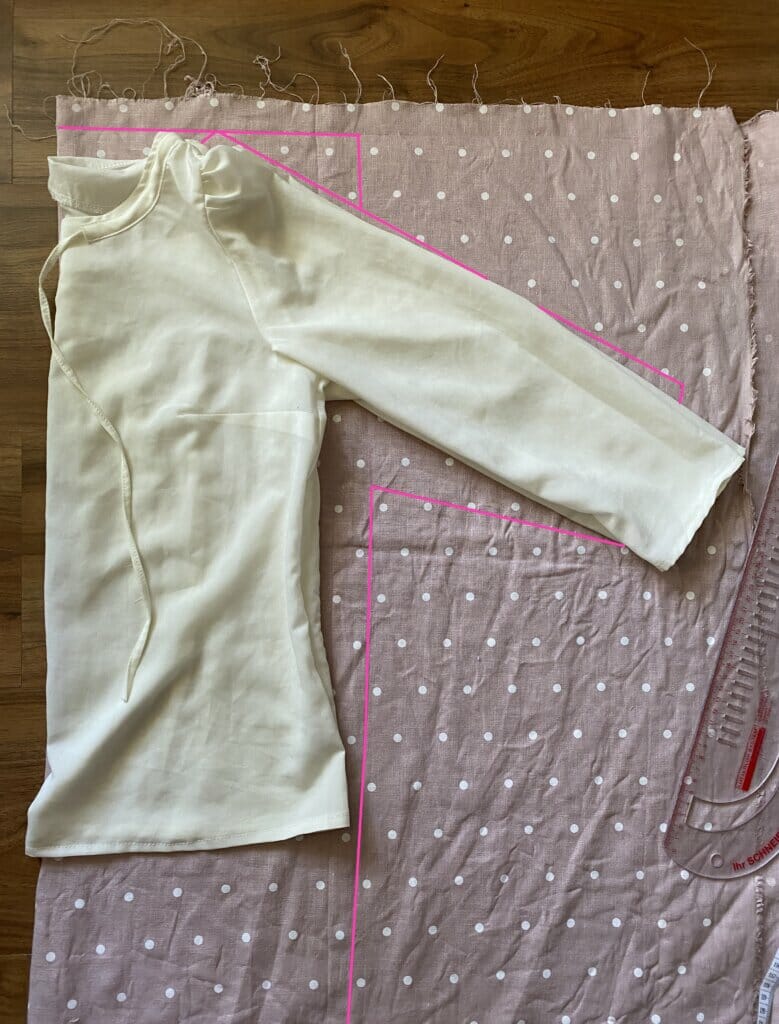
And that’s it for the front pattern piece—go ahead and cut it out!
Step 2 – Cut the back piece and sew the pockets
Now that the front of your dress is done, it’s time to move on to the back piece and those all-important pockets!
The back panel is super simple—it’s basically a twin of the front. The only difference? You need to raise the center back neckline by about ½ inch to stop it from gaping. That little adjustment makes a big difference for a comfy fit.
Now let’s talk pockets—because every good dress needs them, right?
You’ll need four pocket pieces total (two for each side). To make things easy, fold your fabric in half before cutting so you automatically get mirrored pairs. That way, you don’t have to stress about which direction they face later.

Step 3 – Start sewing your linen tunic dress
Time to bring it all together! With right sides facing, sew the shoulder seams, then the side seams. BUT—when you sew the sides, don’t go all the way up to the underarm. Stop about 3 inches below the underarm seam so the sleeves sit nicely.
Pro tip: Sew from the sleeve hem all the way down to the bottom hem in one go. Treat it like one continuous seam, and you’ll get a clean, smooth finish in the underarm area. Trust me—it works!
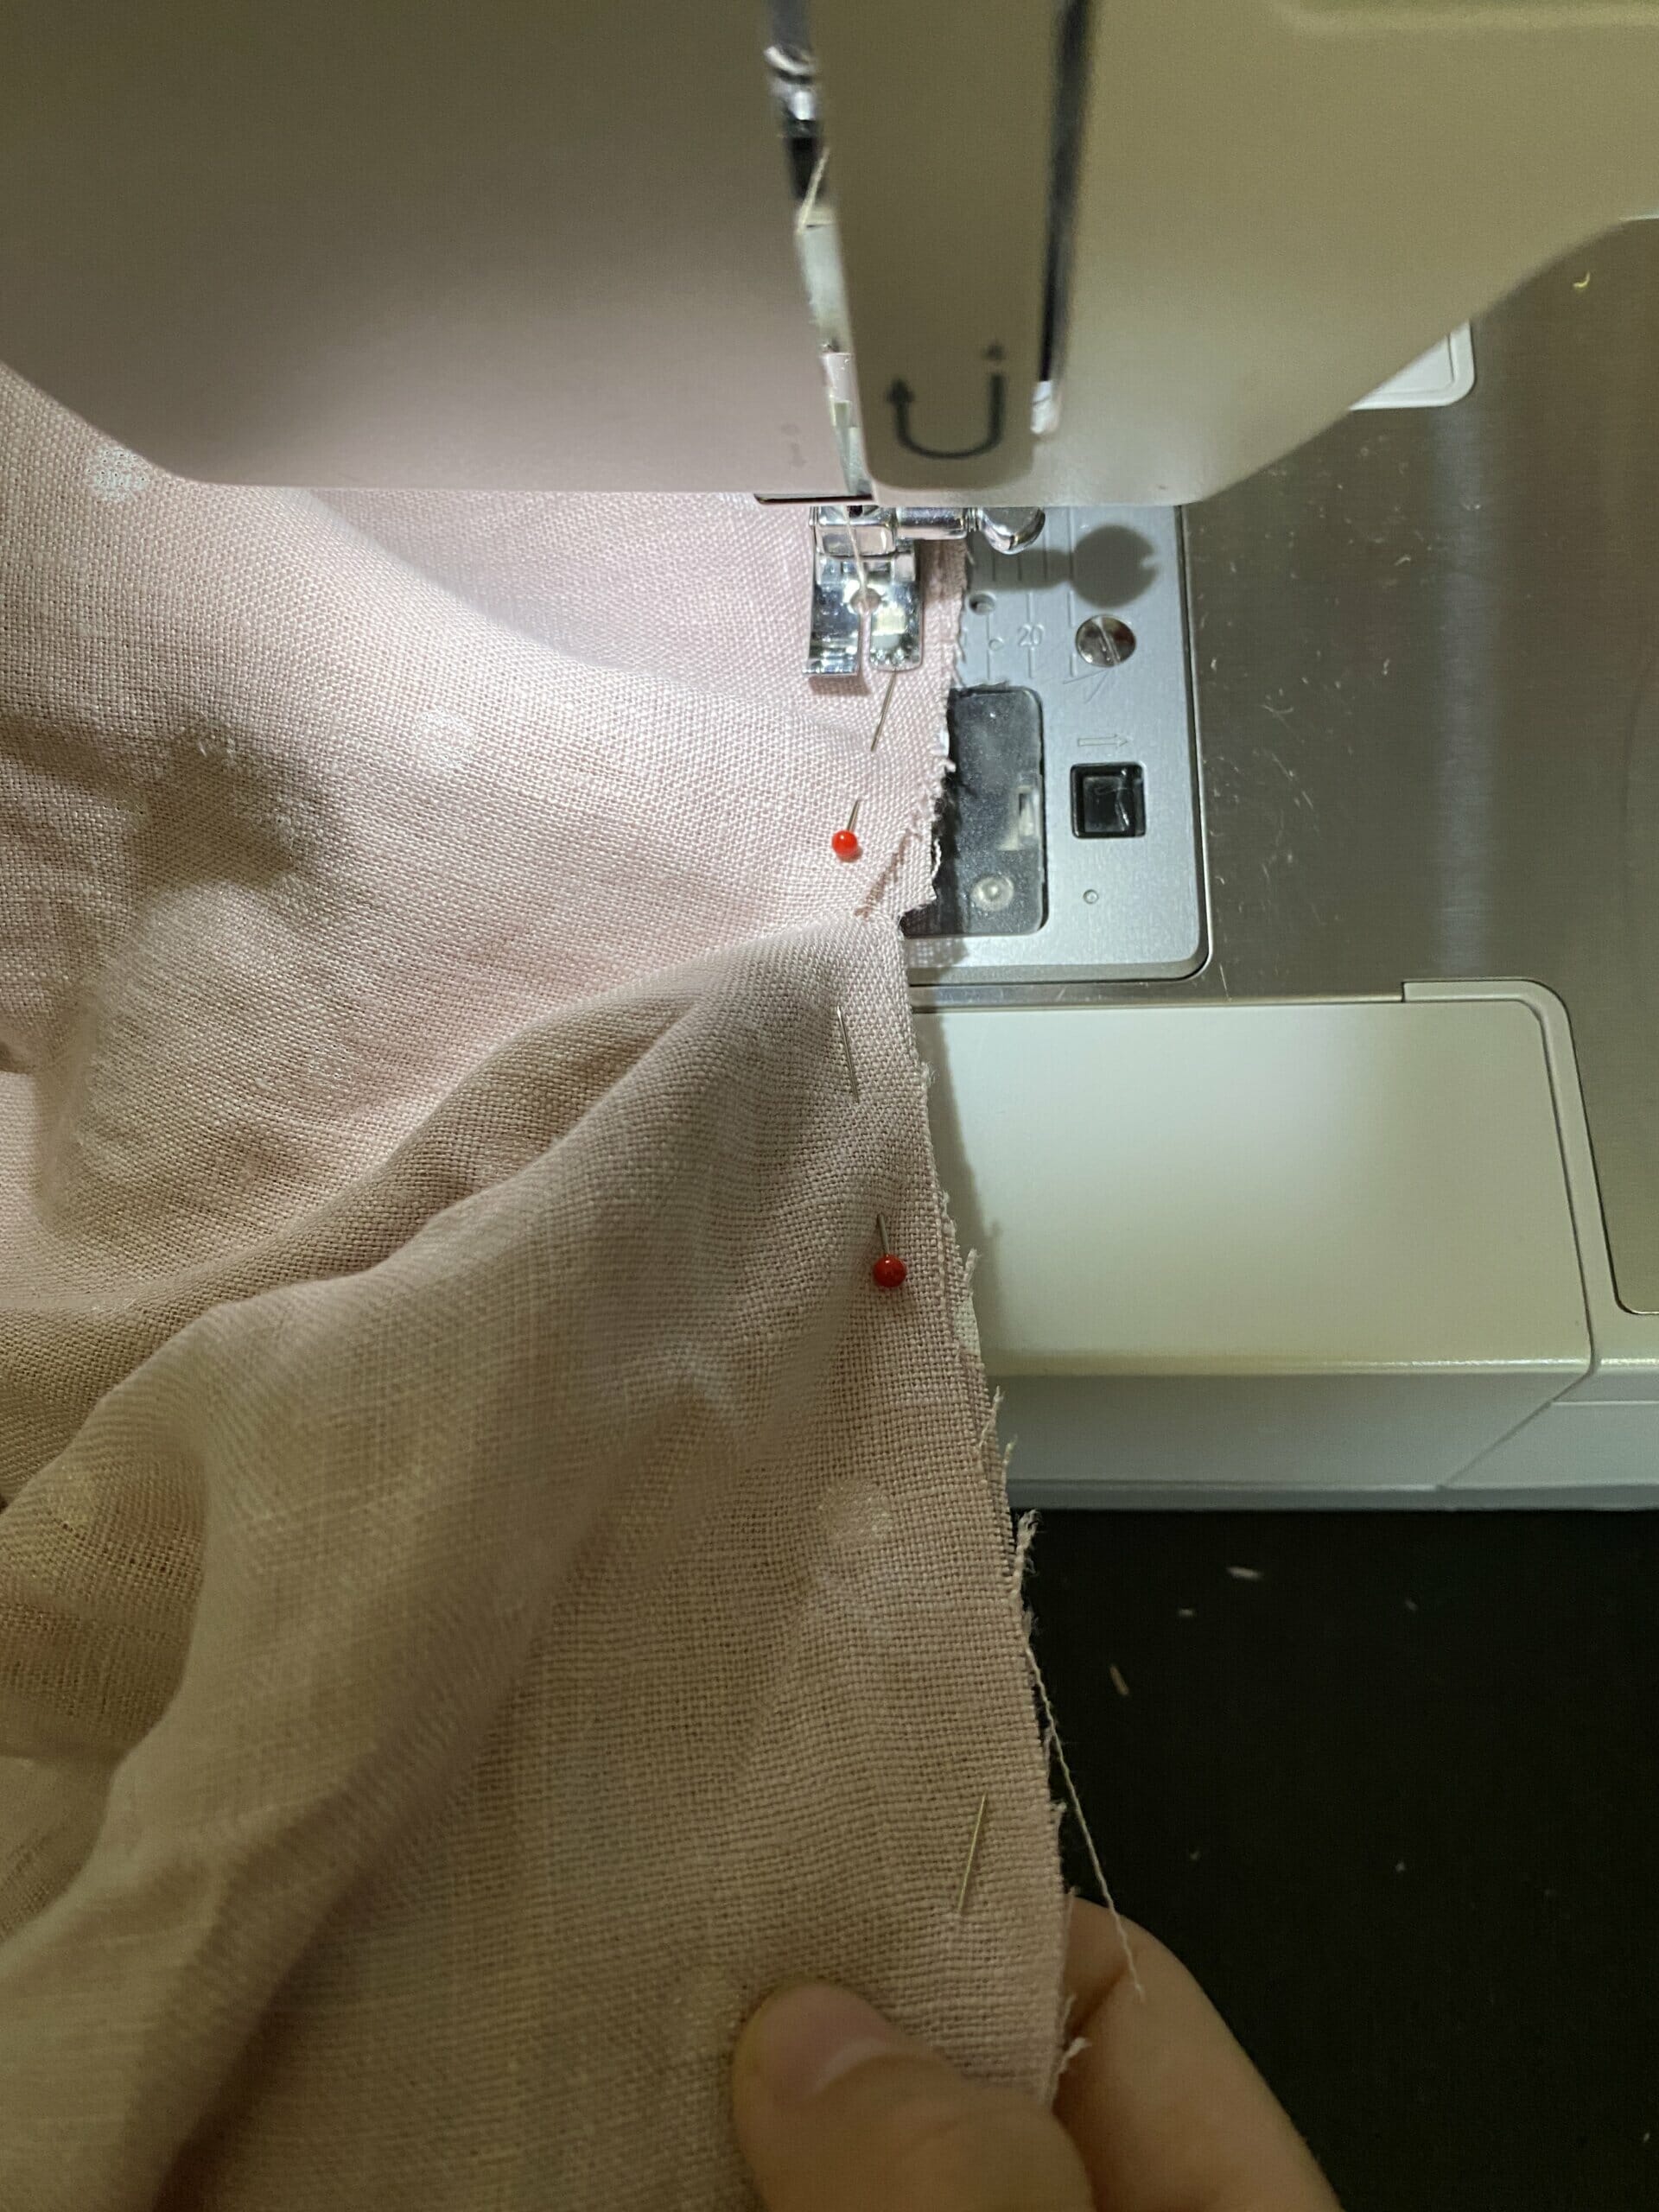
Before you go any further, run a staystitch around the neckline. This stops the linen from stretching out or fraying too much while you’re working. Simple straight stitch does the trick.
Add the pockets (aka best part of the dress!)
Try the dress on real quick and check where your hands naturally land when you reach for pockets. That’s where they should go. Use a pencil or fabric marker to make a tiny mark where the top of each pocket will sit.
Now, pin one pocket piece to the side of your dress, right sides together, matching the edges. Do the same on the other side, and double check they’re even. No wonky pockets here!
Next:
- Press the seams with the pockets flipped open.
- Topstitch 1/4″ along the pocket edge to keep everything neat and flat.
- Fold the dress right sides together again, turn the pockets out of the way, and pin the side seams together.
- Stitch along the side seam AND around the curve of the pocket to attach everything securely.
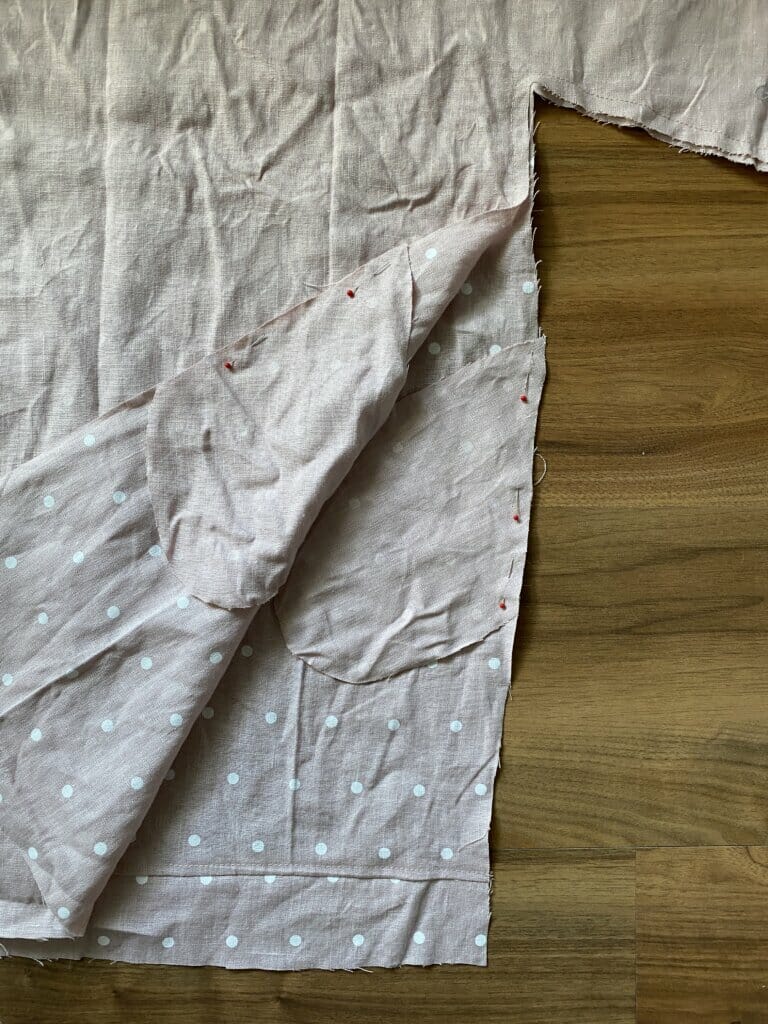
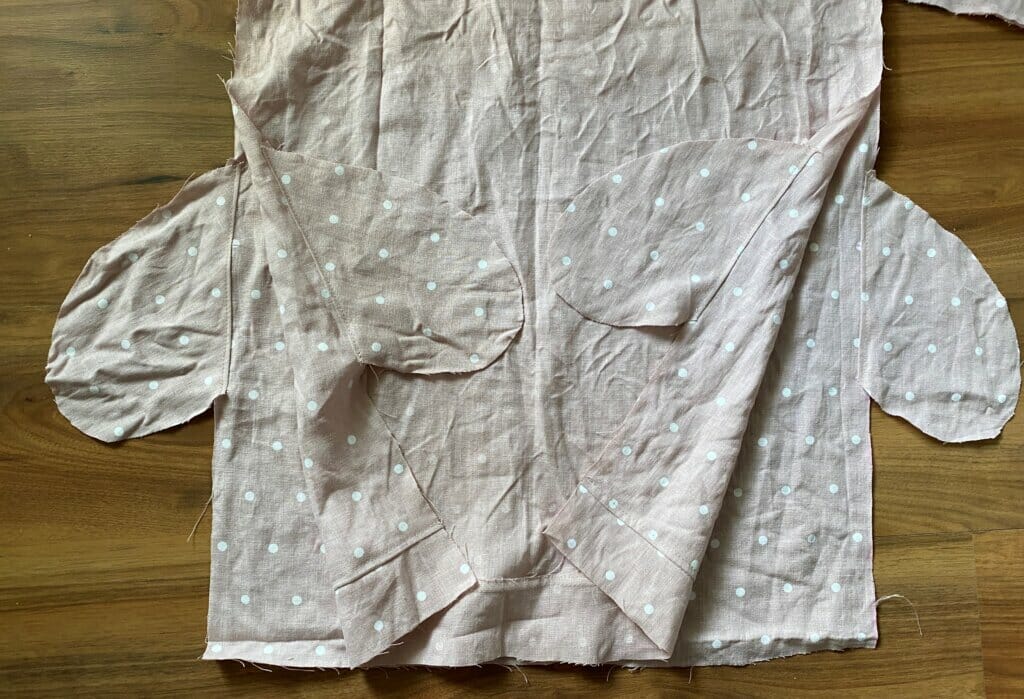

And just like that, you’ve got a dress with real, functional pockets!
")
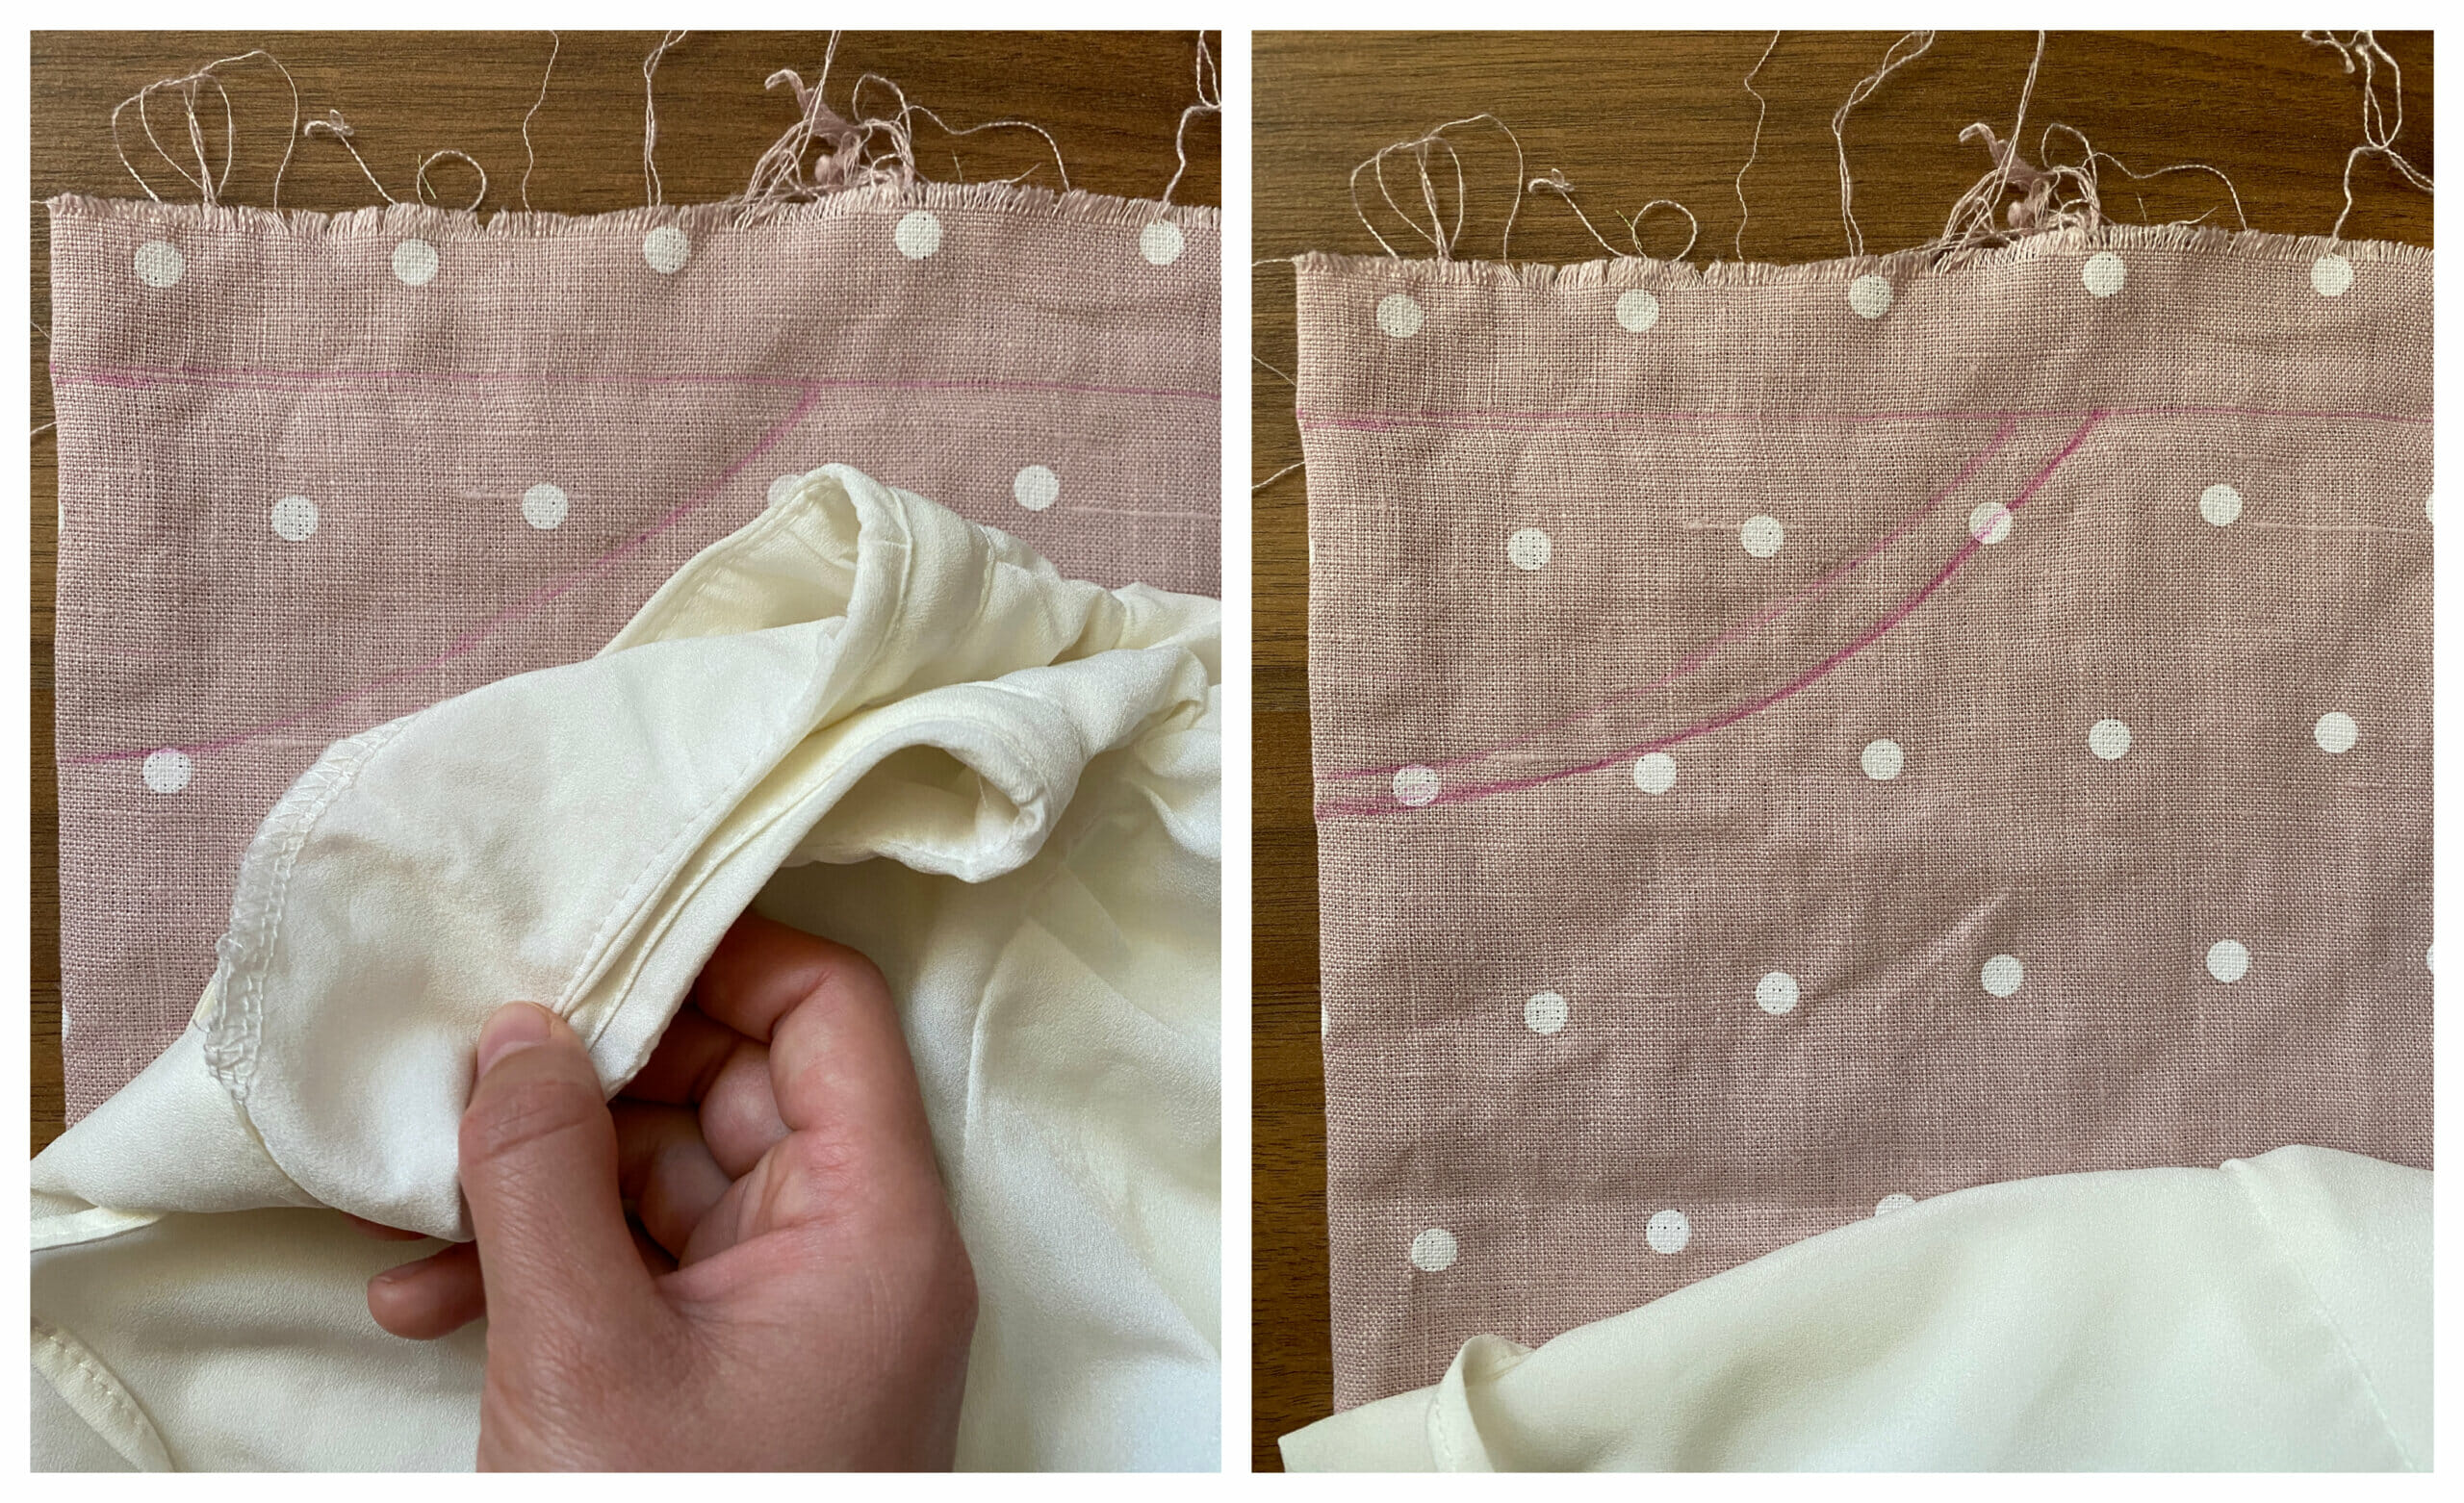
Step 4 – Finish those raw edges
Now it’s time to lean into the frayed linen look. This is what gives the dress its casual, laid-back vibe. Use a straight stitch and a tiny seam allowance to hem the sleeves and bottom of the dress. You’re not folding or finishing anything fancy—just running a line of stitches to keep the fraying under control.
After that, start gently pulling a few threads from the raw edges with your fingers to create that soft frayed effect. Go slow and easy—just a couple of threads at a time—so you don’t overdo it.
And… done!
Your easy DIY linen tunic dress with frayed edges and pockets is ready to wear. It’s comfy, it’s breezy, and it looks effortlessly cool. You can leave it as-is or add a belt, patch, or a little embroidery to personalize it.


Want to switch things up later?
You totally can! A couple of weeks after I made this, I decided to upgrade the look and give it a more polished finish. I added bias tape to the neckline to clean up the raw edge while keeping the relaxed fit. That staystitching from earlier really helped the neckline hold its shape. Here’s the result!
Versatile dresses for the win!
This one’s a keeper—whether you wear it at home, to the market, or dress it up with sandals and jewelry for a smart casual look.
Did this easy frayed edge linen dress tutorial help you out? Let me know what you think—I’d love to hear your thoughts! And if you try this pattern, please tag me or share your pics. I’d seriously love to see your version of this dress!
You might also like:
- How to sew a comfy side-slit skirt with an elastic paperbag waist – super easy, no pattern needed, and perfect for lounging or everyday wear.
- DIY tiered ruffle skirt tutorial – flattering for all body types – learn how to make a layered ruffle skirt that twirls like a dream.
- Simple summer skirt with pockets – no pattern required – a quick and fun sewing project for beginners who love practical clothes.
- Circle skirt dress for little girls – free sewing pattern & step-by-step tutorial – the perfect beginner-friendly dress to make for your little one.
Let’s keep in touch! You can find me on Facebook, Instagram, and Pinterest.


I am speechless.
Do you mean that in a good way? I hope so 😛
I do! Can’t wait to make this. Exactly what I’ve been wanting to learn. Yay! ??