Ready to sew a gorgeous tiered tulle skirt? This beginner-friendly tutorial will guide you through every step, from cutting the fabric to adding an elastic waistband and hemming the skirt. I’ve included lots of photos and my top tips for a smooth, fun sewing experience!
Why you’ll love this tiered tulle skirt
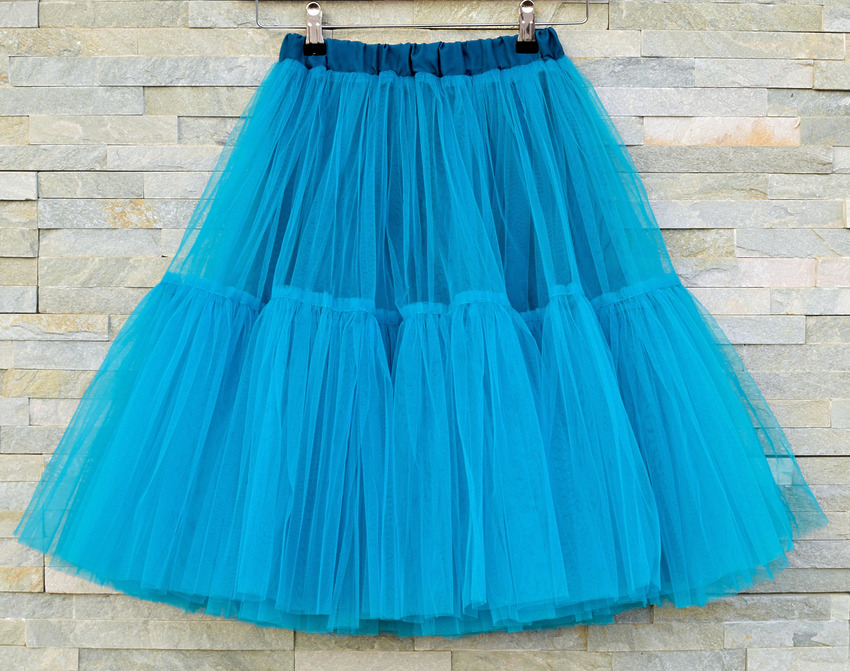
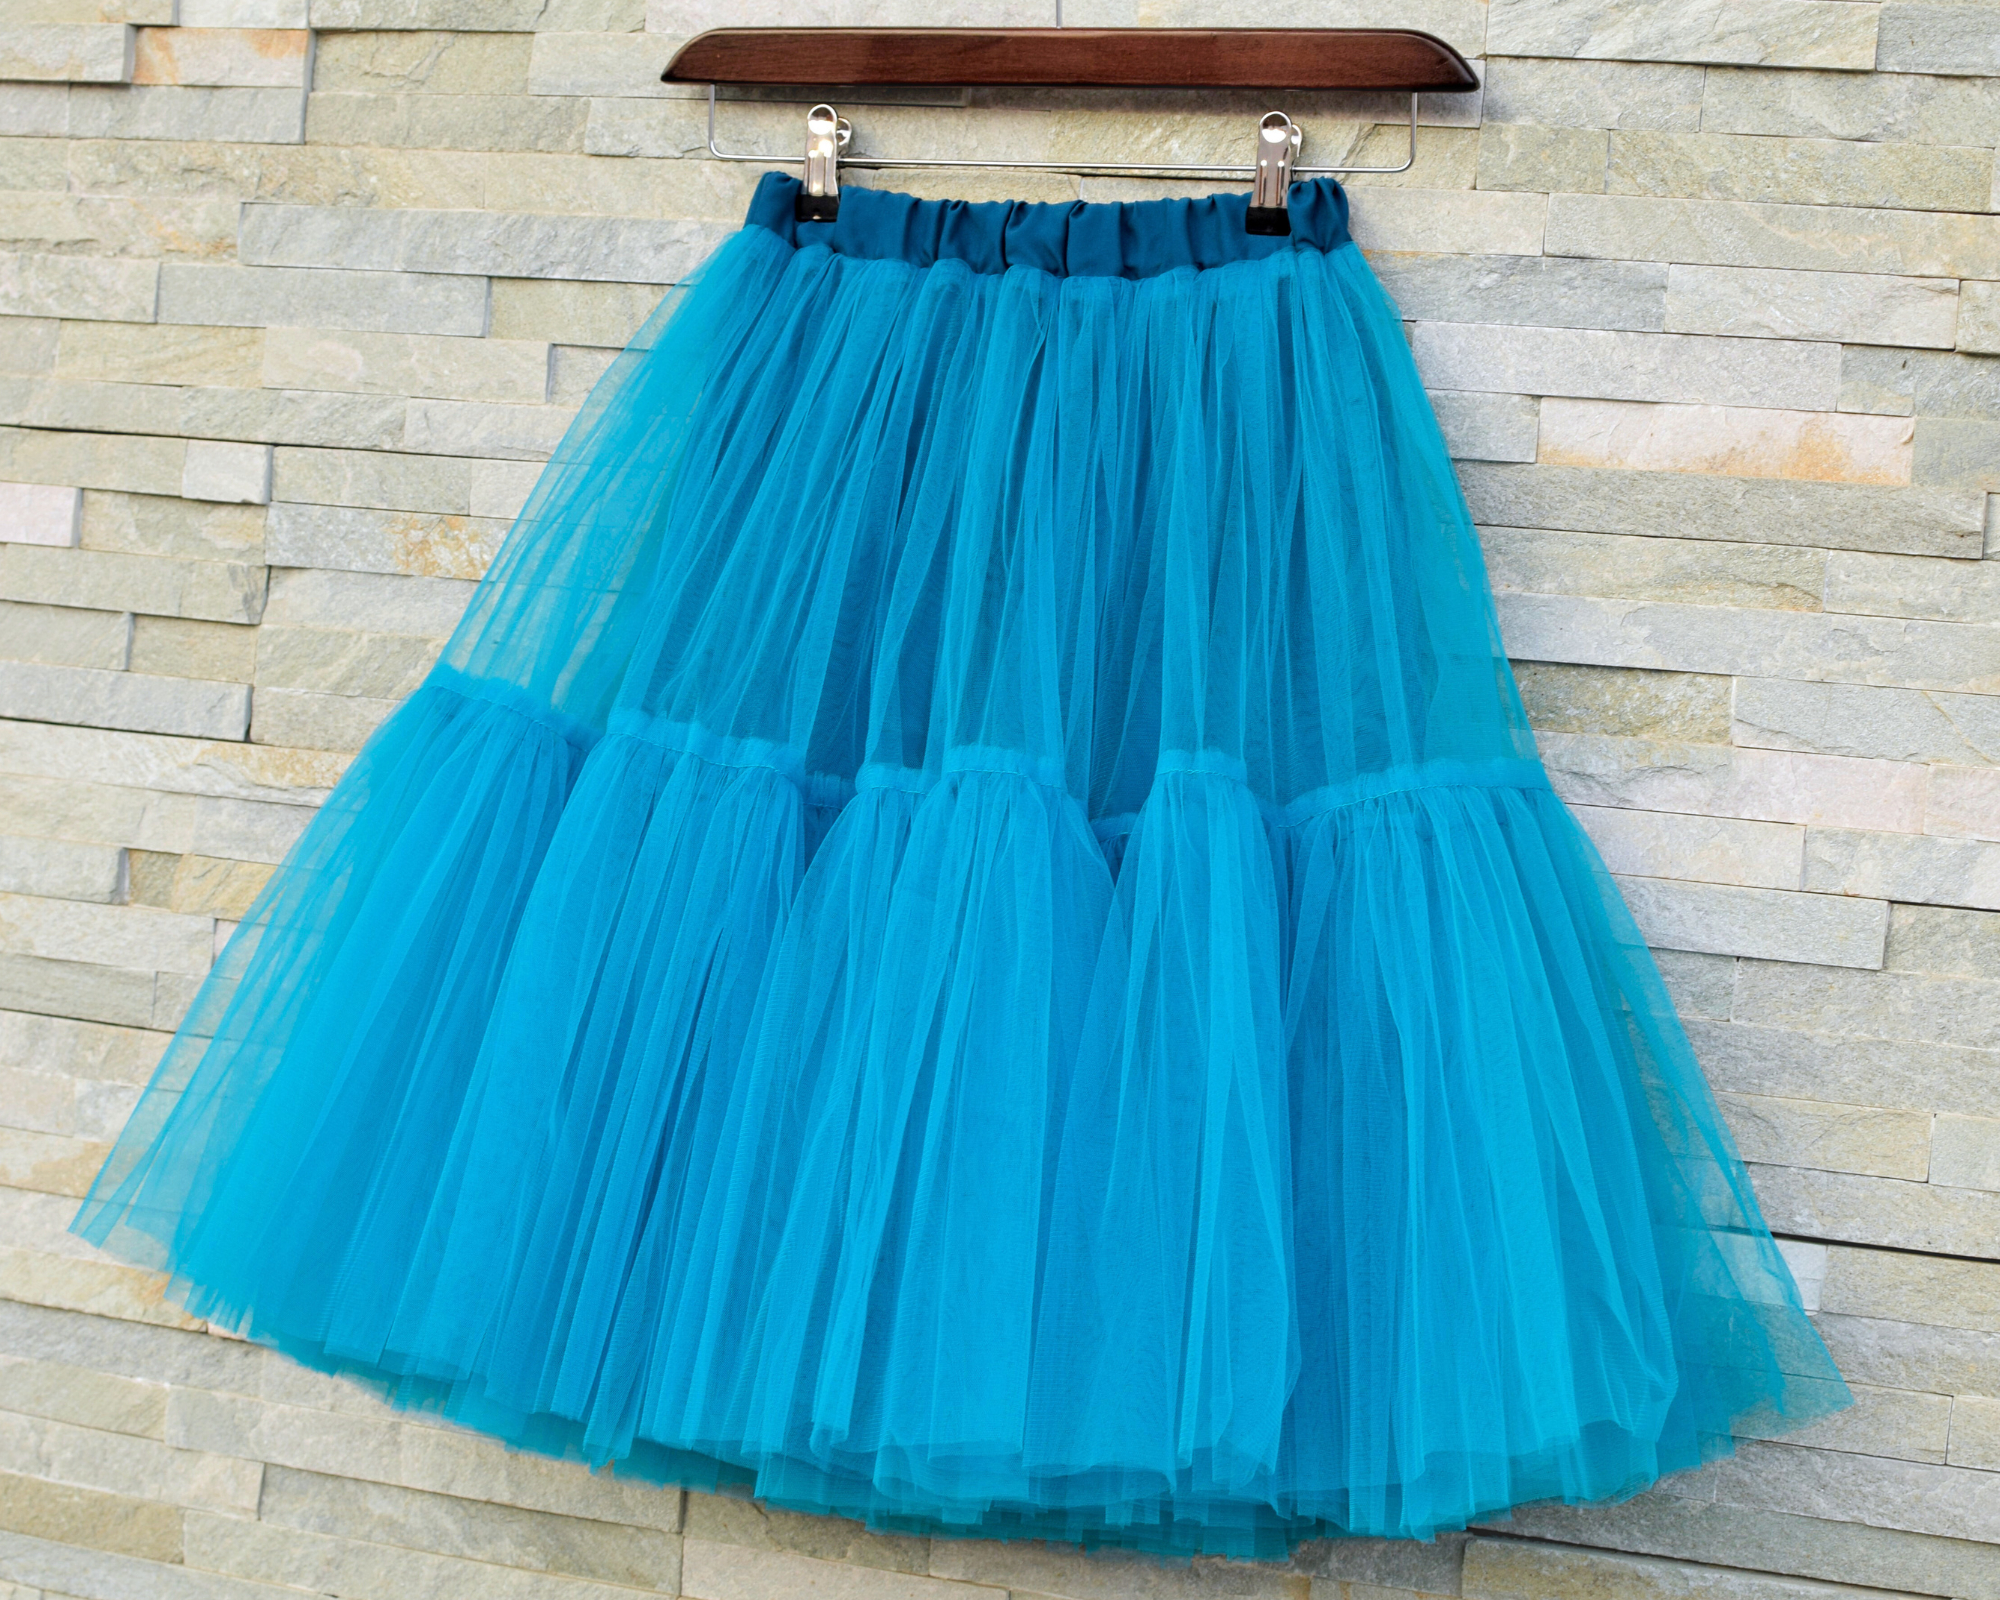
This skirt looks fancy, but it’s actually simple to make! To create the layers, all you need are rectangles of soft tulle fabric – no complicated shapes here!
The skirt lining is made from a half-circle satin skirt, which keeps it light and adds a beautiful, flowy shape without too much bulk around the waist and hips. The result? A dreamy, swishy flare towards the hem that’s fun to wear!
Related: How to make a lined tulle skirt / reusable tulle produce bags / easy one-seam tutu skirt
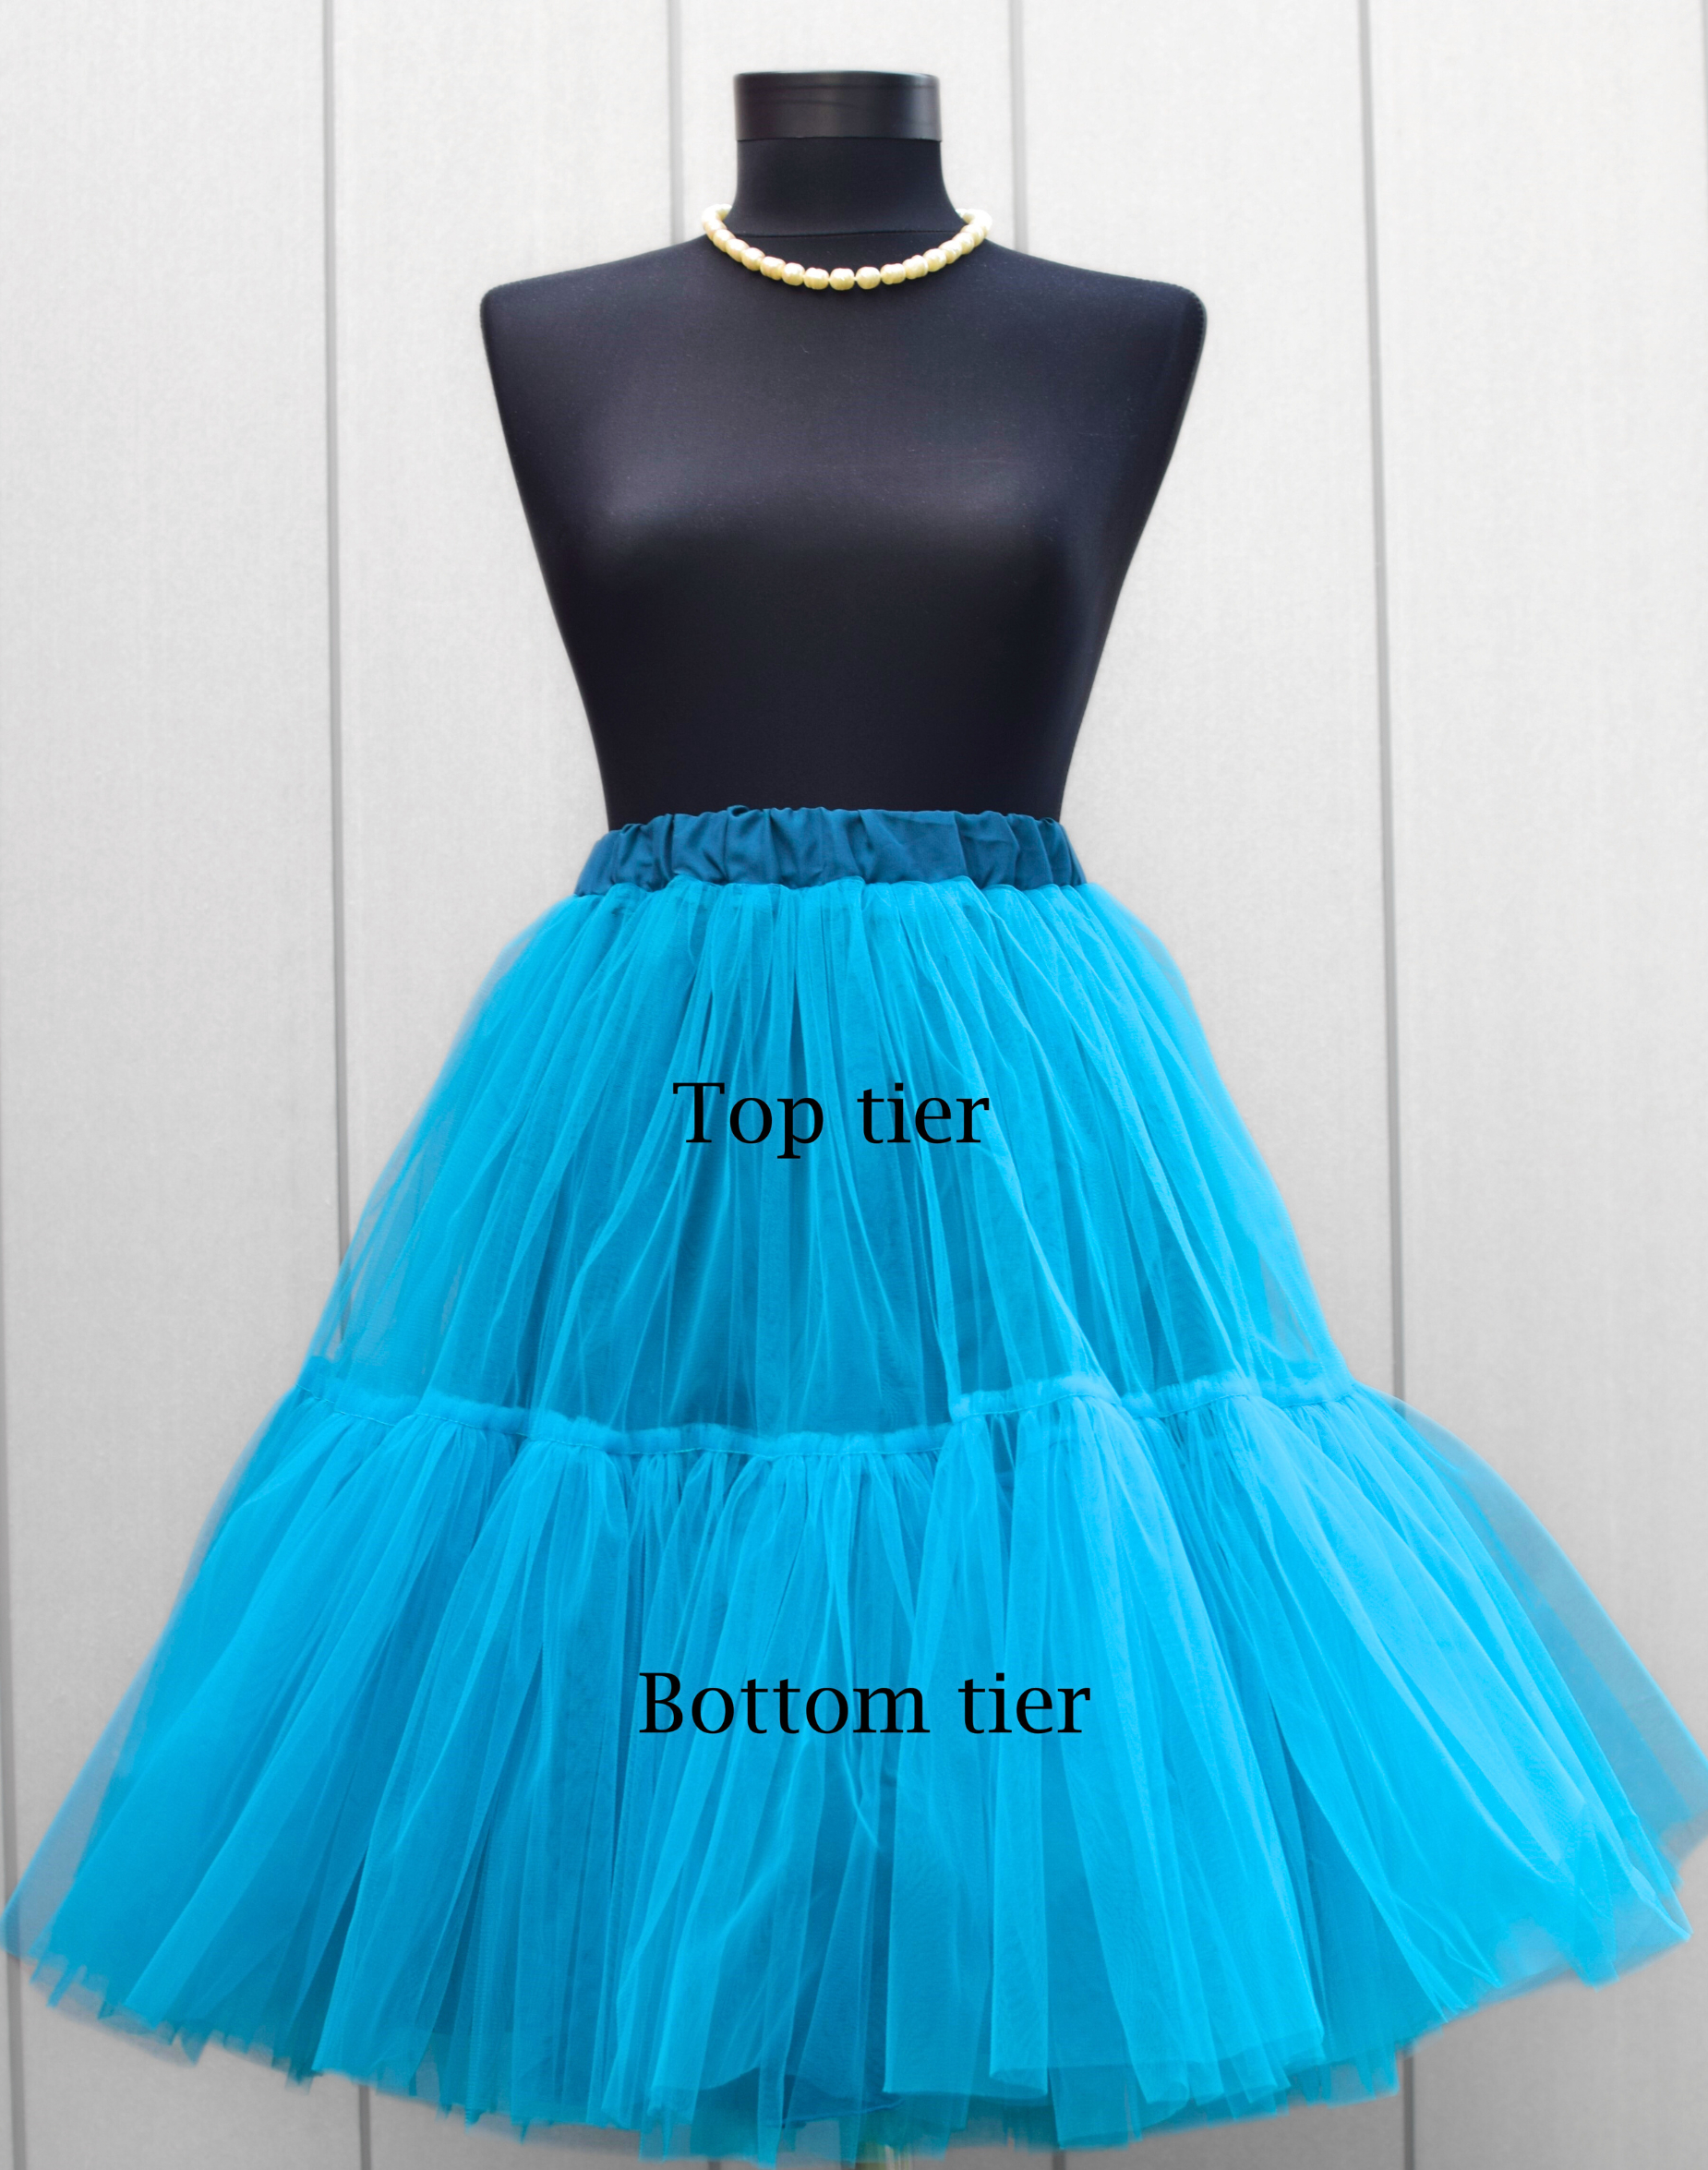
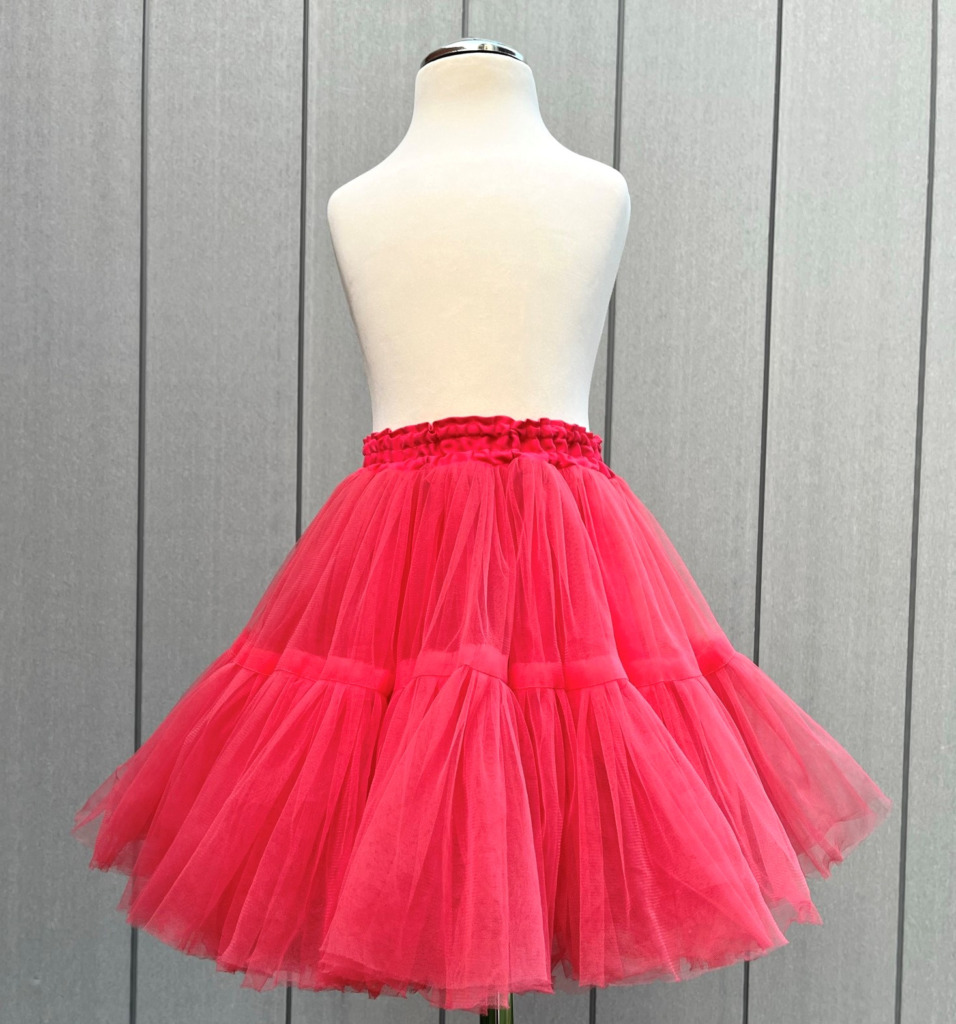
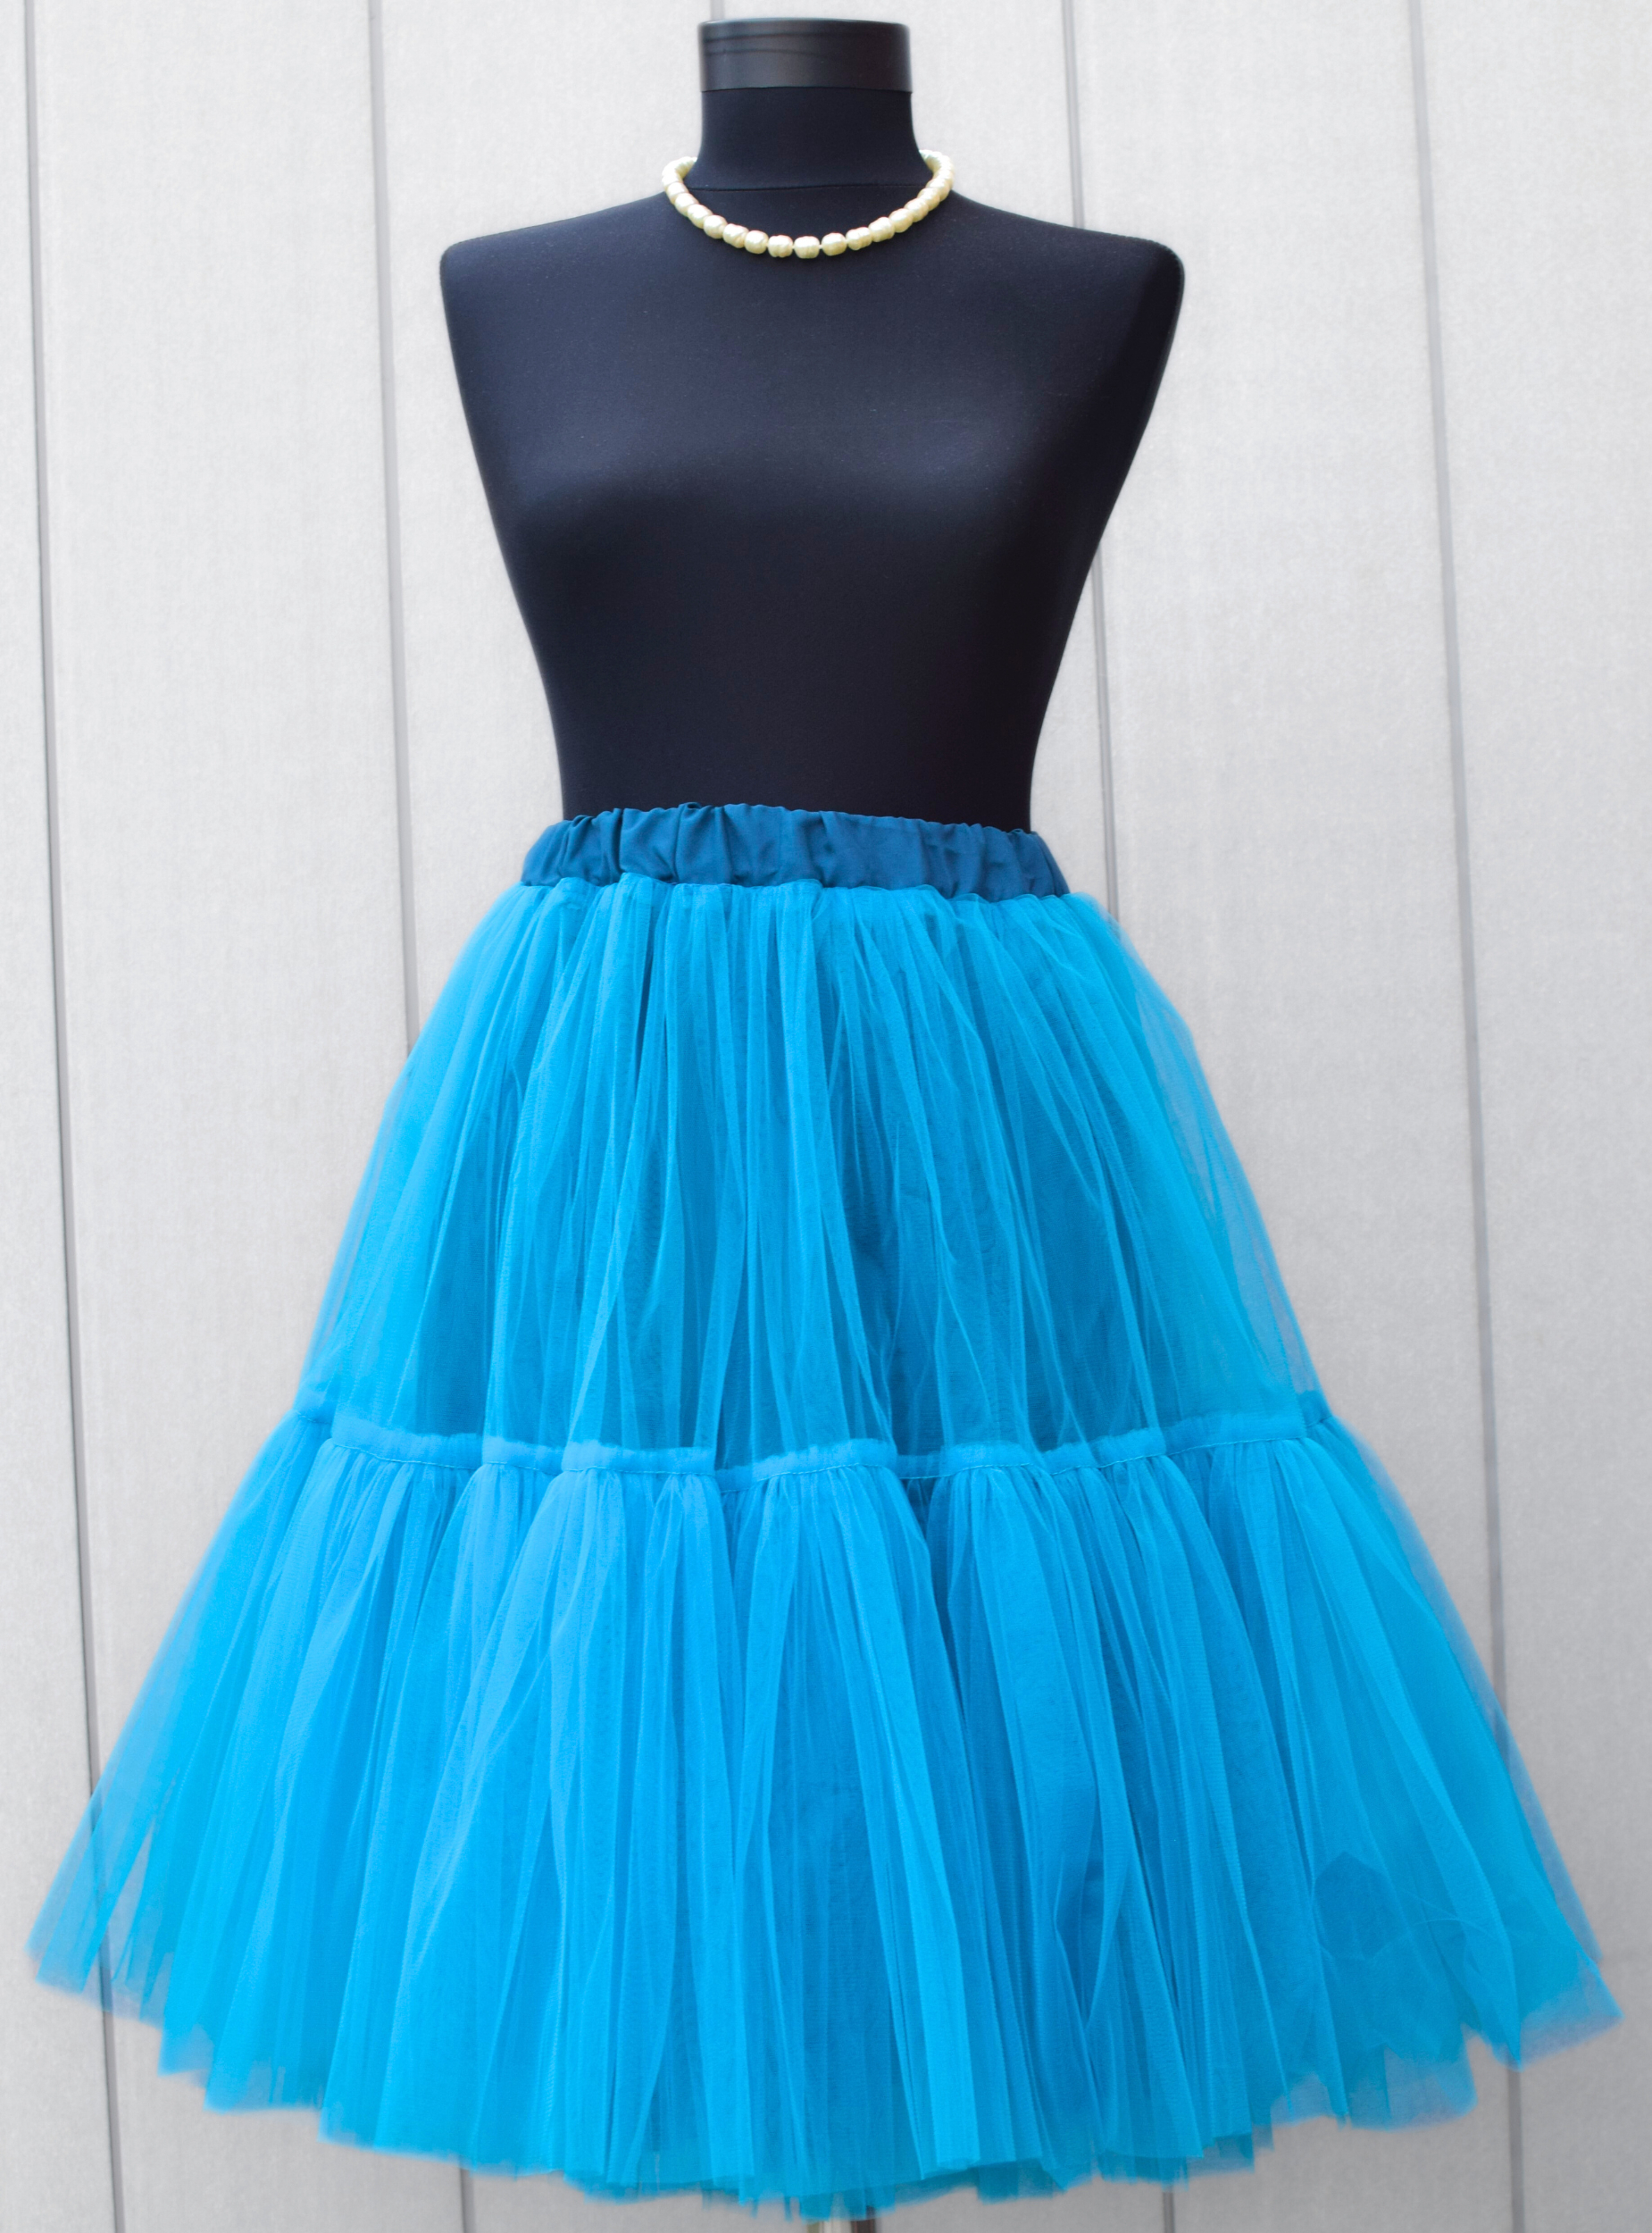
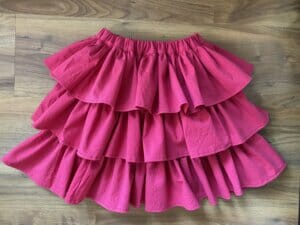
A beautifully gathered skirt with layers of tulle
This tiered tulle skirt is made with a simple gathering technique using a 1:4 ratio.
Here’s how it works: the top tulle layer is about four times your waist measurement, and the bottom layer is four times the top! Sounds easy, right? Believe it or not, this gives the skirt an impressive look – with the bottom edge measuring around 118 feet! The best part? There’s no hemming needed for the tulle.
While this skirt won’t come together instantly, it’s totally doable in an afternoon. Gathering those beautiful tulle ruffles does take a bit of time, but the result is absolutely worth it!
Want to start with a simpler project? Check out my guide on how to make a simple tulle skirt in 10 easy steps!
Sewing supplies – DIY tiered tulle skirt tutorial
- 3-4 yards of 118-inch-wide soft tulle fabric (depends on your size, the length of the skirt, on the fullness you want)
- 2 yards of satin fabric for the skirt lining
- 1 inch wide elastic
- sewing machine
- sewing machine needle
- matching thread
- fabric scissors
- rotary cutter
- cutting mat
- fabric marking pencil
- sewing pins
Step 1 – cut your tulle fabric pieces
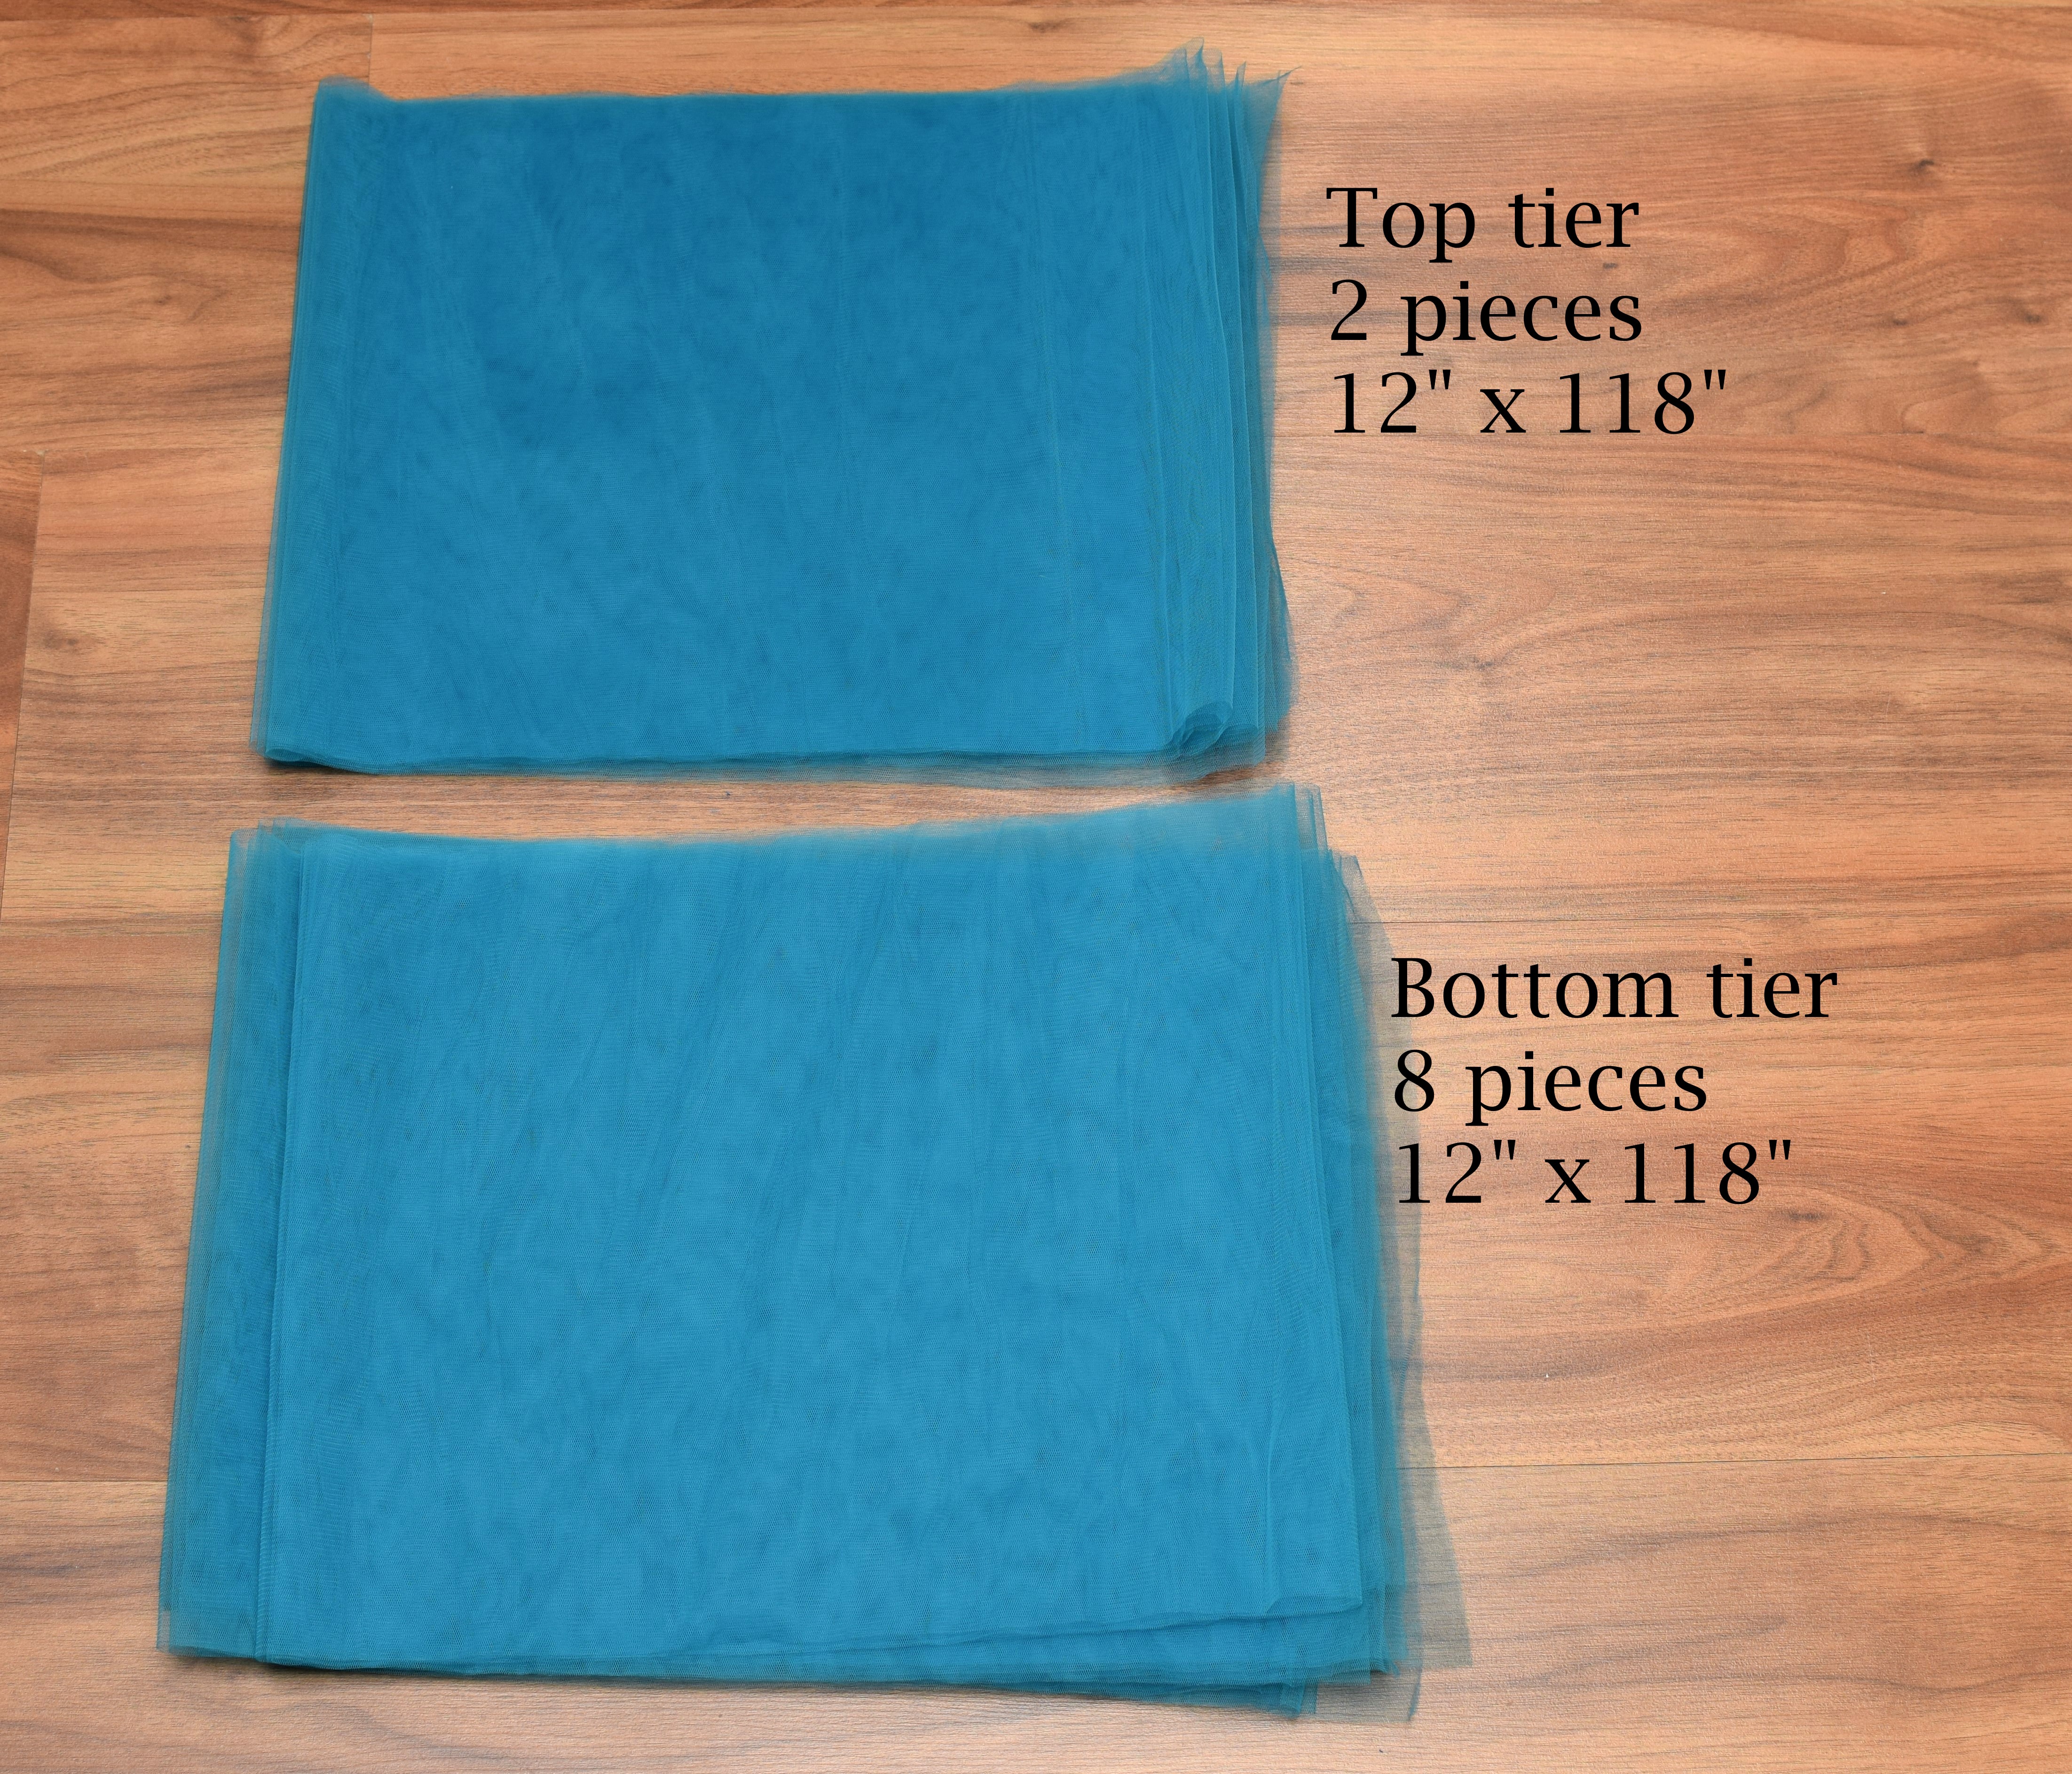
Start by deciding how long you want your skirt to be. Take that number, divide it by 2, and you’ll have the length for each piece of tulle. Each piece should be 118 inches (or 300 cm) wide – perfect for creating a voluminous look!
This tiered tulle skirt will have two layers, and each layer has its own “tiers”. For the top tier, you’ll need 1 rectangle of tulle, and for the bottom tier, you’ll need 4 rectangles (using a 4:1 ratio).
Don’t worry about seam allowances for the height – just cut the pieces to match the length you want, and you’re good to go!
Quick tips:
- If you’re using 118-inch-wide tulle, fold it three times to make it about 14.7 inches wide, which makes cutting straight edges super easy.
- Use a rotary cutter, ruler, and self-healing mat for smooth, even cuts. (see Step 1 in this tutorial)
- Got wrinkled tulle? Gently iron it on a low heat setting before cutting.
For my skirt, which I wanted to be 24 inches long, I cut 10 pieces of tulle, each measuring 118 by 12 inches.
Customize your style
Feel free to play with the tier lengths! You could make the top tiers taller or shorter than the bottom – it’s all up to your style preference. If you’re aiming for a fuller skirt, here are some options:
- Shorter length: Keeping the width and layers the same but making the skirt shorter (say, 20 inches instead of 24) will add extra fluff!
- Extra layer: Add a third tulle layer! For this, you’ll need 3 top-tier rectangles and 12 bottom-tier rectangles for extra volume.
Lastly, don’t stress over exact measurements. A 1:3.5 ratio works well too if you’re low on fabric or want a slightly different look. There are endless ways to make this skirt unique to you!
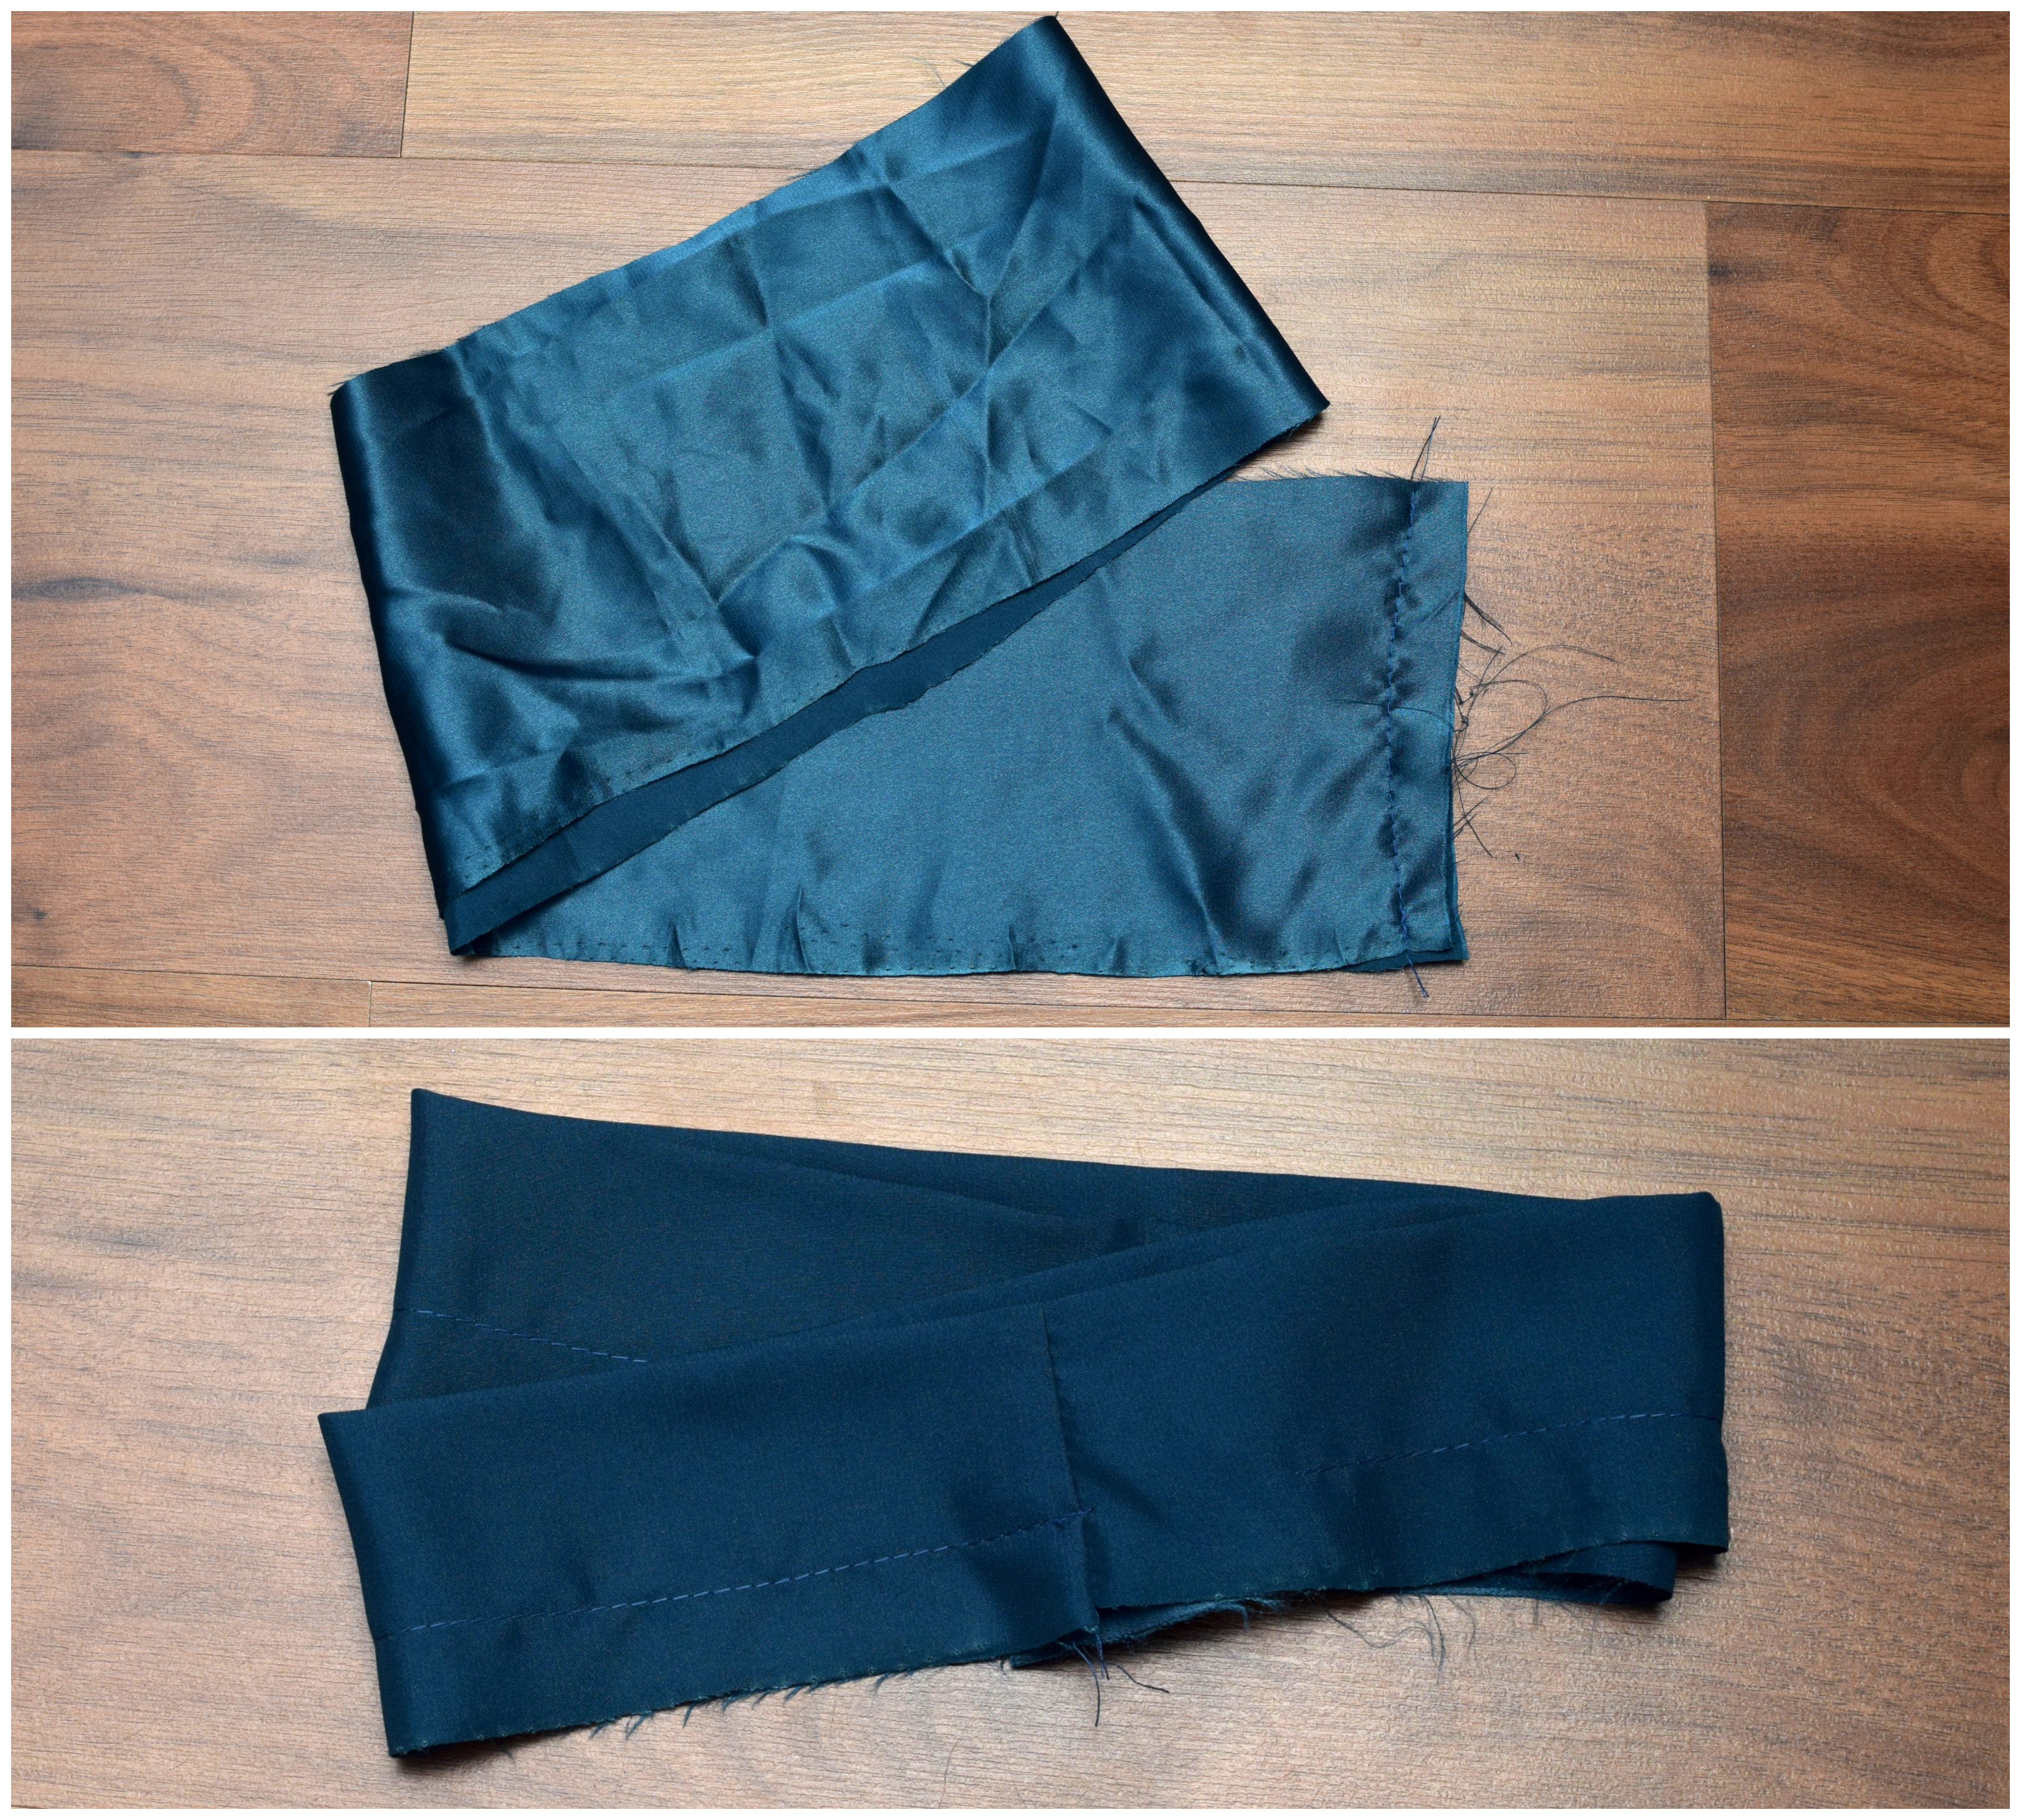
Step 2 – cut the lining fabric
First, measure around your hips. Since we’re using an elastic waistband, we want the skirt opening wide enough to slide over your hips comfortably. I added 4 extra inches to my hip measurement for a bit of wiggle room (my hips are 35 inches, so I cut to 39 inches).
Next, take your adjusted measurement (39 inches in my case) and divide it by 3.14 to get the waist radius. I used the circle skirt calculator from By Hand London to get an accurate measurement for a half-circle skirt. My waist radius came out to 12 inches.
I made the lining 24 inches long, just like the tulle layers. While it looks great, a lining 2 inches shorter than your tulle layers can save on fabric and make hemming easier!
Measurements recap:
- Waist radius: 12 inches
- Skirt length: 24 inches (feel free to adjust based on your preference)
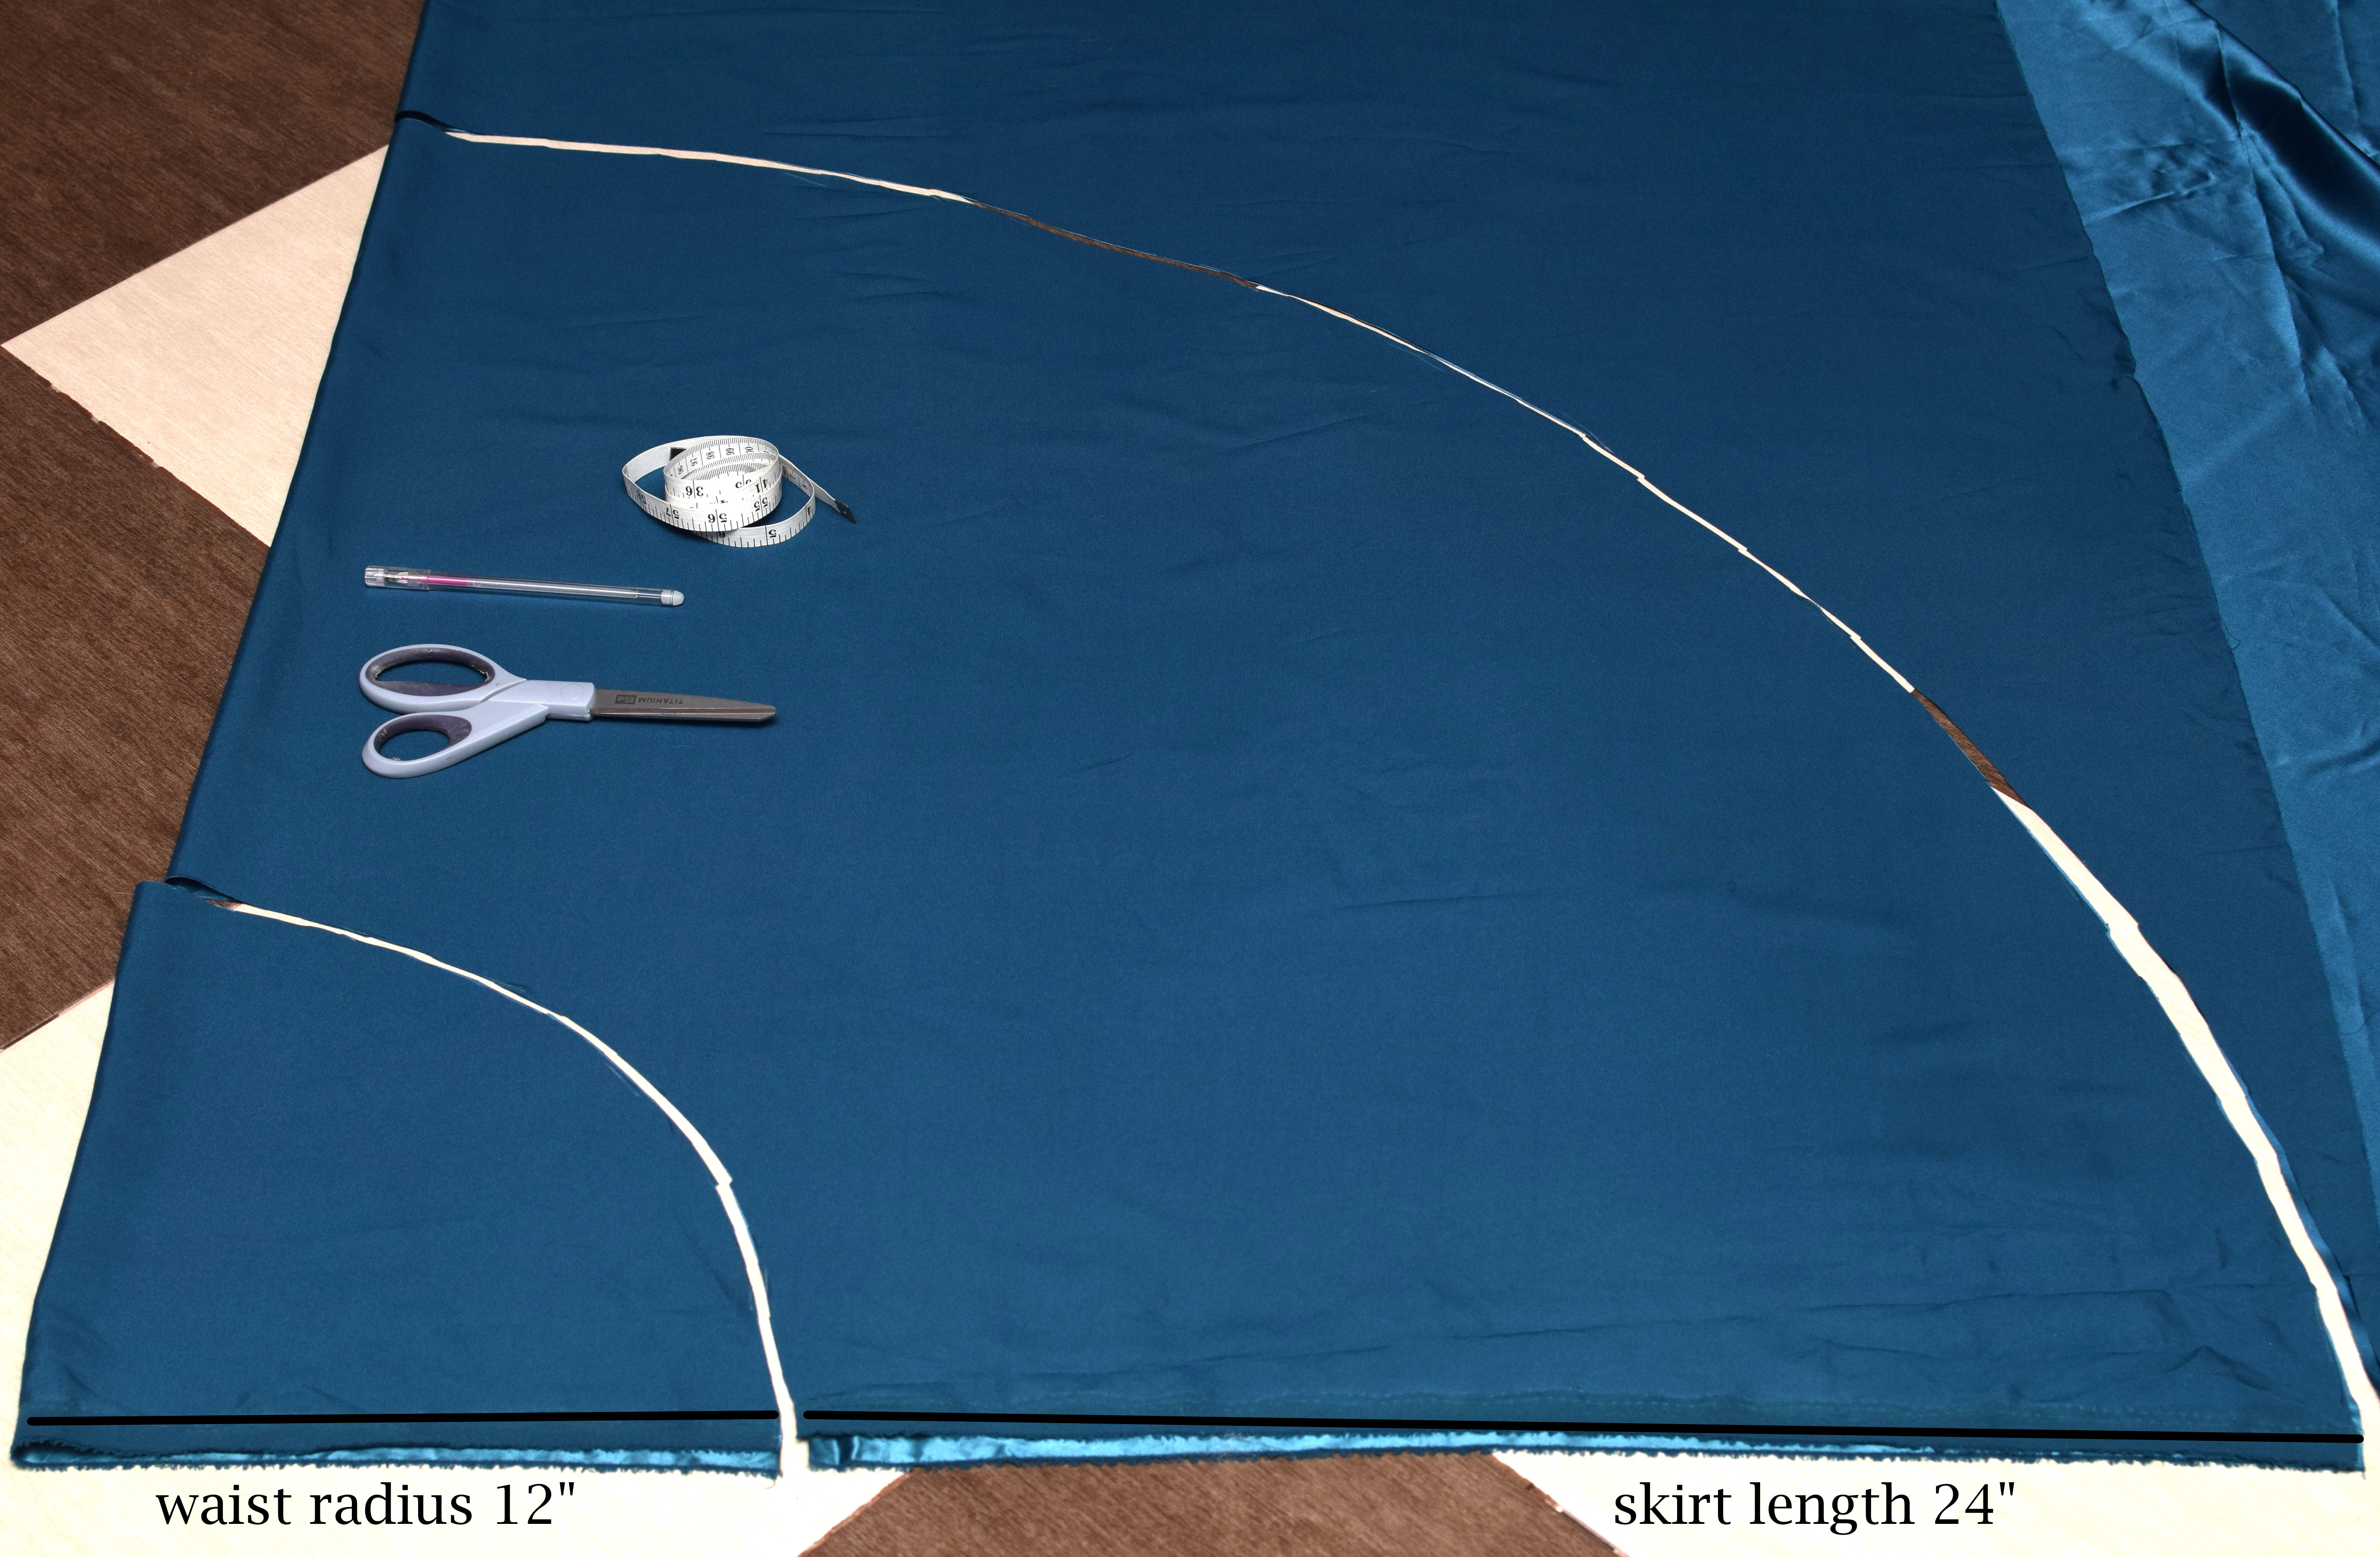
How to cut the lining:
- Lay your lining fabric on the floor and fold it in half, aligning the selvage edges.
- From the top corner, measure out your waist radius (12 inches in my case) to create a smooth curve for the waist.
- Repeat the process from the same corner, using the skirt length (24 inches) to mark and cut the hem curve.
And that’s it for the lining! Keeping it slightly shorter than the tulle adds a lovely layered effect to your finished skirt.
Step 3 – sew the side seam of the lining
Let’s start by sewing the side seam of your skirt lining. Place the fabric wrong sides together, then pin and sew along the side seam.
If you have a serger, you can finish the seam quickly by placing the fabric right sides together before sewing. However, I prefer using a French seam for a neat finish:
- After the first seam, trim down the seam allowance and press with an iron.
- Flip the fabric so it’s right sides together, press again, and sew along the seam to fully encase the raw edges.
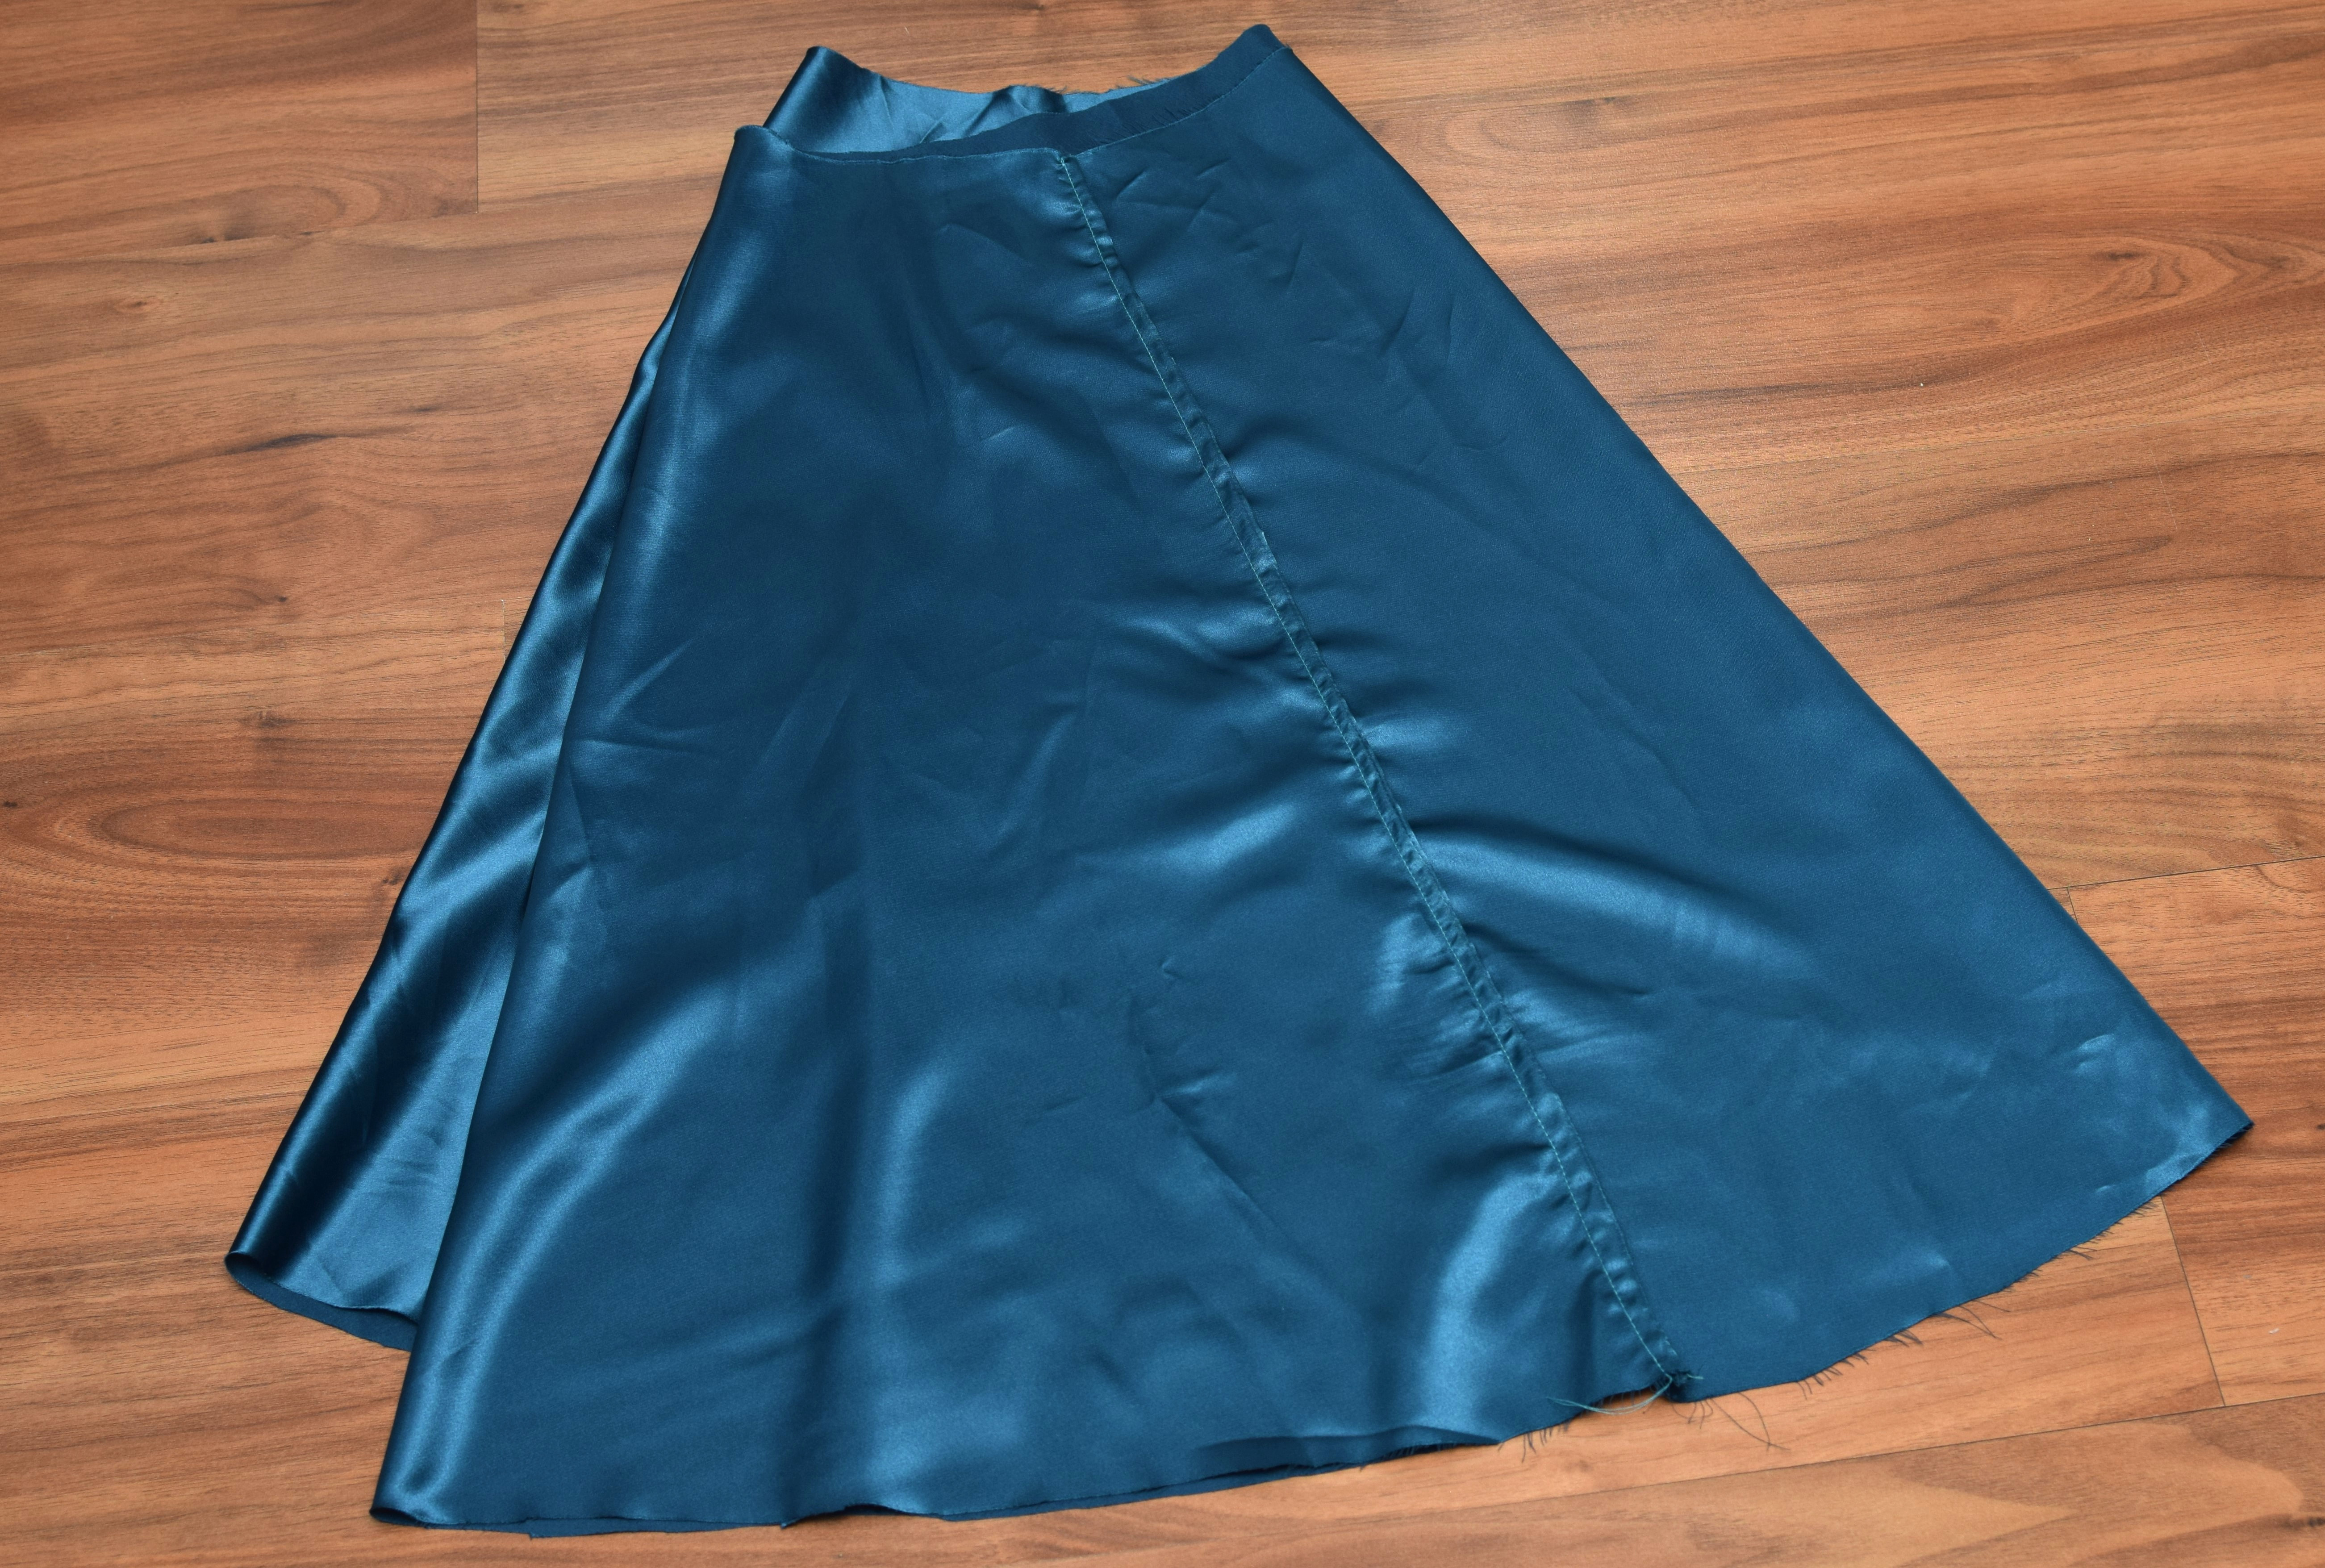
Now you’ve got a smooth, fray-free seam with no raw edges in sight!
Step 4 – sew the back seams for the top tulle tier
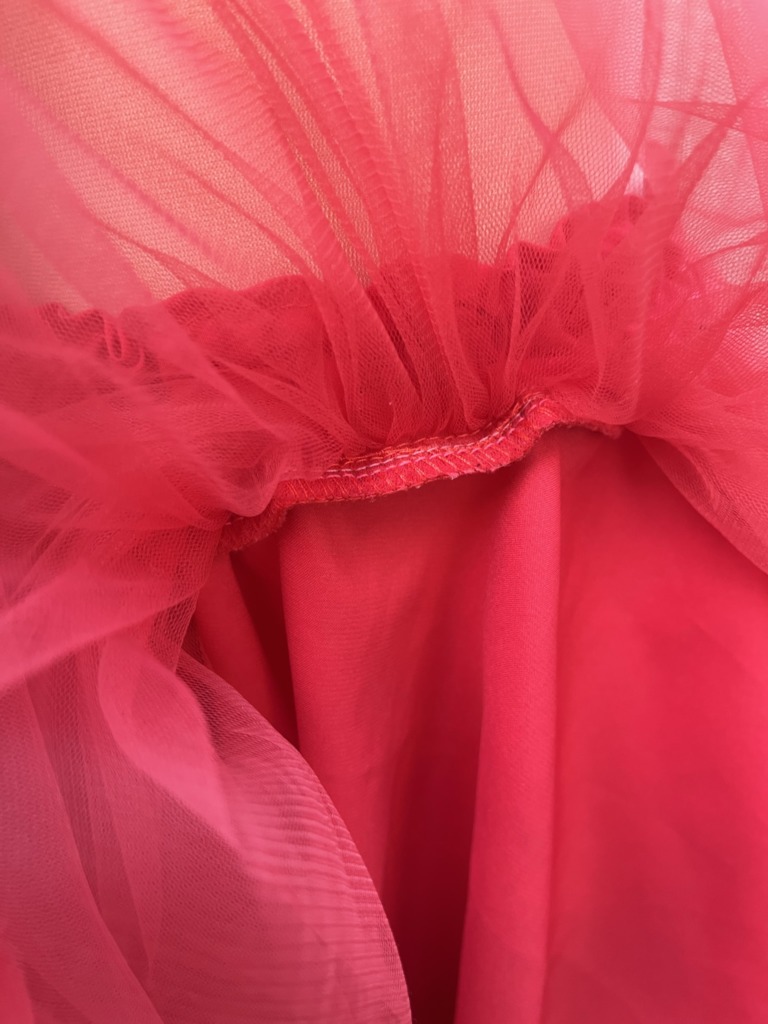
Now let’s work on the back seams of the top tier. Take one of the tulle layers that make up the top tier, and sew the short ends together to create a loop. Do the same with the second layer. Each loop should measure about 118 inches around (minus a little for the seam allowance).
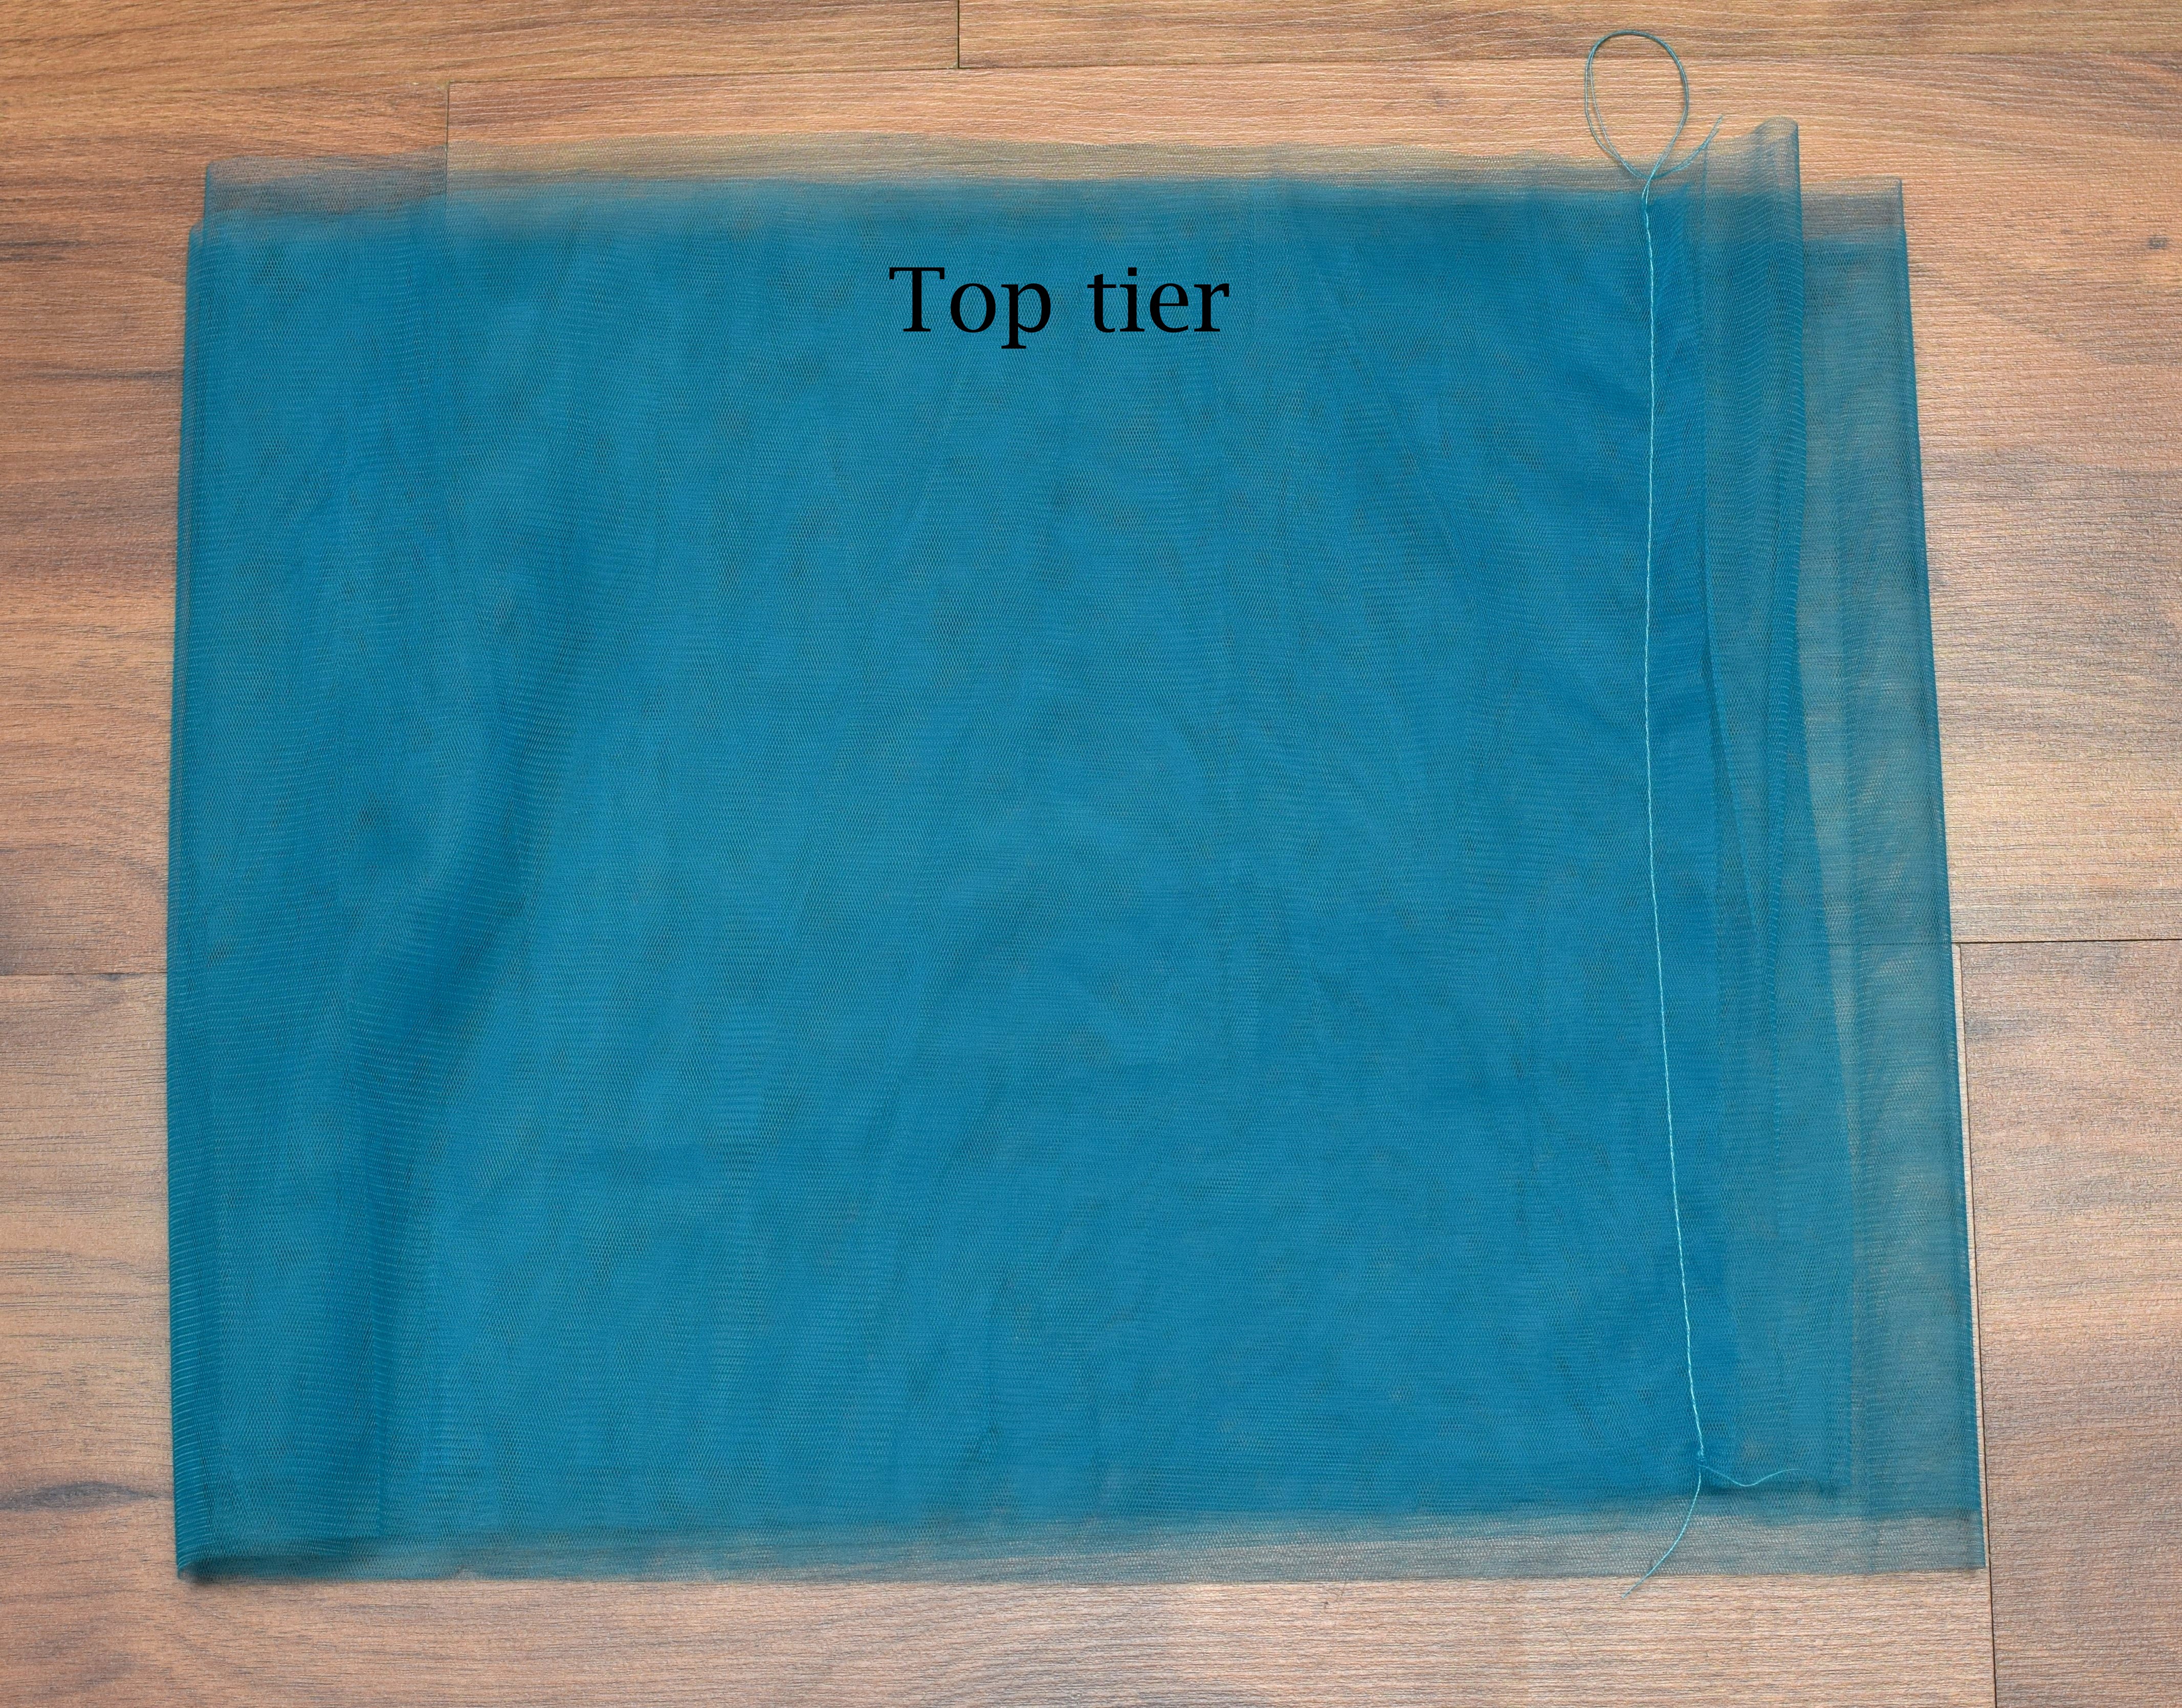
Tips for sewing tulle:
- Switch to a fresh ballpoint/jersey needle (size 70/10 works well) to avoid any snags.
- Use a short straight stitch and lower your machine’s speed for smooth, pucker-free seams.
Taking it slow with tulle makes a big difference in the final look – these loops will form the beautiful top layer of your tiered tulle skirt! More tips on how to sew tulle fabric on your regular sewing machine.
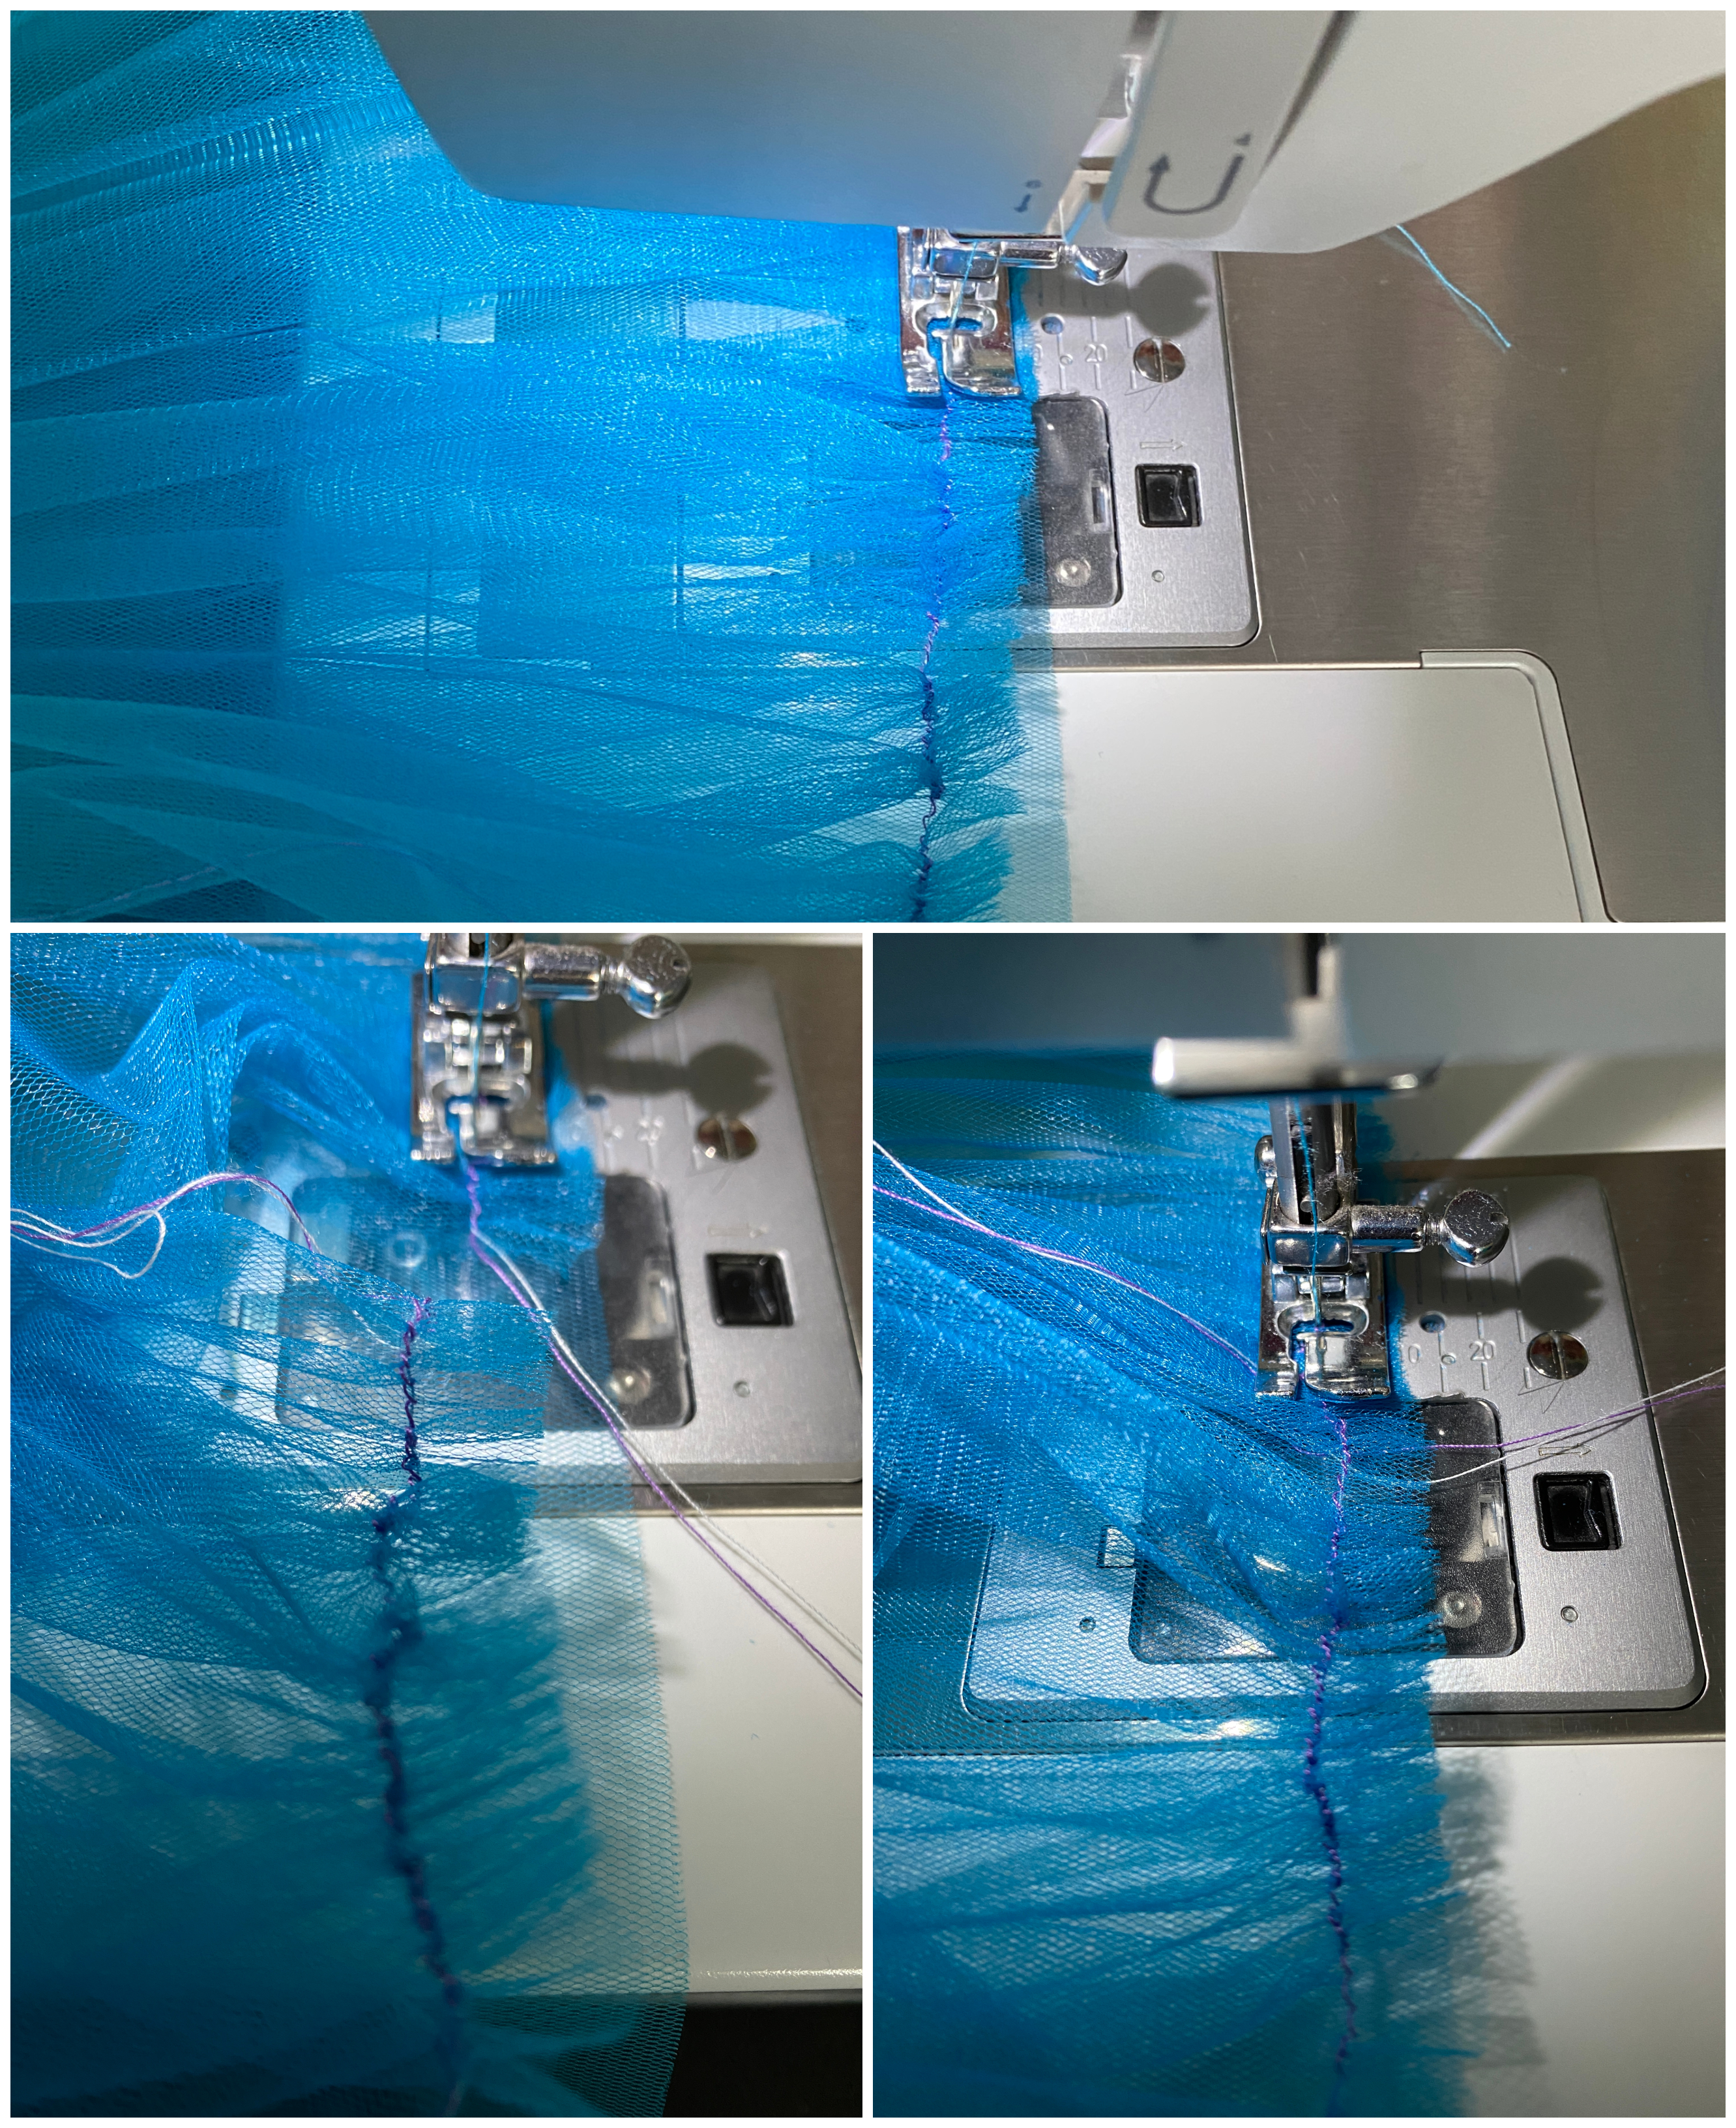
Step 5 – make the tulle ruffles for the bottom tier
Now it’s time to make those dreamy tulle ruffles for the bottom tier! Start by setting your stitch length to the longest setting and run a basting stitch along the top of each of the 8 tulle rectangles. Each rectangle is part of the bottom tier, and each should measure 118 inches long.
Pro tips:
- Leave long thread tails at the start and end of each row – don’t backstitch!
- Using a contrasting thread for basting makes it super easy to remove later.
Yes, this part can feel a bit tedious (after all, it’s 8 rows totaling about 944 inches or 24 meters of stitching!). But take it slow, and you’ll get it done. Even as a beginner, you can tackle this in about 30 minutes – and the results are absolutely worth it!
Creating the gathers:
- Grab one of the long threads from your basting stitch in one hand, and gently push the tulle fabric over with your other hand.
- Keep gathering until each rectangle is about 1/4 the length of the top tier. I recommend adding about 2 inches for overlap and a little extra for adjustments.
When you’re done, each tulle ruffle for the bottom tier should be gathered to around 31.5 inches (118 ÷ 4 + 2). Now you have a set of lovely, even tulle ruffles ready to go!
Step 6 – finish the tulle part of the skirt
Now, let’s put it all together by attaching those gathered ruffles to the top tiers. Each of your two tulle layers is made up of 1 rectangle for the top tier and 4 ruffled rectangles for the bottom tier, following the 4:1 ratio.
Attaching the ruffles
- Start by placing the first top-tier loop on your sewing machine with the right side out.
- Align the first ruffle along the top tier and attach it with a straight stitch, using a matching thread this time.
- Overlap each ruffle by about 1 inch as you attach them around the top tier. You’ll notice the threads from the previous ruffle are visible, and they should overlap slightly with the new ruffle’s threads.
Continue attaching all 4 ruffles until you’ve covered the entire circumference of the top-tier loop.
Tip for a smooth finish:
It’s always better to have a bit of extra length on your ruffles than to fall short. I recommend gathering each ruffle to about 1/4 of the top tier’s circumference, plus 2 inches. If you have a little extra ruffle at the end, just trim it off for a clean edge. This ensures you won’t run out of ruffles near the end, saving you from the hassle of cutting, gathering, and attaching an additional piece.
When you’ve completed the first tulle layer, repeat the same steps for the second layer using your remaining 5 tulle rectangles.

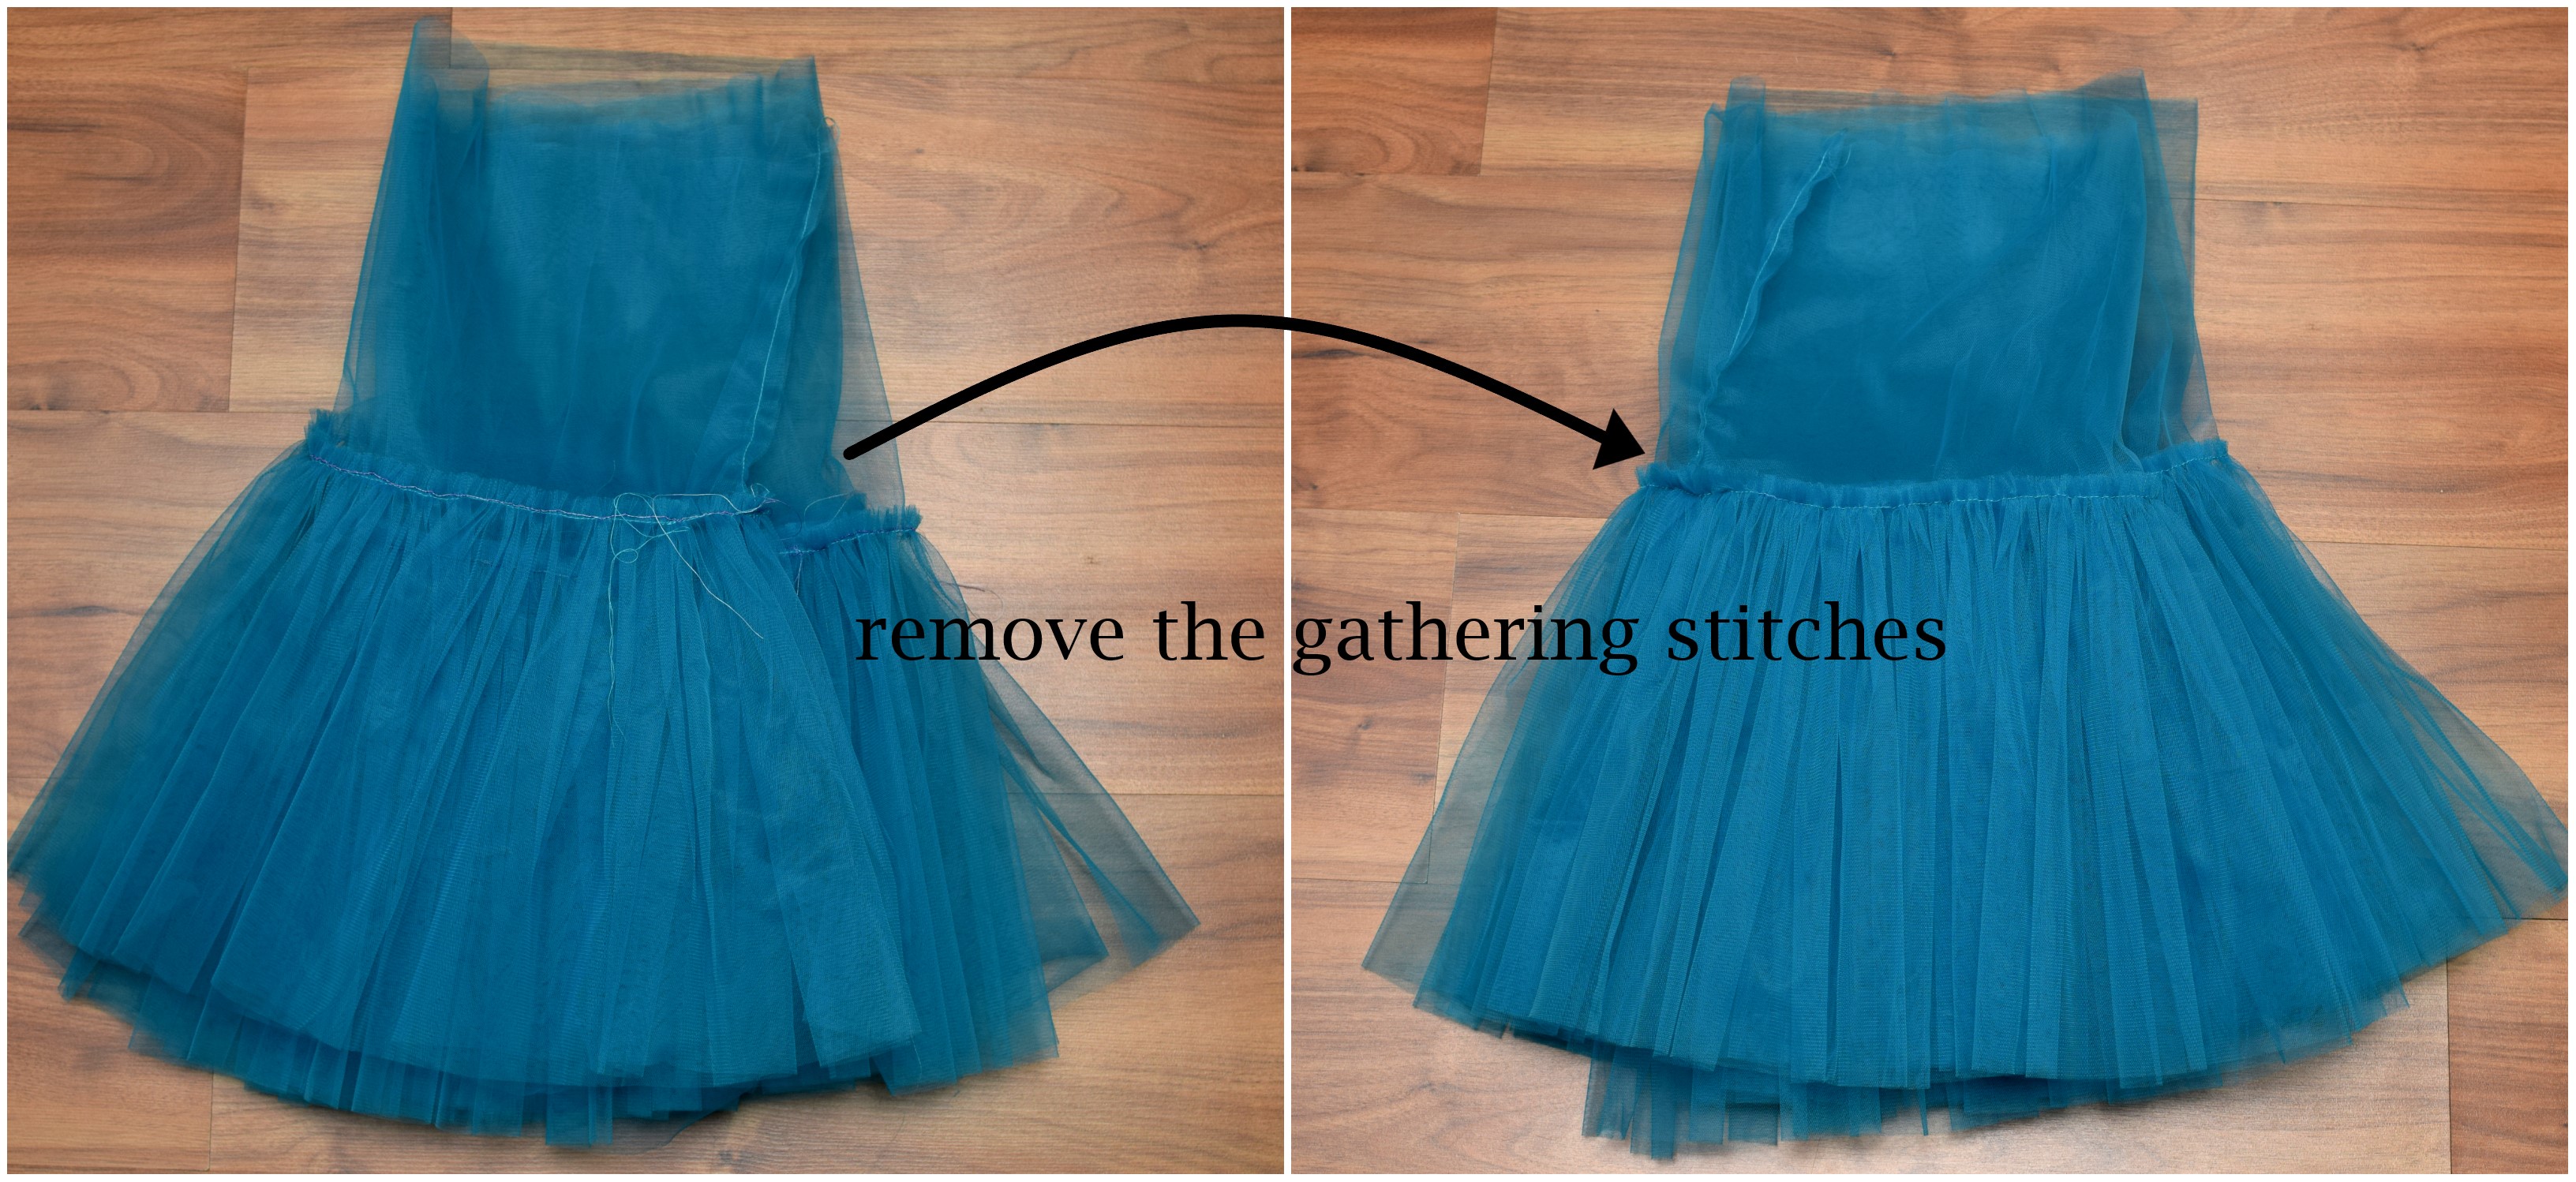
Removing the basting stitches
Now for a satisfying step – removing the basting stitches! Thanks to the contrasting thread you used, this part is quick and easy.
At this point, your skirt should be looking beautifully layered and full with both tulle tiers attached. The finish line is in sight!
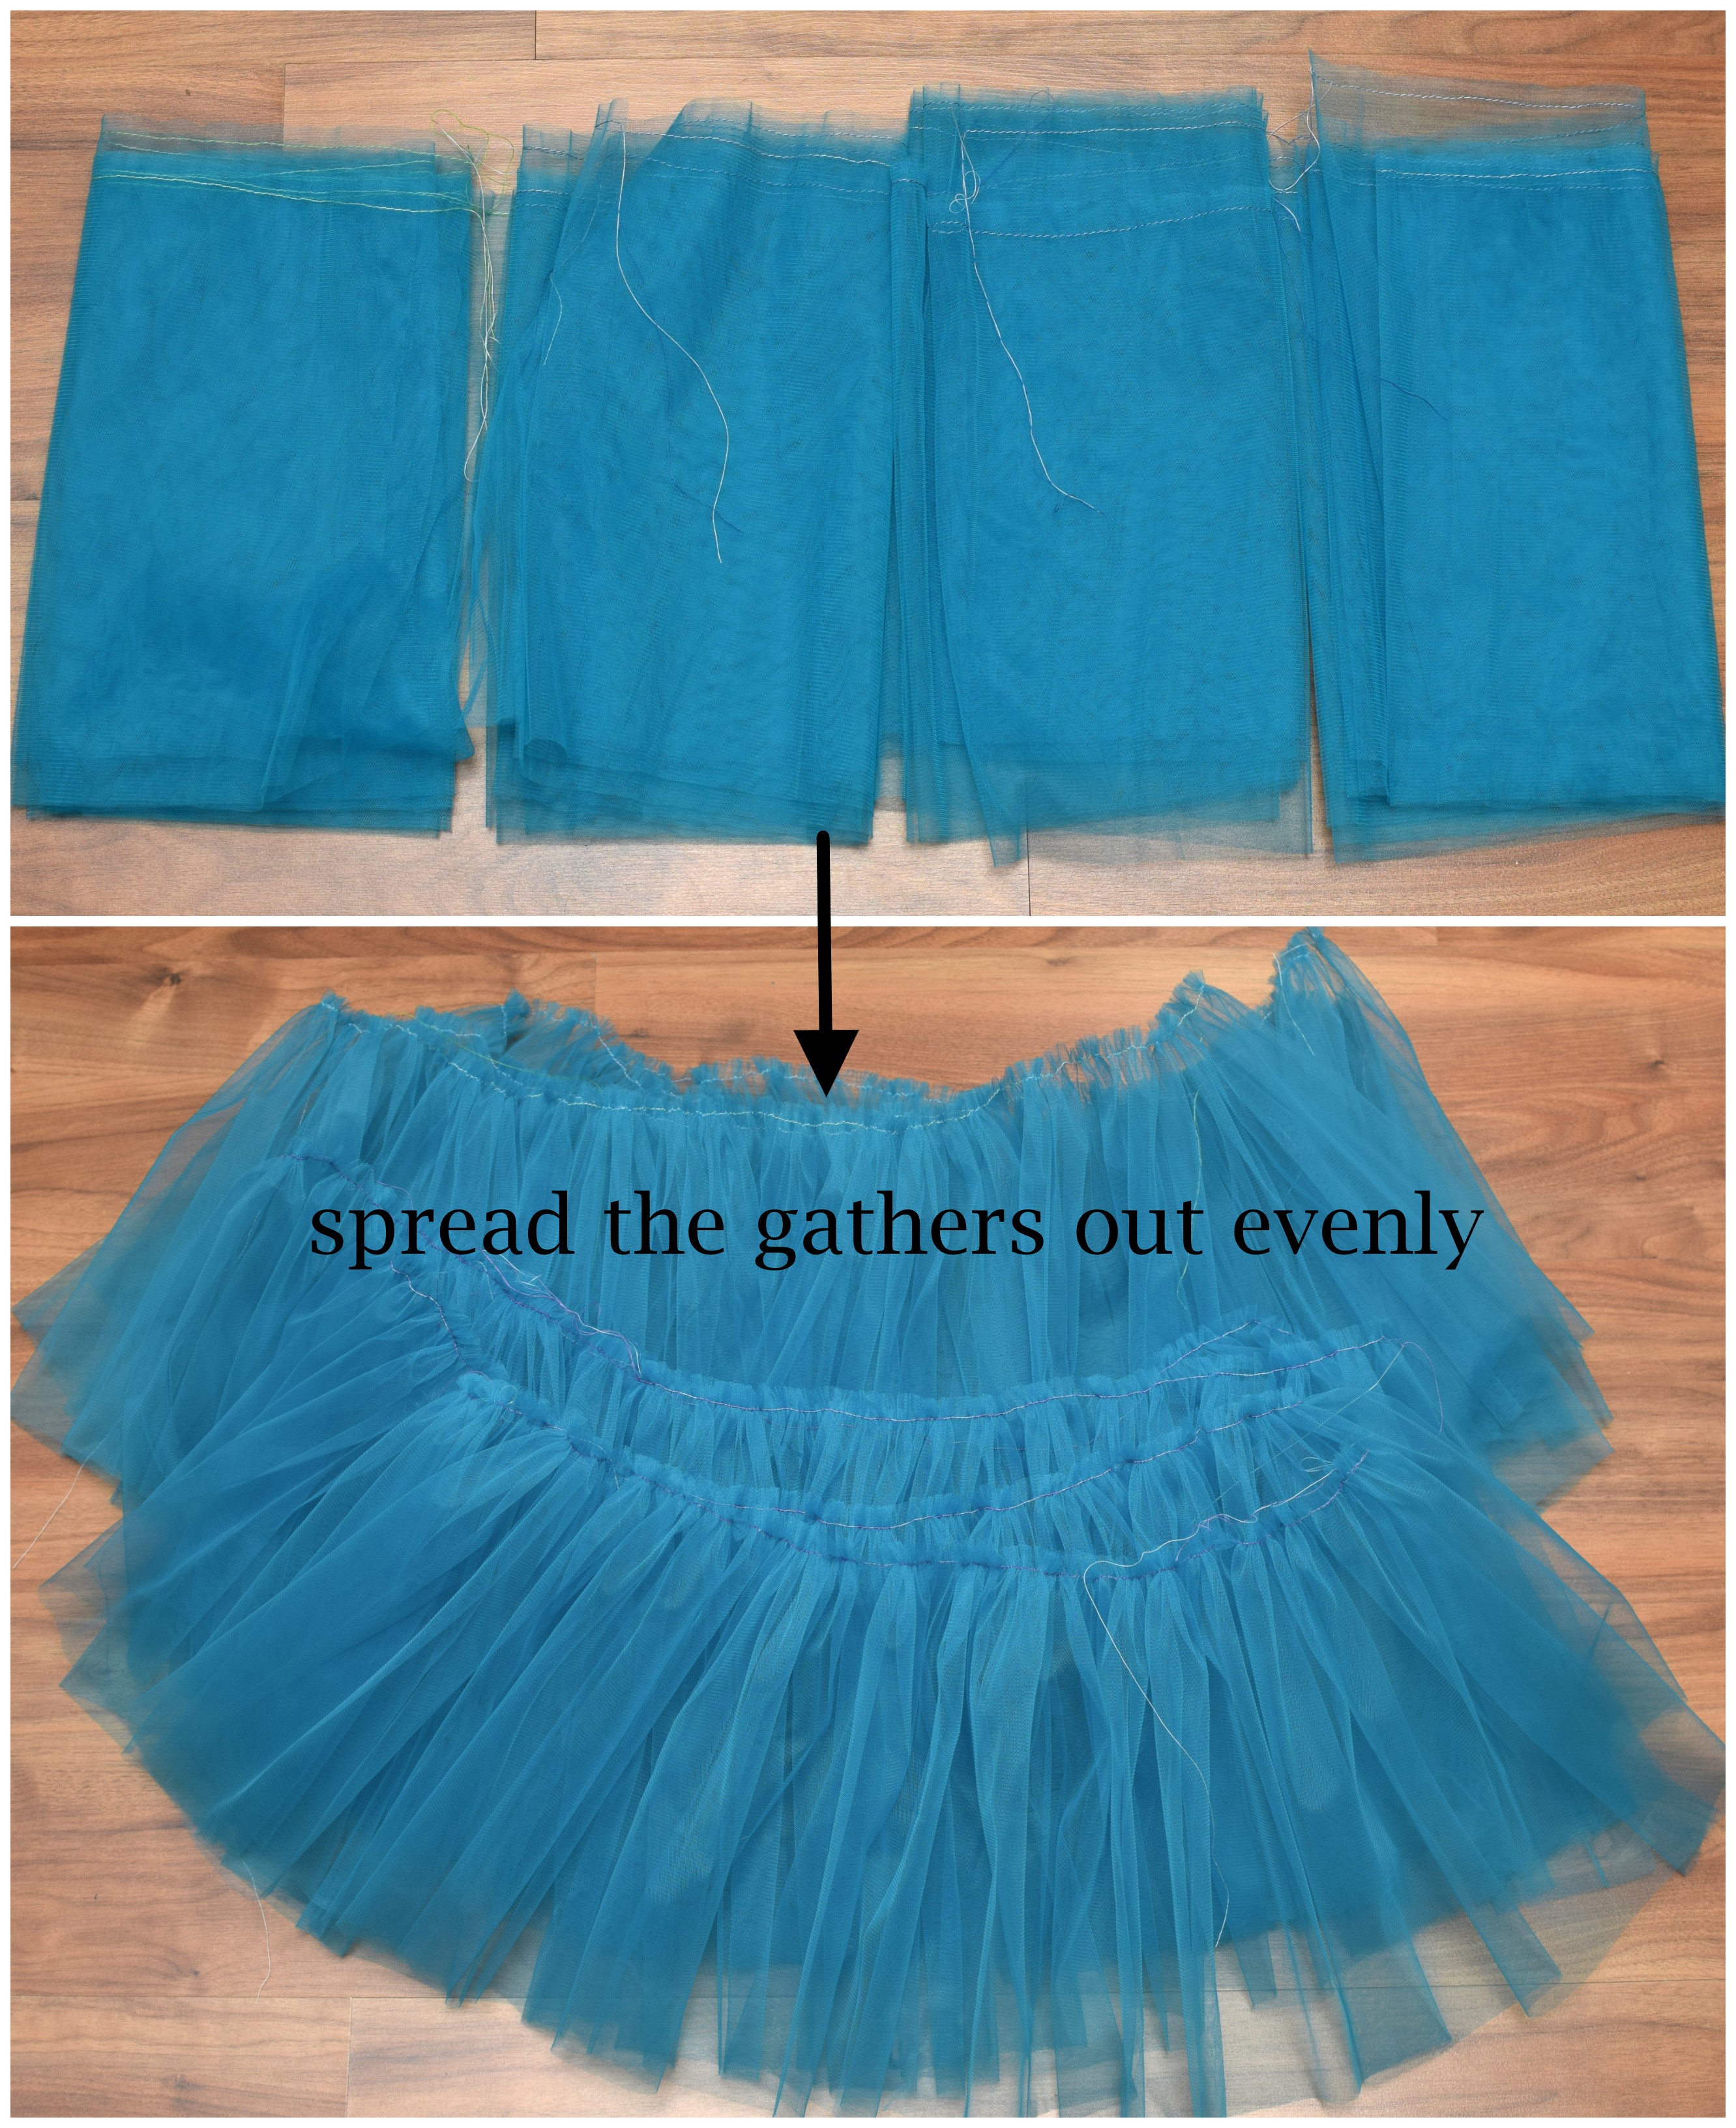
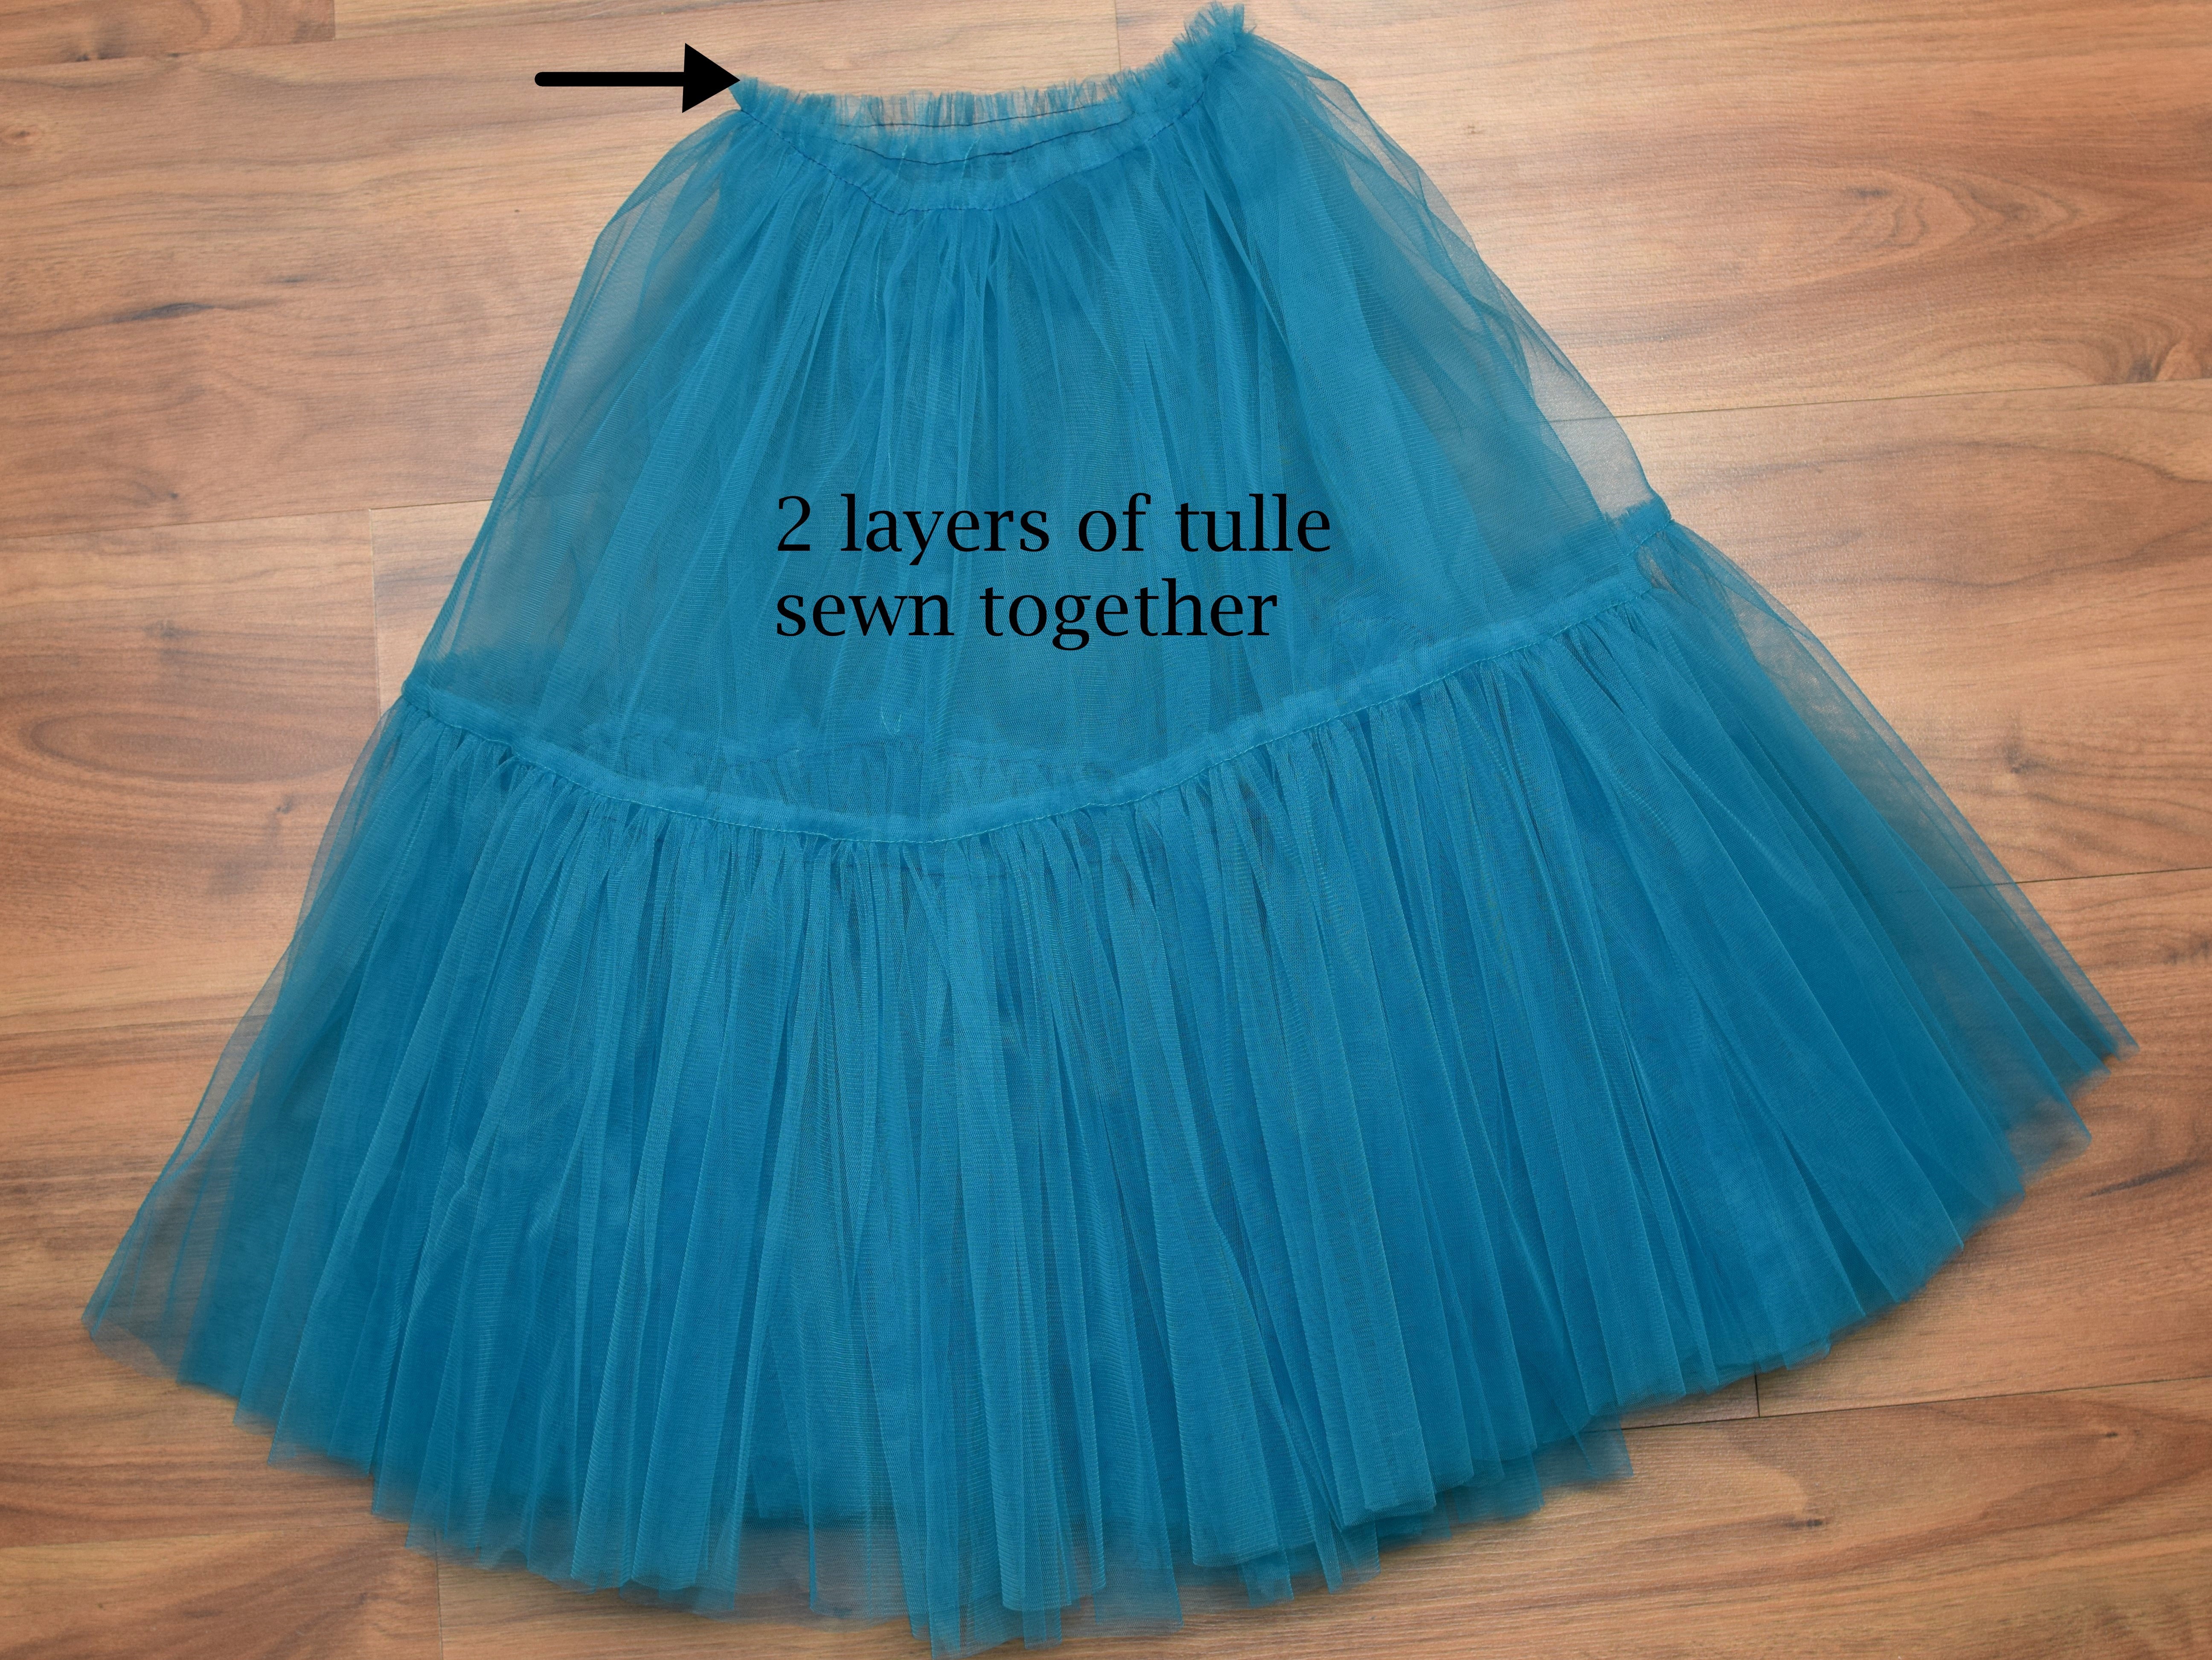
Step 7 – gather each tulle layer
To make your DIY tiered tulle skirt as fluffy as possible, gather each tulle layer individually. Run a basting stitch along the top edge of each layer, then gently gather them to fit the waistband casing.
Once both tulle layers are gathered, place them together and sew them along the top edge to join them. This way, they’ll sit nicely under the waistband without slipping or shifting around.
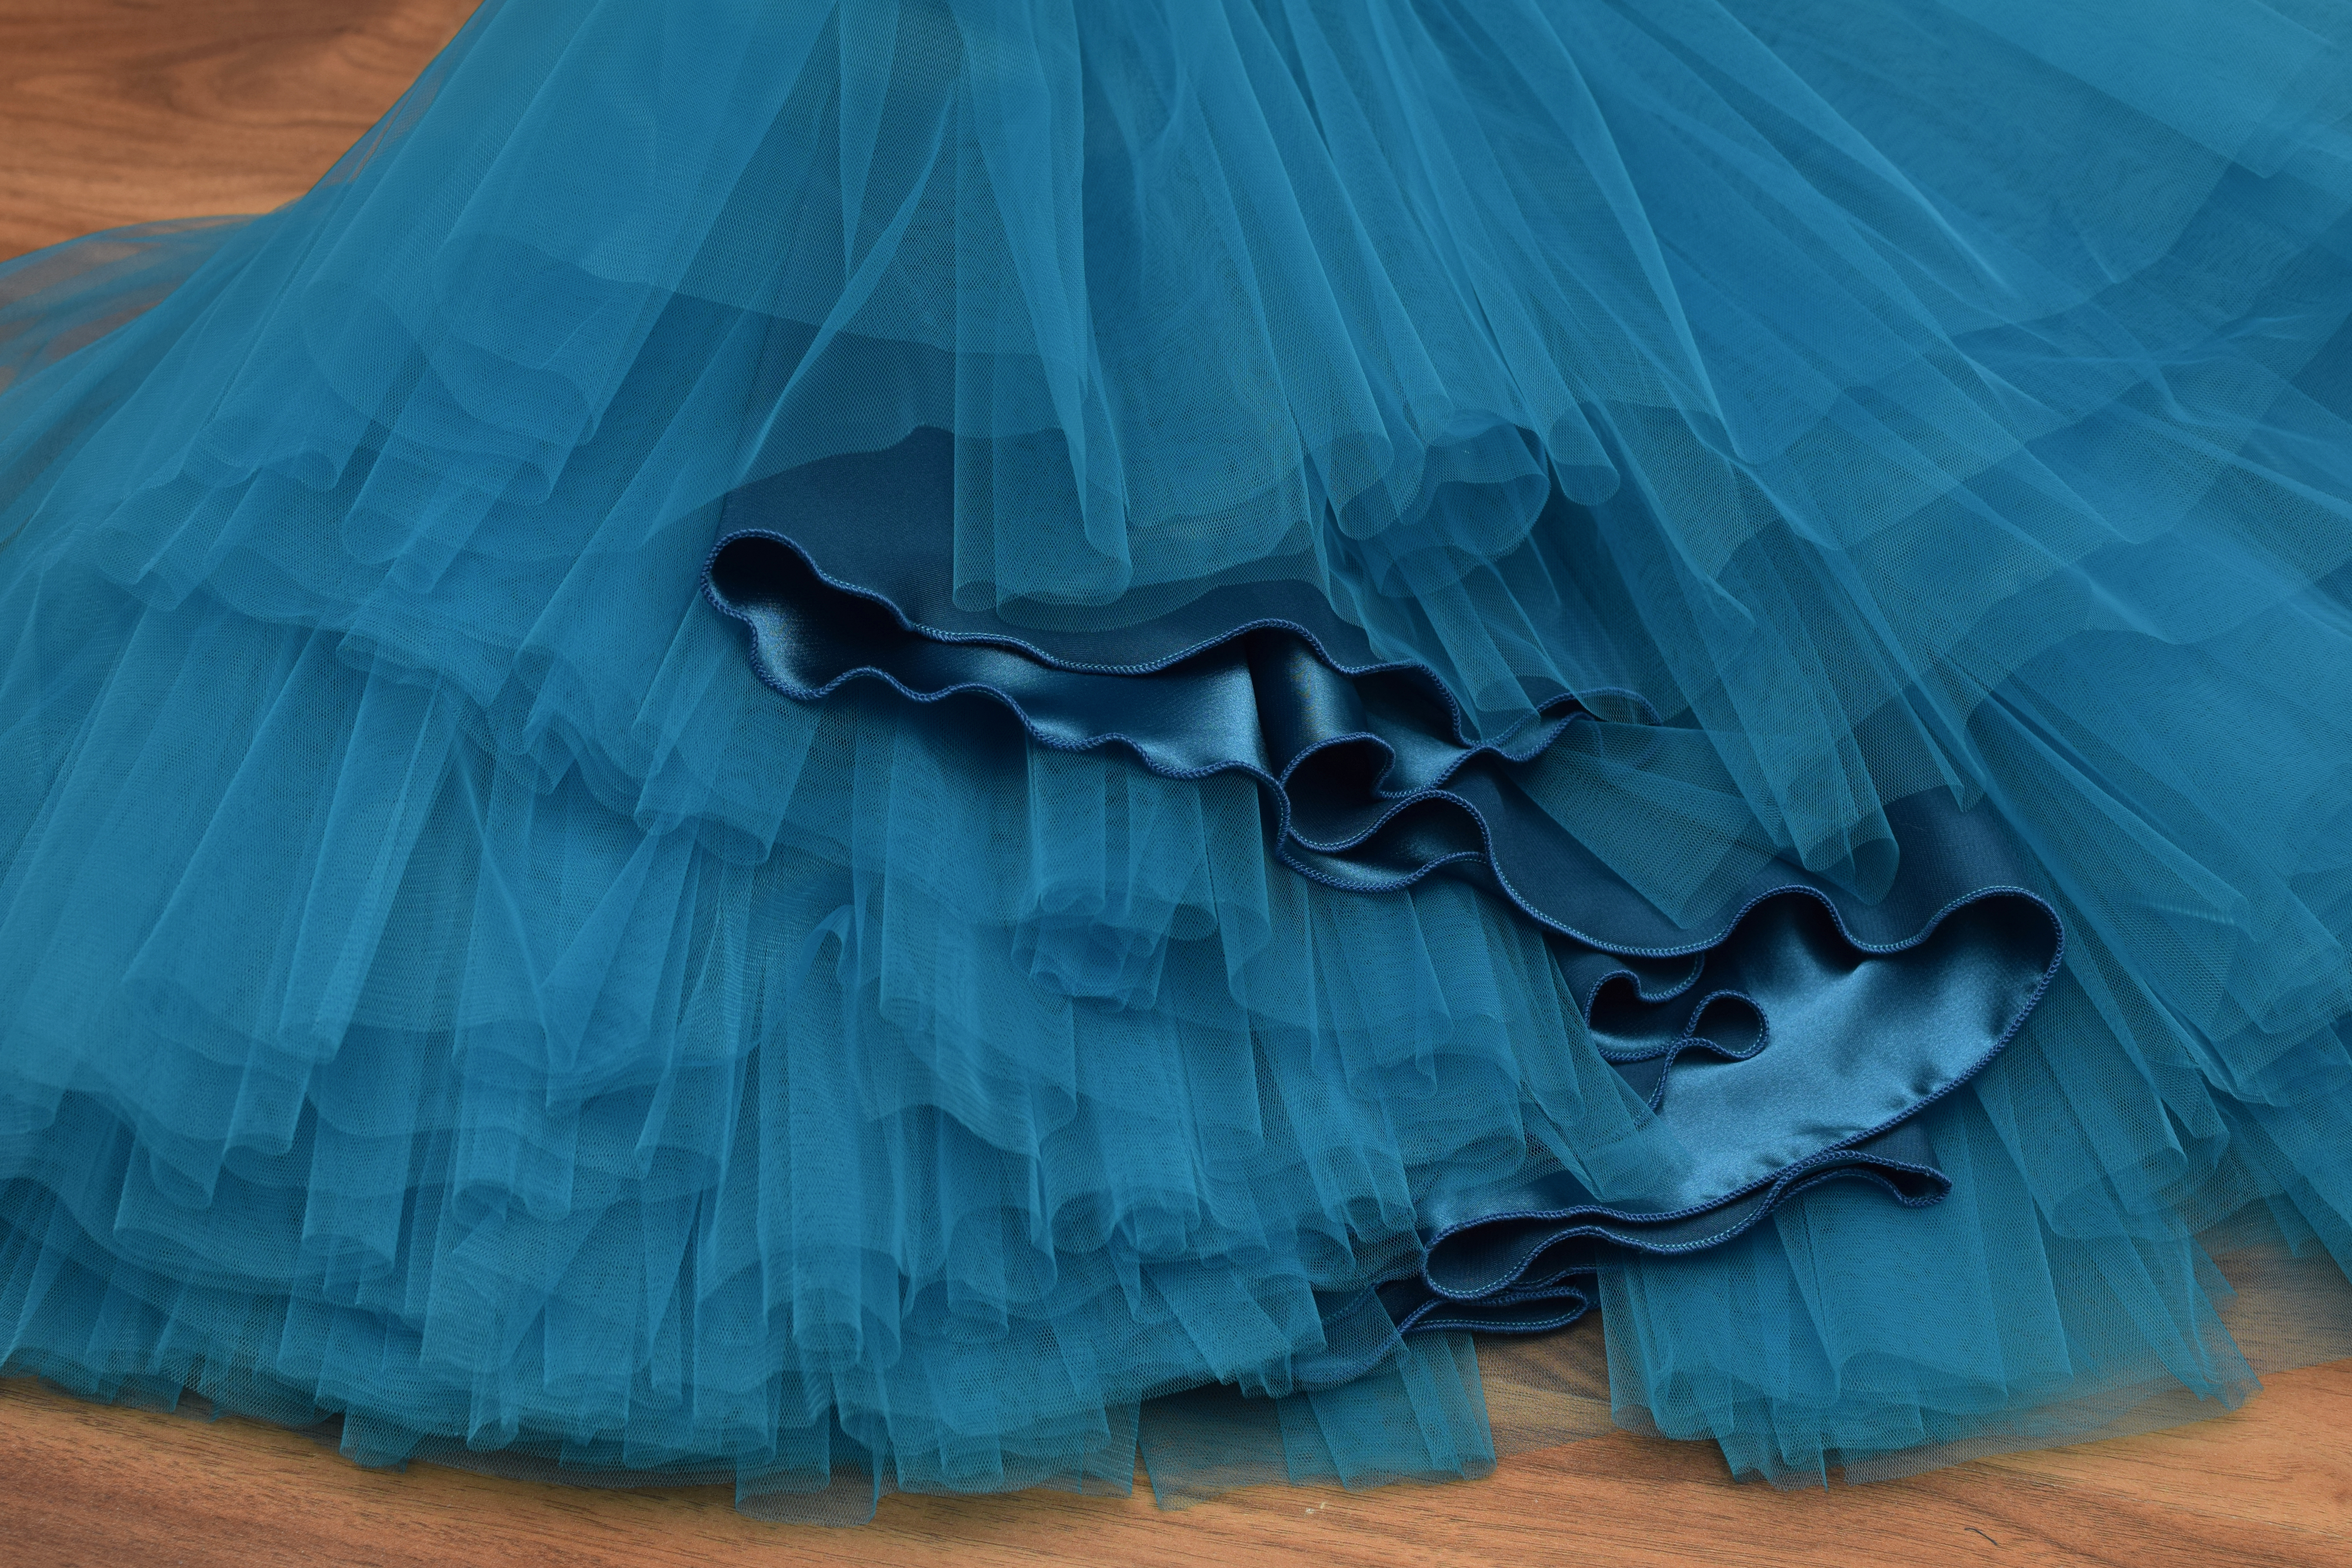
Step 8 – sew the waistband
Now, let’s create the waistband. Cut a strip of fabric about 40 inches long and 5 inches wide. This length will give you a finished opening of 39 inches (matching the lining from Step 2), plus 1 inch for seam allowance.
- Sew the short ends of the waistband together to form a loop.
- Fold the waistband in half, wrong sides together, aligning the long edges so the seam is hidden inside. Press it flat with an iron.
- Stitch around the folded edge, about 1 1/8 inches from the fold, to create the casing for the elastic. Leave a 2-inch opening to insert the elastic later.
Step 9 – attach the lining to the waistband
First, decide which side of your satin lining will be the “right” side. I chose the dull side because I prefer its look, but it’s all up to you!
- Place the lining inside the waistband with the wrong side out.
- Pin the lining to the waistband, lining up the top edges, and stitch along the existing seam line. Be sure to leave the 2-inch opening unstitched so you can insert the elastic later.

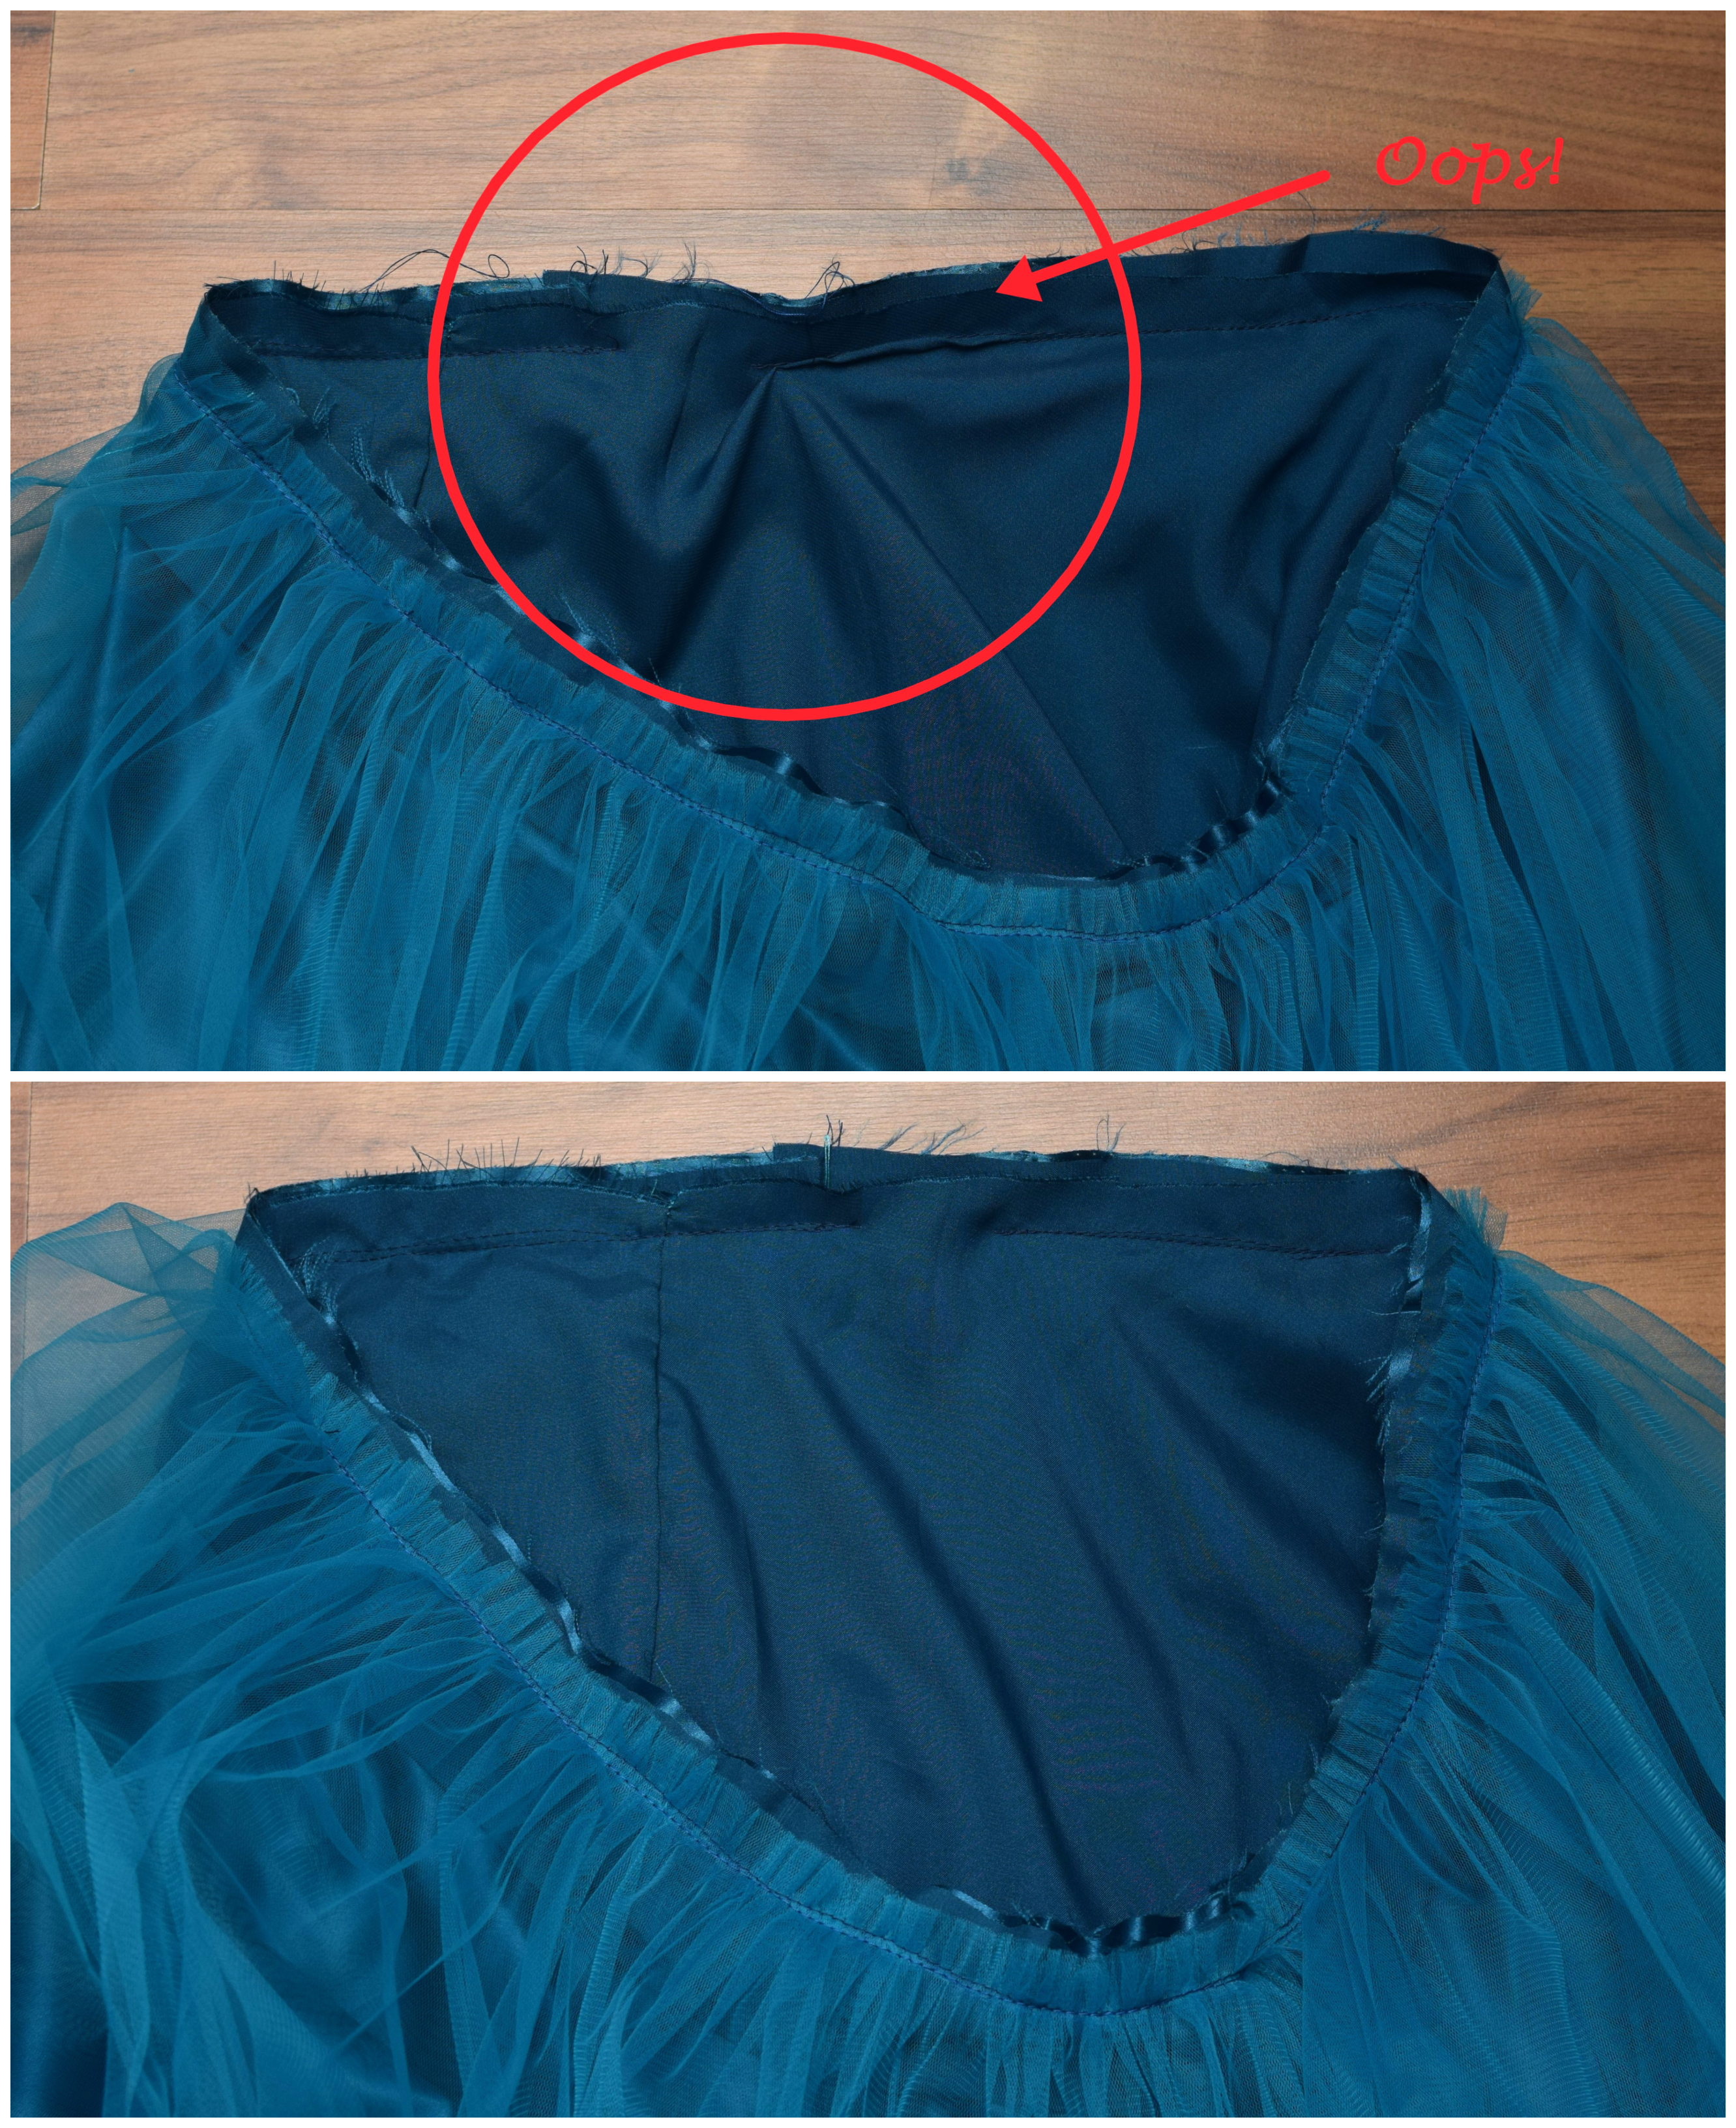
Note: It may feel odd, but at this stage, the raw edges should be visible on the right side of the lining. Align the back seam of the lining with the waistband seam for a neat finish (I sometimes forget this part – oops!).
Step 10 – attach the tulle layers to the waistband
Now, place the lining inside the gathered tulle skirt so that the waistband is “sandwiched” between the tulle and the lining.

- With the tulle skirt wrong side out, pin the right side of the tulle layers to the wrong side of the lining. Take your time here to make sure everything is aligned correctly – trust me, this step will save you from reaching for the seam ripper later!
- Sew along the existing waistband seam line to attach the tulle layers to the waistband. Be careful not to catch the lining in your stitching. It’s an easy mistake, especially if you’re feeling tired or in a rush.
I make this mistake more often than I’d like to admit. Ever seen that meme that says, “I never make the same sewing mistake twice. I make it a bunch of times, just to be sure”? Yup, that’s me!
Step 11 – insert the elastic
Now it’s time to add the elastic to your waistband. Separate the tulle layers from the lining, and use a safety pin to guide the elastic through the 2-inch opening in the waistband.
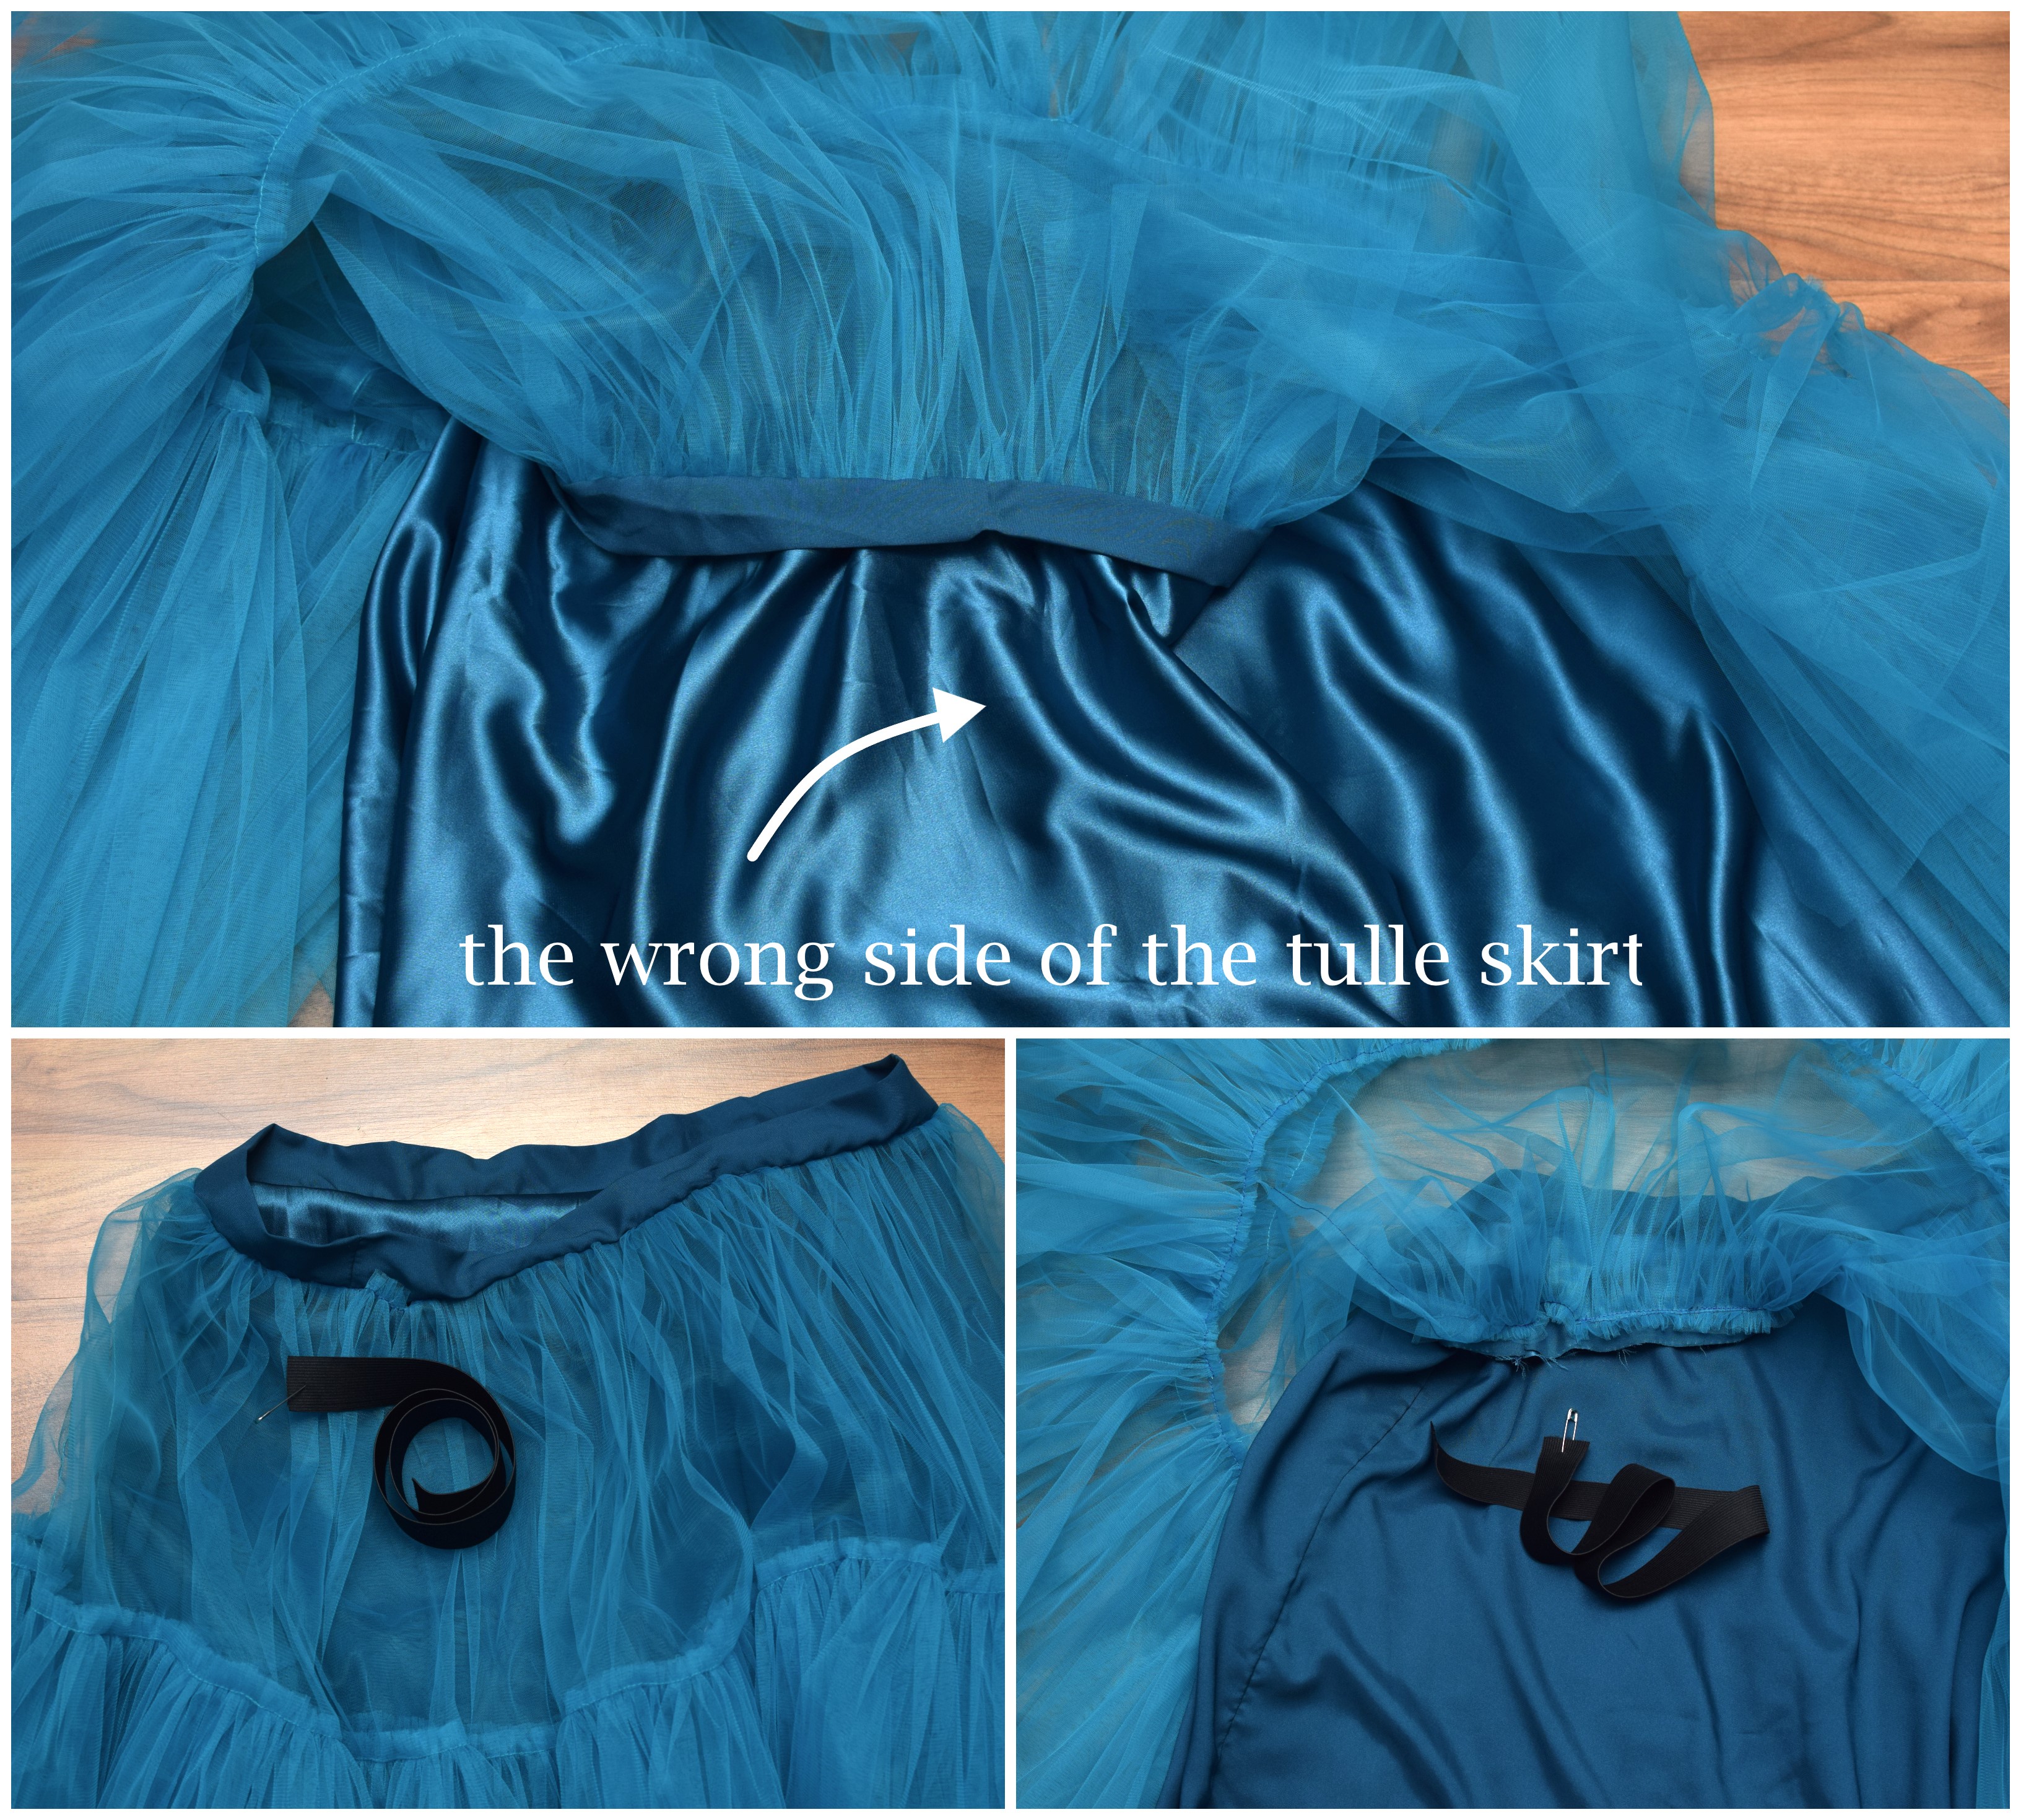
Pro tip: Double-check that the elastic isn’t twisted inside the casing! Once it’s threaded all the way through, overlap the ends of the elastic and sew them together securely.
Step 12 – finish the waist seam
With the elastic in place, close the small opening in the waistband with a simple straight stitch.
Now, let’s finish the waist seam. You have a couple of options:
- Serger: If you have a serger, you can finish the seam with a clean, professional edge. Just keep in mind that you’ll need four matching thread colors for the best look at the waist.
- Pinking shears: For a quicker finish, pinking shears work great and keep the fabric from fraying.
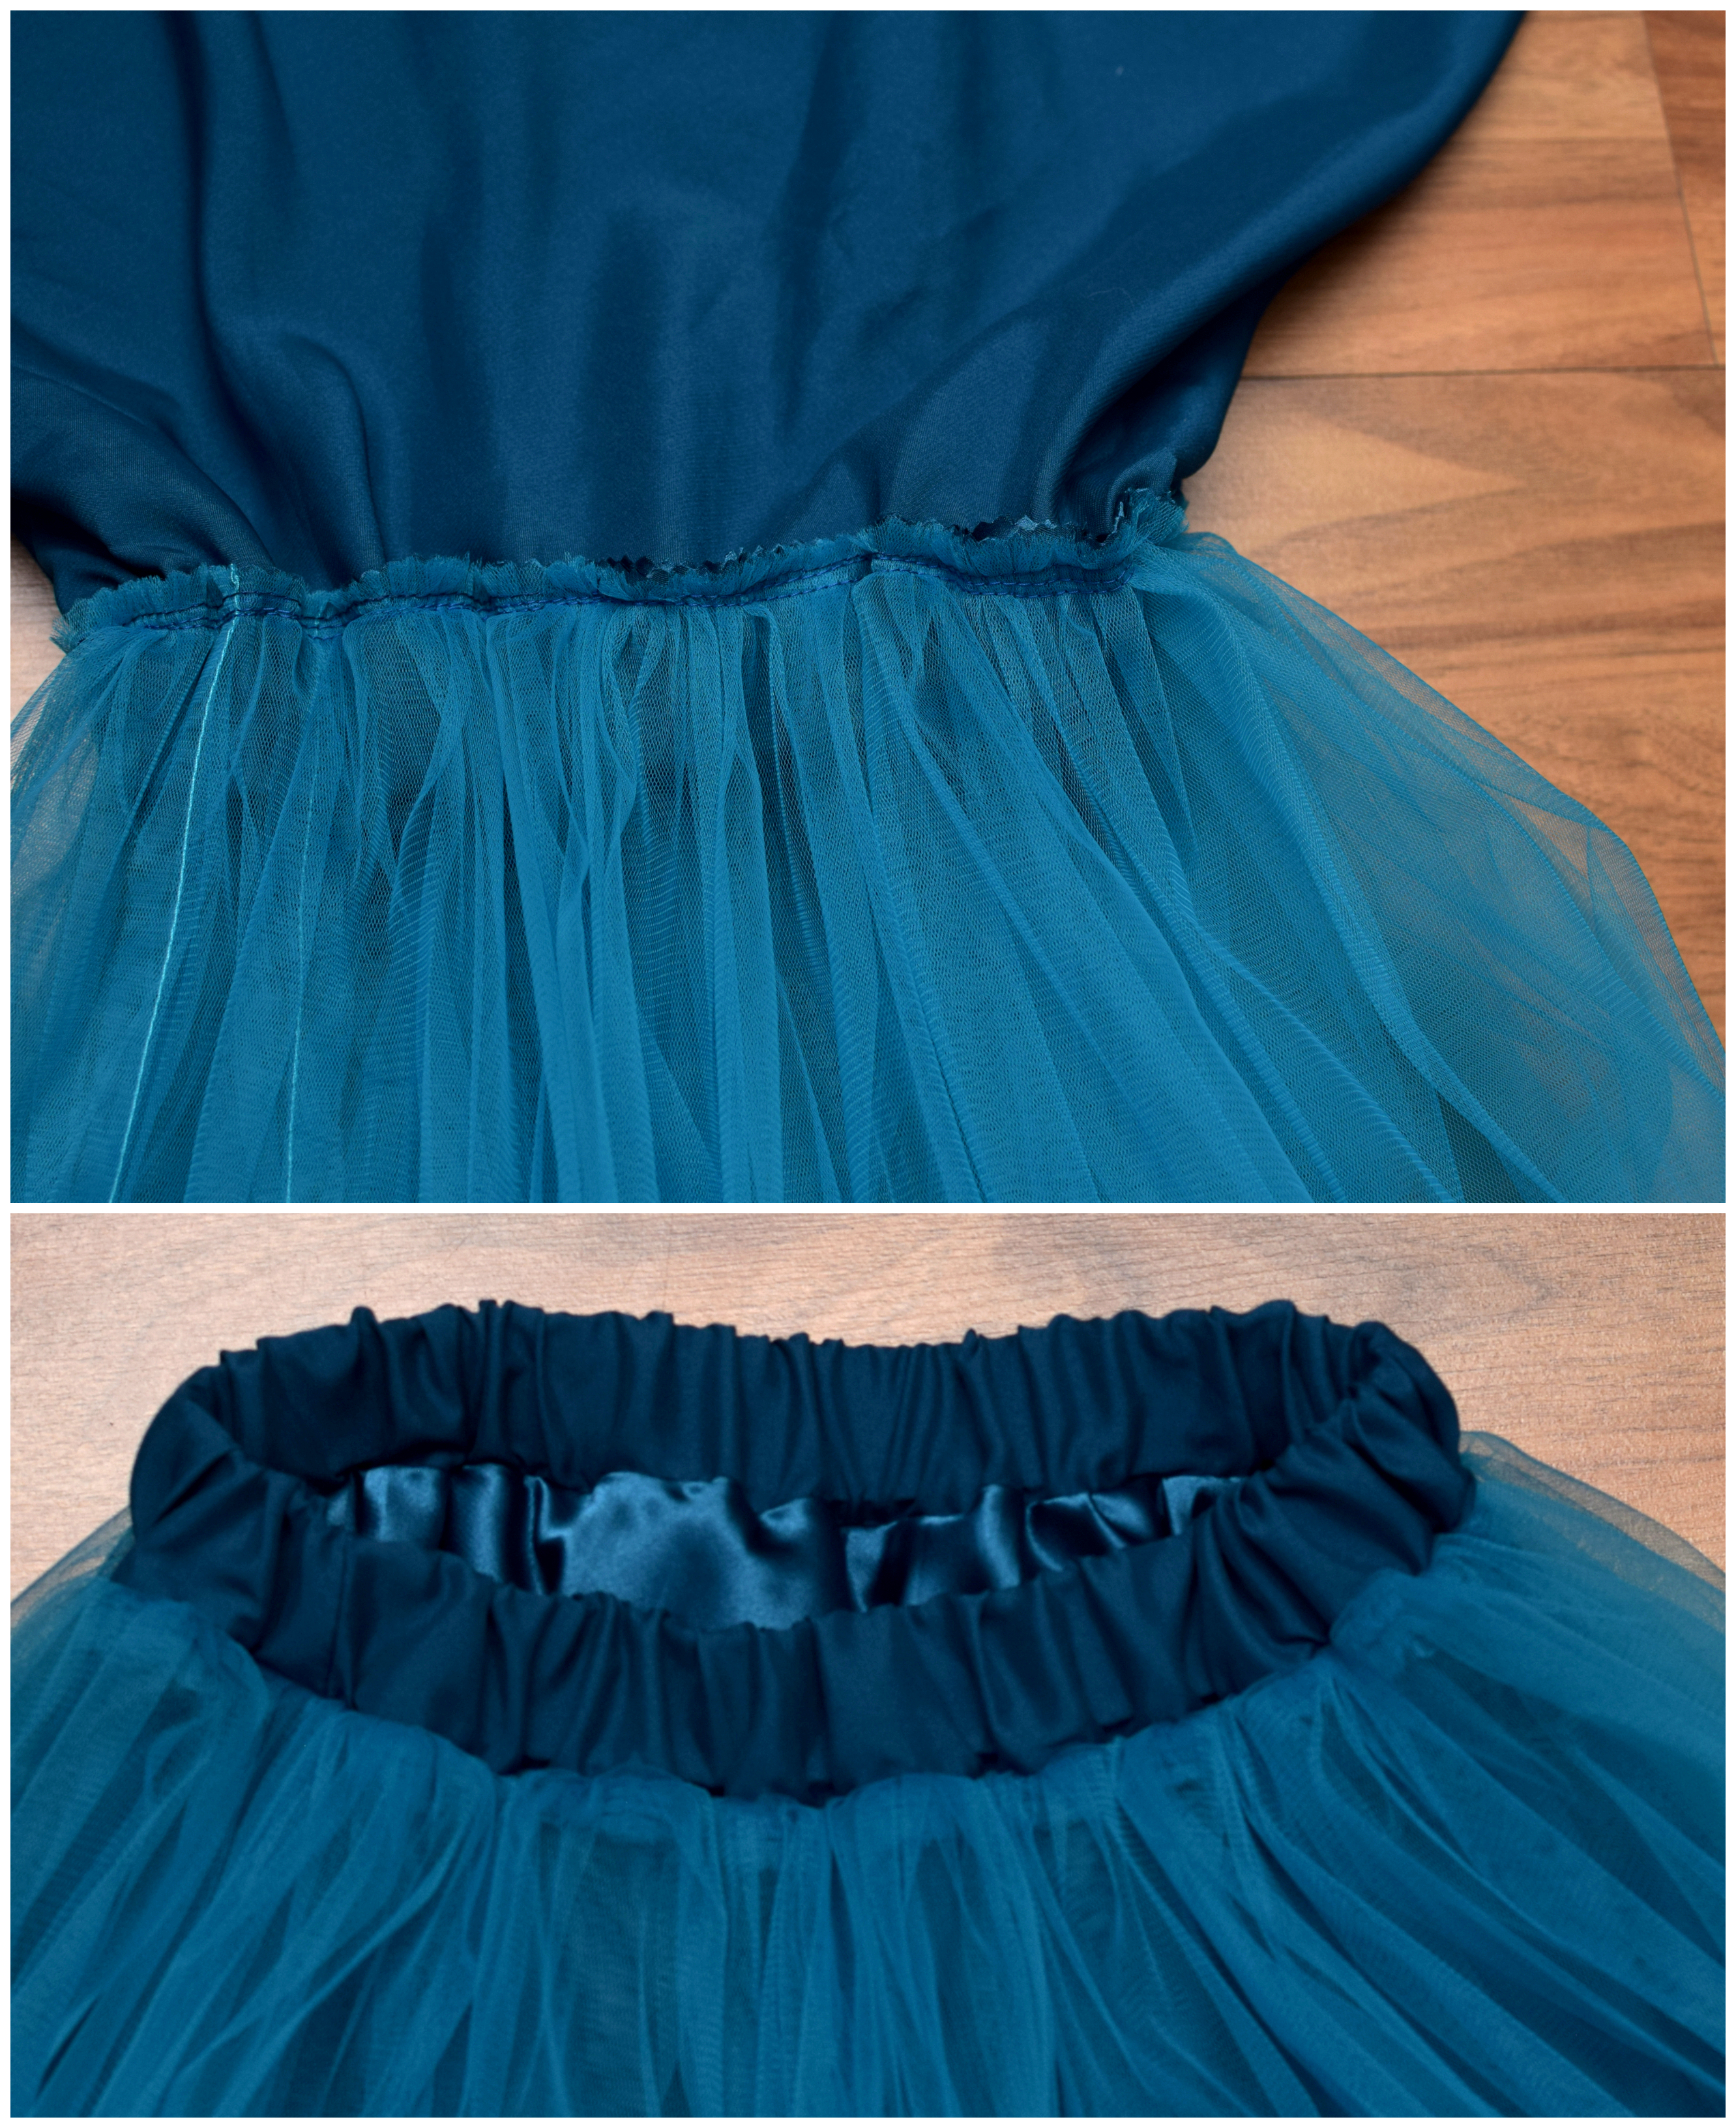
Personally, I took the easy route with this DIY blue tulle skirt and used pinking shears. A few years back, when I made a pink tiered tulle skirt for my daughter, I went the extra mile and switched all four serger threads to match.
That skirt has held up beautifully over the years, but sometimes shortcuts are just as effective!
Step 13 – hem the lining
We’re almost done! Turn your skirt right side out so the lining is on the inside, with all those fluffy tulle layers in place.

All that’s left is to hem the lining. Use a pair of sharp scissors to carefully trim any excess fabric from the bottom of the lining – just be careful not to cut the tulle by accident!
To finish the lining’s raw edge, I used a narrow rolled hem on my serger, which gives it a clean and durable finish. And with that, you’re done!
Did you enjoy this DIY tiered tulle skirt tutorial?
I hope you found this guide helpful! Let me know what you think, and I’d LOVE to see photos if you try this skirt yourself. Tag me @icansewthis or share your pictures – I can’t wait to see your creations!
Let’s keep in touch! You can find me on Facebook, Instagram, and Pinterest.

If I wanted to make this skirt but with cotton versus tulle, would I follow the same steps?
Hi Larissa,
I’m afraid you can’t follow the same instructions. For this tiered tulle skirt, the ratio is 1:4, but if you were to use cotton, a good ratio would be 1:2, maybe 1:3 if you use a very lightweight cotton fabric. Another difference is that you’d need to hem the skirt. Also, if you were to use 3 layers as with this tulle skirt, it would look much fuller.
Hello! My biggest problem is spacing the gathers equally. Is there an easy to do that? Thanks!
This is SO cute! Thank you for taking the time to put this together.
I want to make sure I’ve got this correct… For the top tier, you sew the rectangle into a tube, but you don’t sew the bottom tier/ruffle into a 4x tube, you just attach it leave a bit of overlap? Is that correct?
Thank you!
Thank you, Ellie! Yes, you got that right. There’s no need to sew the bottom tier into a tube, overlapping the ruffles is enough.
Hi from Connecticut. This was a very well done tutorial, as compared to many that I’ve read. I also understand how difficult it can be to figure out whether you are over explaining, making it too long, or under explaining it, leaving too many questions. I’d say I’m a mid level sewer, having sewed for pleasure for 50+ years, and found your instructions pretty easy to follow. I’m actually just looking around to see if it’s possible for me to make my daughter’s wedding dress, once she figures out a style and all. Again, thank you for sharing your expertise.
Janet
Janet,
You left me the sweetest comment! Thank you so much for the kind words!
hello, thank you so much for sharing, I had look before for this kind of skirt tutorial but could not find any on social media …till now. I hope you can reach more people, because this is very helpfull.
LOTS OF LOVE AND GRATITUDED FROM MEXICO
Hi Paulina, I’m so glad you like it. Thank you! I hope you will make many beautiful tiered skirts.
Sending you my best wishes all the way to Mexico!
I can’t believe there aren’t any comments!
This is such a great post. It’s really helpful to see all the photos rather than try to follow a video (thought a video would be a nice addition)!
I know how much work goes into a post like this, so please take my comments with a grain of salt…
I do think a few more photos would be nice because it took me several re-readings to figure out what you were saying and I’m not positive I’ve got it right. Re-reading is often illuminating with sewing patterns, so I’m just sending my thoughts along in case they help someone else.
After I read your instructions a few times, I thought I discovered that we’re making two separate tulle skirts with two layers of tulle at the top and four layers at the bottom. Is that right?
I got that idea from this sentence:
“This will be the first tulle layer of the skirt. Now repeat the steps for the second tulle layer.”
I think step 6 might be a little easier to follow if it was broken into 3 or 4 different steps.
Are you saying that we sew both ruffles right on top of one another? I was worried they were supposed to be staggered by 1″ because of this sentence (“The next ruffle will overlap the first ruffle about 1″. Continue around the circumference of the upper tier until you attach all 4 ruffles. Cut off any excess ruffle.”).
Finally, do we not attach all 4 at once because they’re hard to get through the machine that way?
Thanks again for the post. Wish me luck!
Hi Eve,
I do wish you luck :)) and thank you so much for your detailed and kind comment, it’s very helpful. I just love getting feedback!
The post doesn’t have comments because I haven’t shared it a lot on social media. I’m not satisfied with the photos (I think this is my biggest problem and frustration at the moment) and I want to re-take them all, hopefully soon.
English is not my native language, so I’m certain my tutorials could sometimes use a little bit more clarity.
– You do have to make two separate tulle skirts (the finished skirt has 2 layers of tulle) BUT each layer will have one piece of tulle at the top (118” wide) and four pieces at the bottom (4 x 118”).
I now realize that my phrasing is rather ambiguous: “You will need 2 such rectangles of tulle fabric for the top tier, and 8 rectangles for the bottom tier.” I will edit the article immediately.
– Step 6 might seem complicated, but it’s just repetitive work. All you have to do is attach the 4 ruffled rectangles to the piece of tulle at the top. All at once, it’s simple and easy, no difficulties here. Just a bit boring, haha.
Each ruffled rectangle is about 1/4 of the length of the upper piece, plus approx. 2″ to allow for the 1″ overlapping and make room for error as well. I made a lot of tiered skirts in the past and sometimes I would run out of ruffles before reaching the starting point, and it’s quite annoying. That’s why I prefer to make my ruffles a bit longer – it’s better to trim the excess ruffle a little bit than to cut another tulle piece, gather, then finally attach it to cover that small gap.
This is what you should get after completing Step 6 – This is the first tulle layer. https://static.icansewthis.com/2021/12/tiered-tulle-skirt-tutorial-2-768×352.jpg
The ruffles should cover the entire circumference of the upper piece. Then you have to work on the second tulle layer. And then gather each layer separately, then sew them together like this https://static.icansewthis.com/2022/01/tulle-skirt-layers-2-768×576.jpg
Now off I go, to re-read the tutorial and make necessary changes.