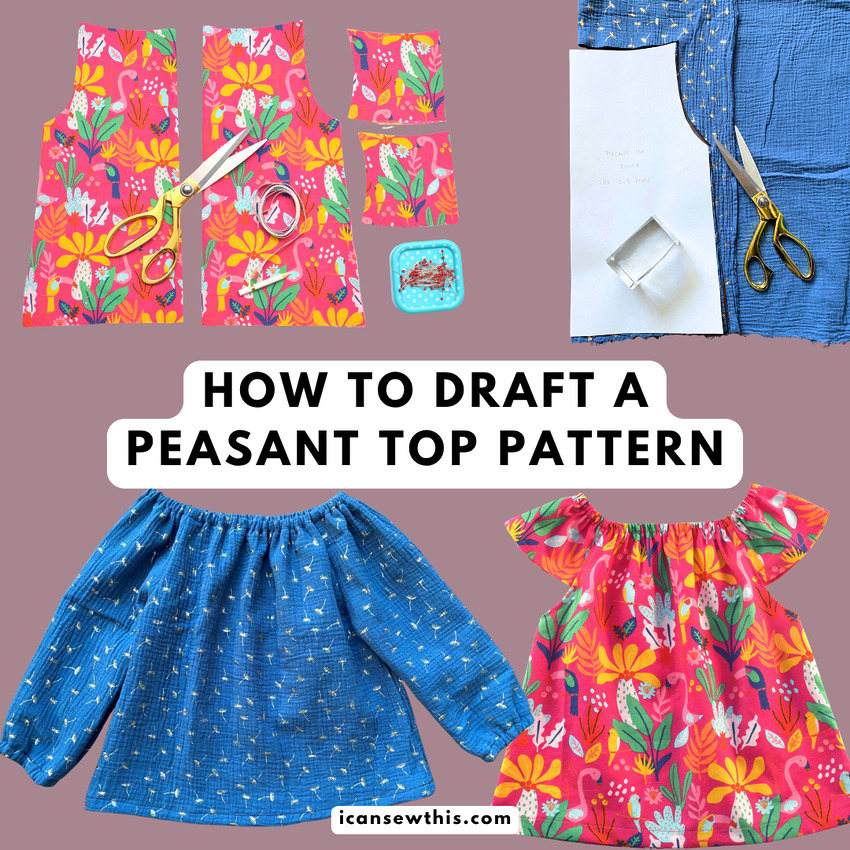
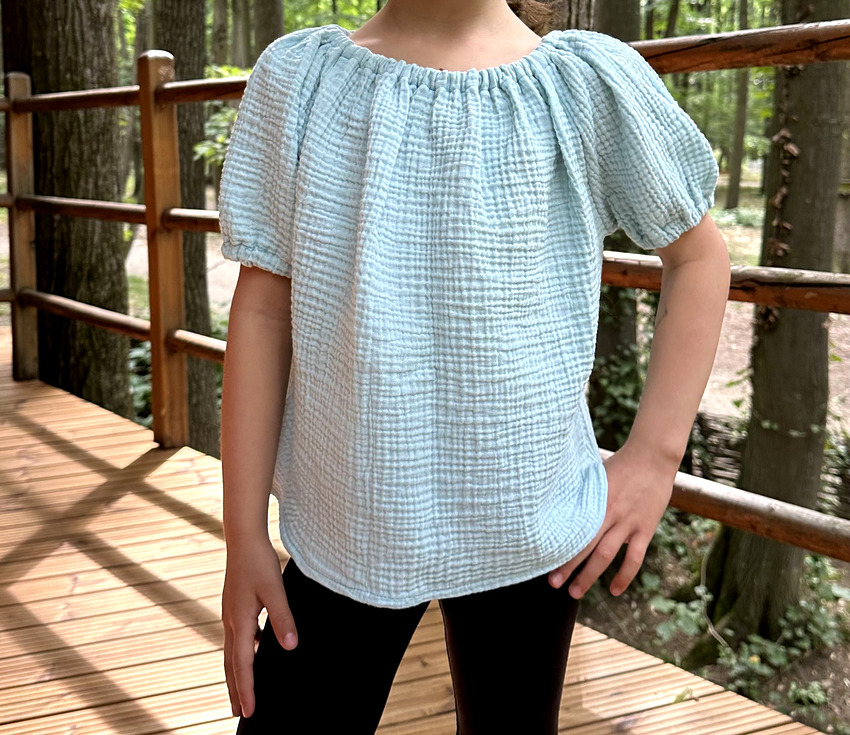
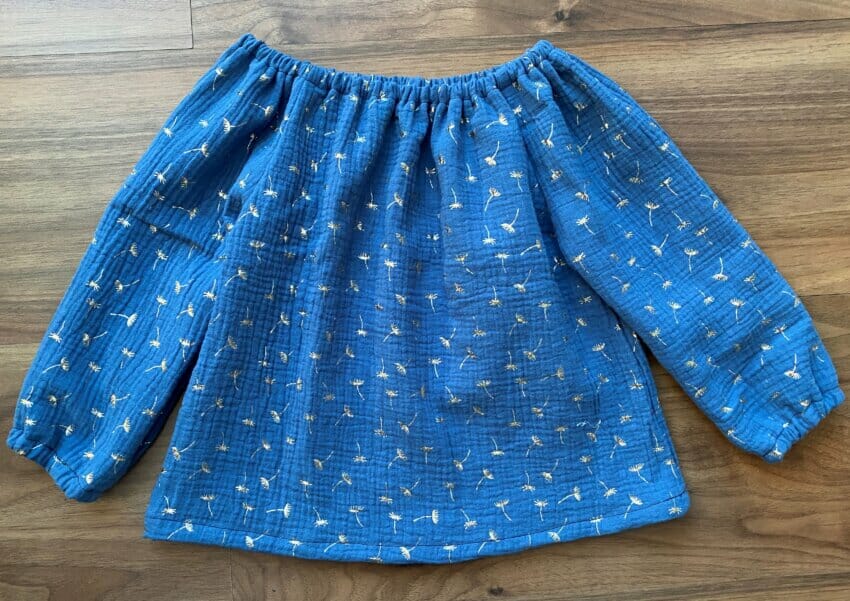
Learn how to make your own DIY peasant top pattern in any size with this foolproof formula! No extensive sewing knowledge or years of experience are required. This method needs little to no math and no body measurements. All you need is a short sleeve t-shirt with a regular fit to create different DIY peasant top variations.
With this skill, you can create DIY peasant tops for yourself or others. This tutorial is simple and easy to follow, so you can have a blast while making your first garment!
The simple principle of peasant top drafting
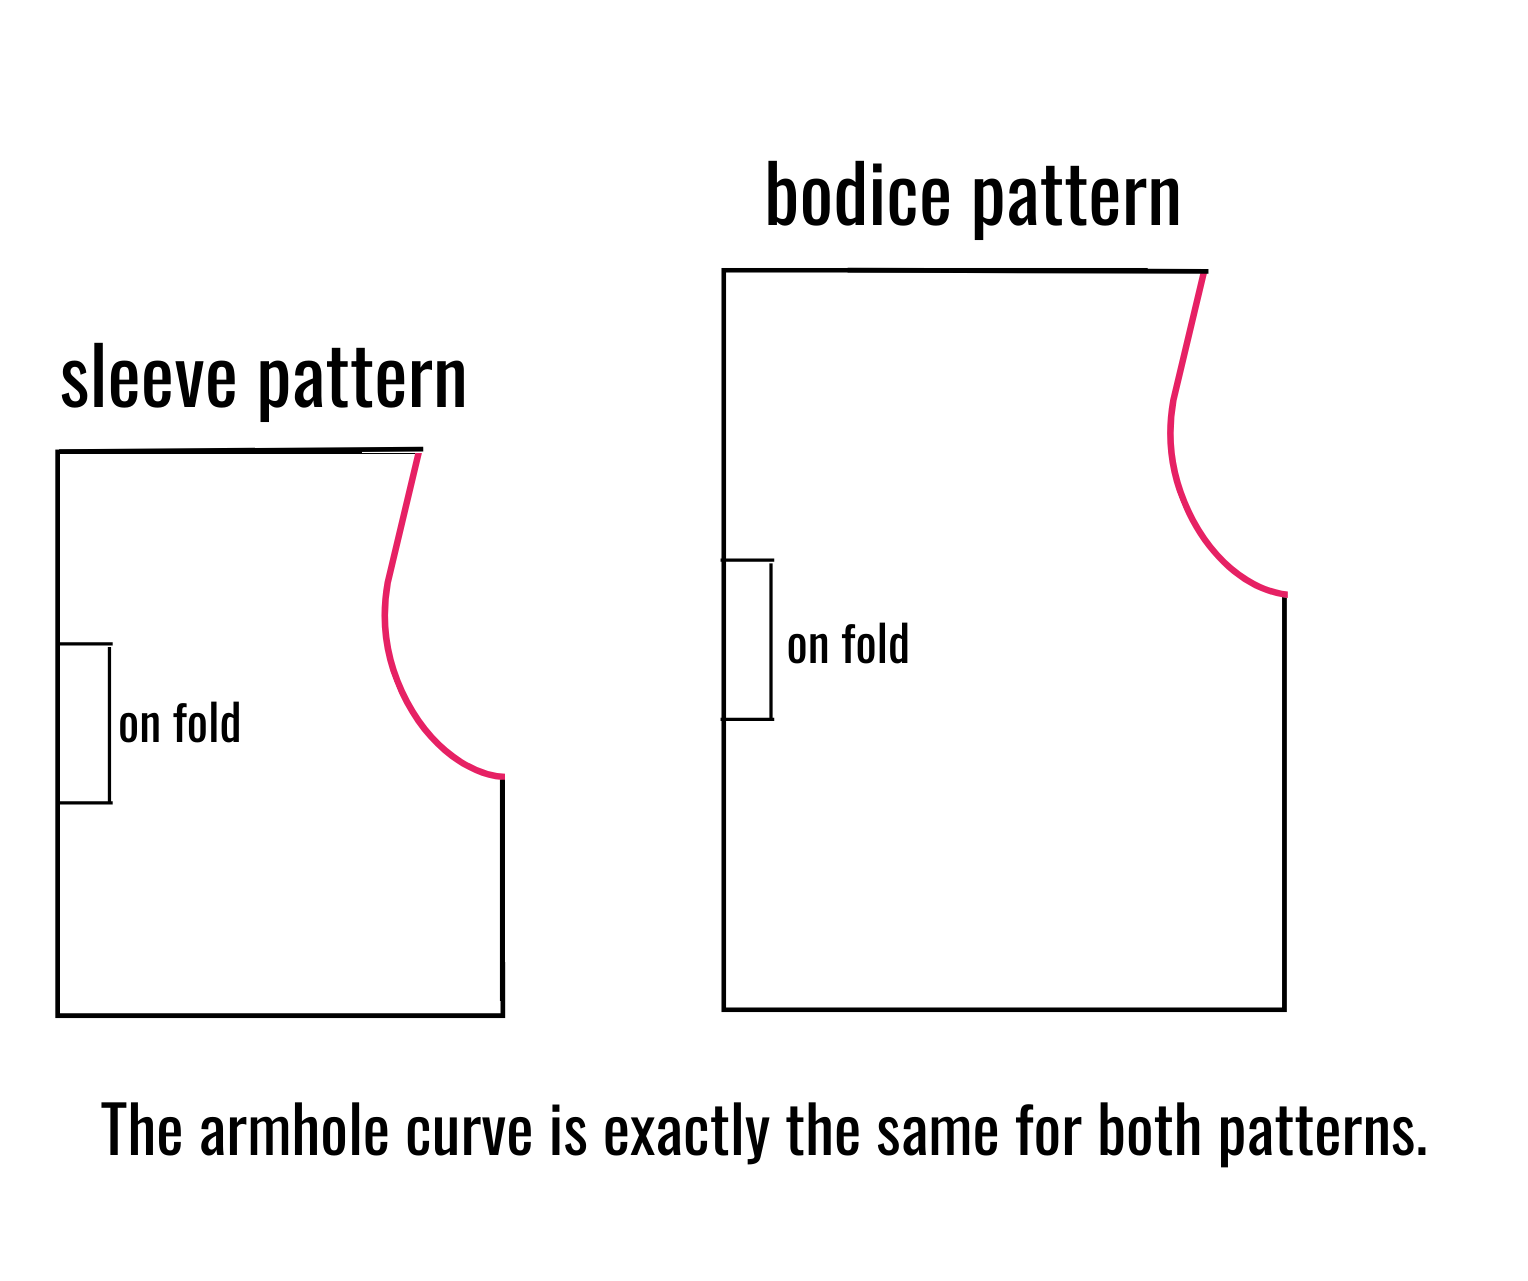
I’m a self-taught sewist, and I love DIY peasant tops because they are comfortable, cute, and quick to make. Whether you are sewing for an 11-year-old, a toddler, or yourself, the principle is the same. You only need a rectangle for the bodice, a smaller one for the sleeve, and a basic armhole curve.
I’ve already shared several tutorials on how to make a long sleeve peasant top, a flutter sleeve peasant top, and even a cute dress that combines a peasant top with a tulle skirt.
Essential DIY sewing supplies
- Ruler and pencil
- Measuring tape
- All-purpose scissors
- Pattern paper: Use kraft paper, freezer paper, or even newspaper.
- Template: A short sleeve t-shirt with a regular fit (not too tight or too loose).
Step 1: Take two basic measurements
Fold your t-shirt in half and measure:
- S: The opening of the sleeve at the hem.
- B: The bust measurement.
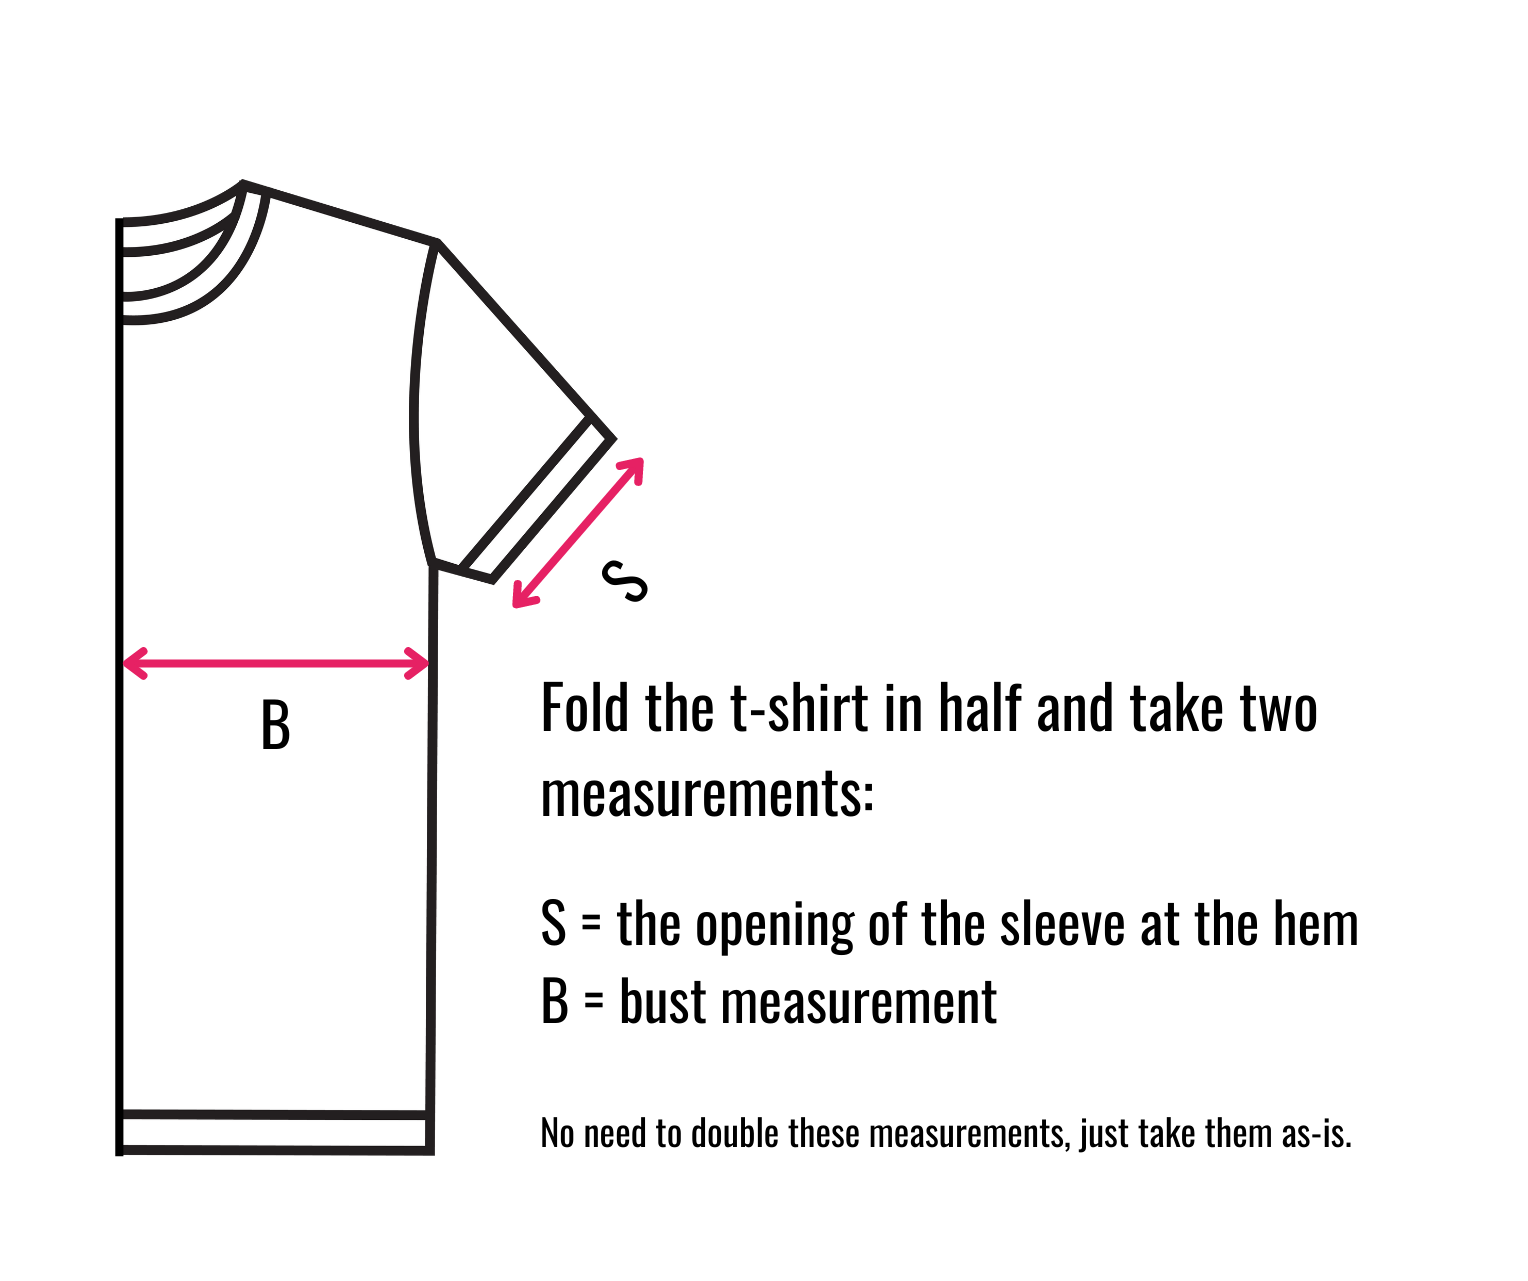
Jot these down exactly as they are. No need to double them or calculate circumference yet, as we will draft the DIY pattern on the fold.
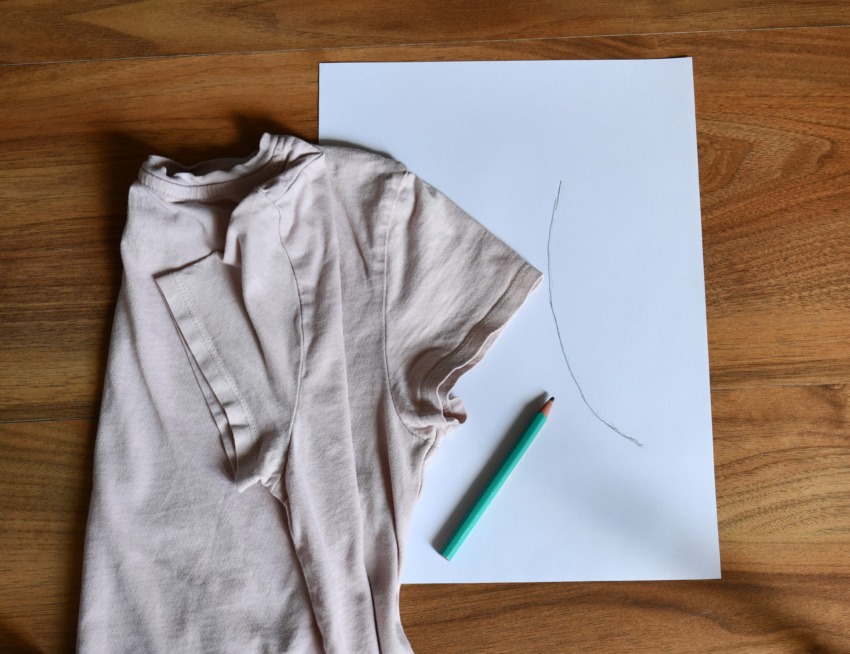
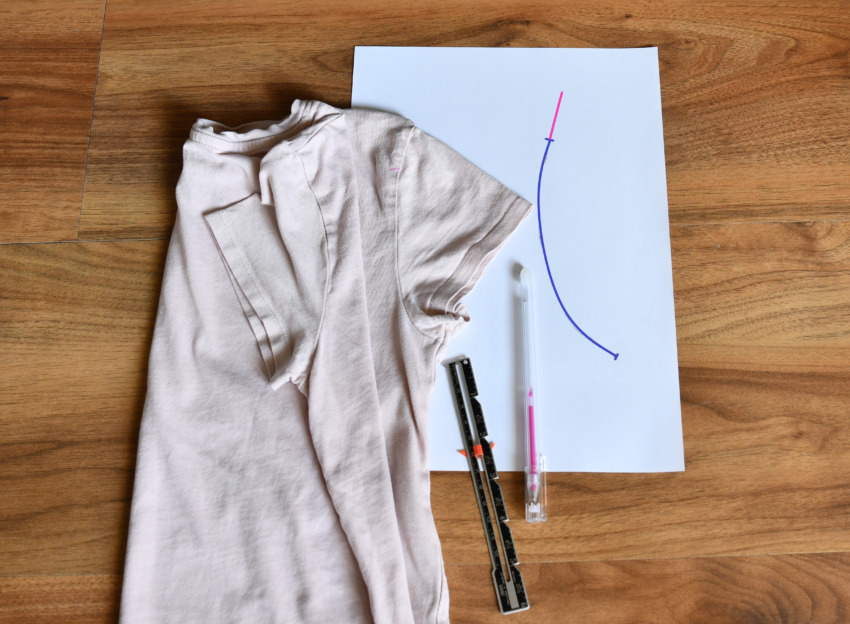
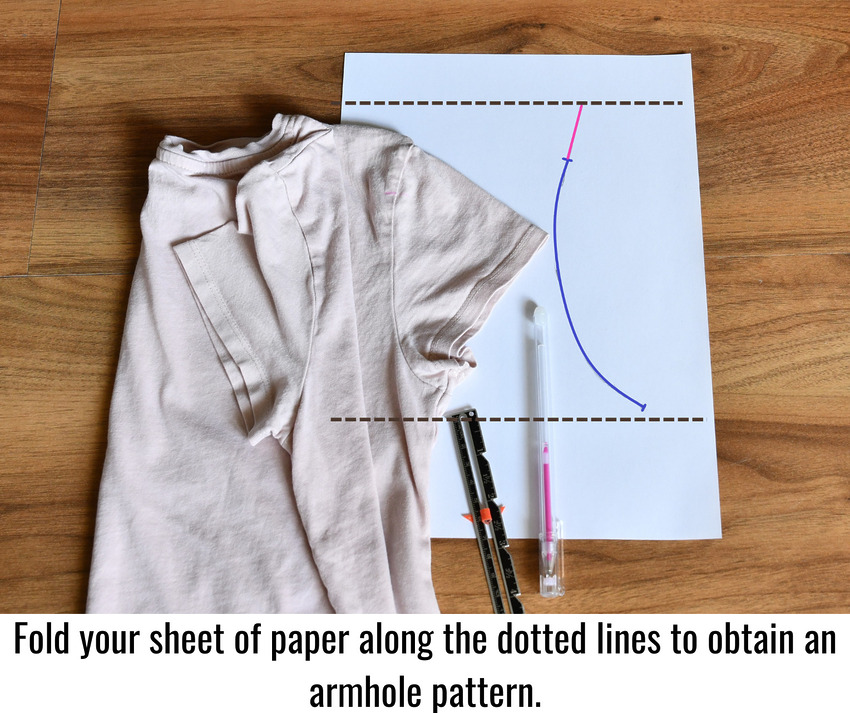
Step 2: Trace the armhole curve
Fold the t-shirt in half on your paper. Trace the curve from the shoulder seam to the underarm. This is your base, but you must extend this curve to allow for movement and the elastic casing.
How much you add depends on your vision for the neckline:
- For a classic DIY peasant blouse: Add 2-3” for adults or 1-2” for kids. This provides a comfortable fit and a standard gathered neckline.
- For a paperbag or ruffled effect: If you want a tall, pretty ruffle above the elastic casing, add more (about 3-4”). This extra height creates that beautiful gathered header.
- For an off-shoulder look: You can actually add a bit less (around 1”) if you want the top to sit lower on the shoulders without too much extra fabric bunching up.
Pro tip: Always consider the width of your elastic. If you are using wider elastic or creating a double-row casing, you’ll need to add a bit more to the curve to compensate for that extra fabric being used up.
Step 3: Create the armhole template
Fold down the top and bottom of your paper sheet to isolate your curve and cut it out. This becomes your master template for both the bodice and the sleeve.
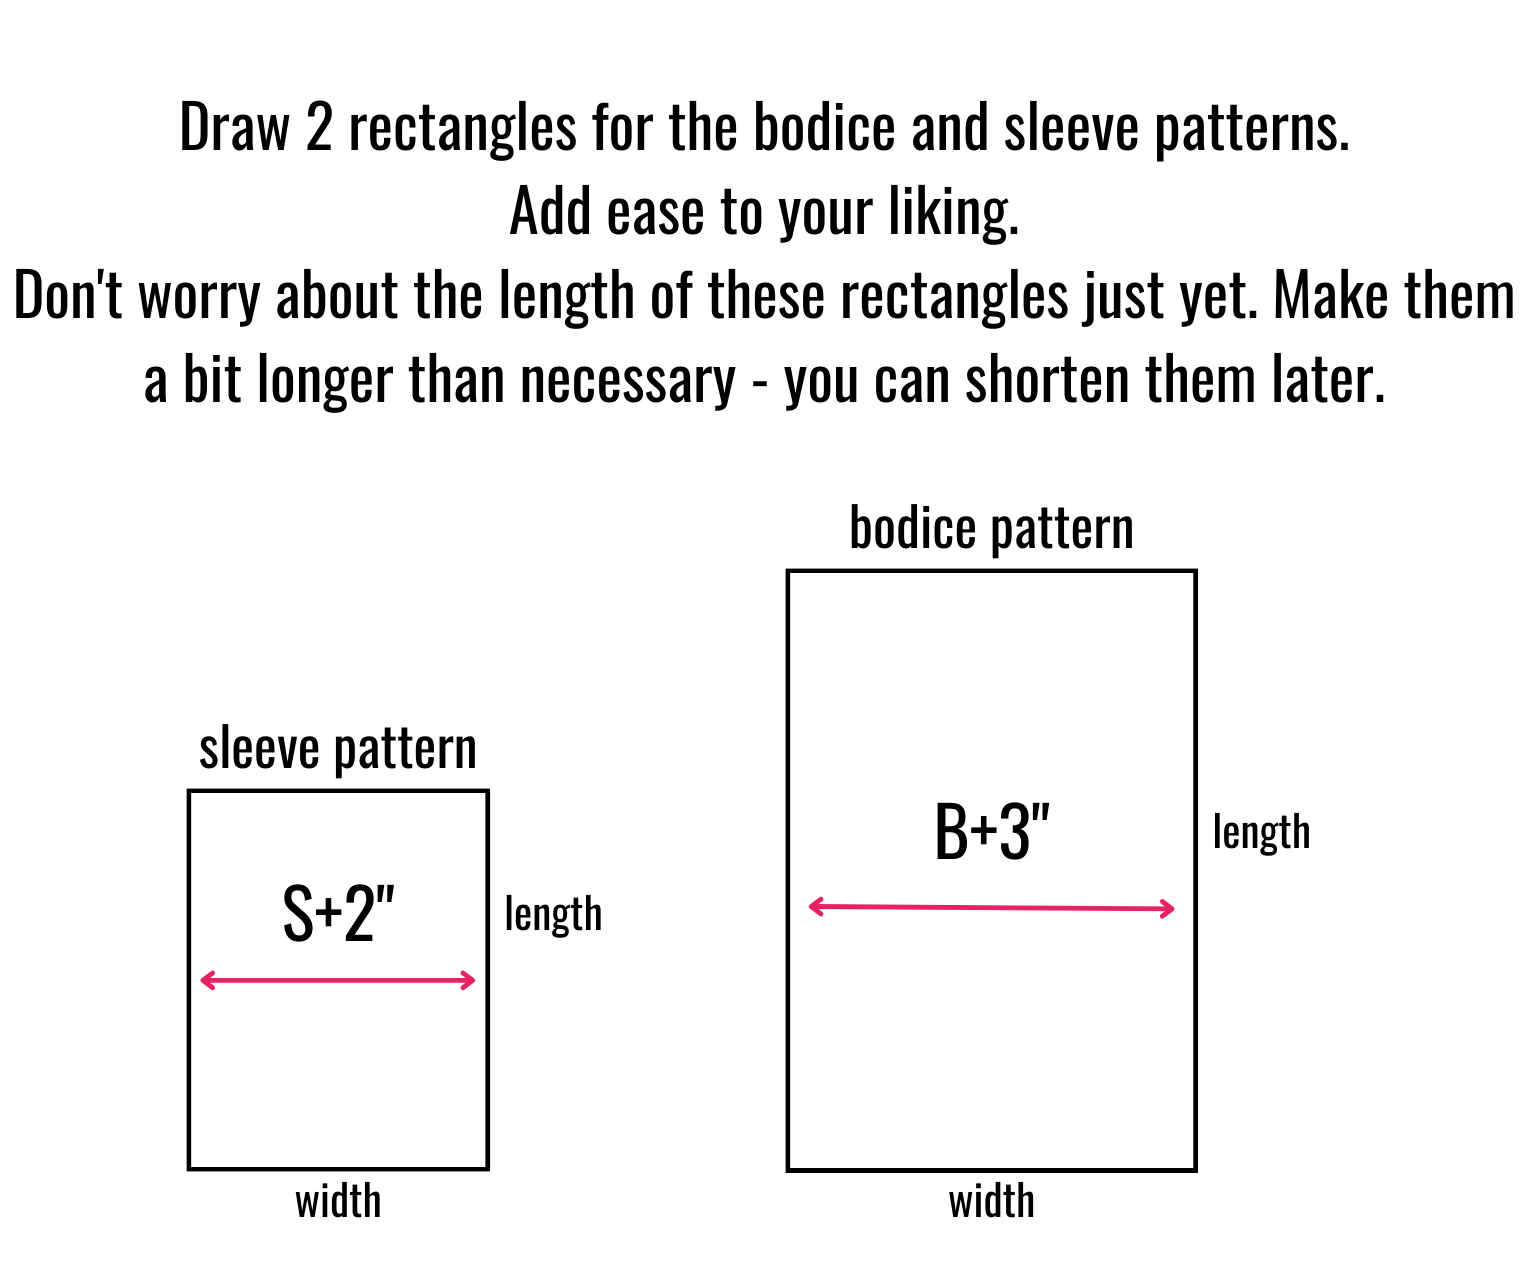
Step 4: Draw your rectangles
On your pattern paper, draw two rectangles using your B and S measurements for the width. These measurements serve as your base, but now you need to decide how much “ease” to add.
Gauging your ease: The amount of extra width you add is a matter of personal preference and who the pattern is for. You should gauge this based on:
- The wanted look: Add more for a voluminous, gathered style and less for a slimmer fit.
- The fabric weight: If you use a super lightweight fabric like viscose, chiffon, or silk, you can add up to 5” or more for beautiful movement. For crisper fabrics like linen, you might add less.
- The wearer: For toddlers, a little extra ease goes a long long way, whereas adults might want more defined volume.
As a starting point, I often add 3” for the bodice and 2” for the sleeve, but feel free to experiment to get the exact silhouette you envision!
Don’t worry about the length yet – it’s safer to draft them long and trim them later!
Step 5: Finalize the DIY pattern
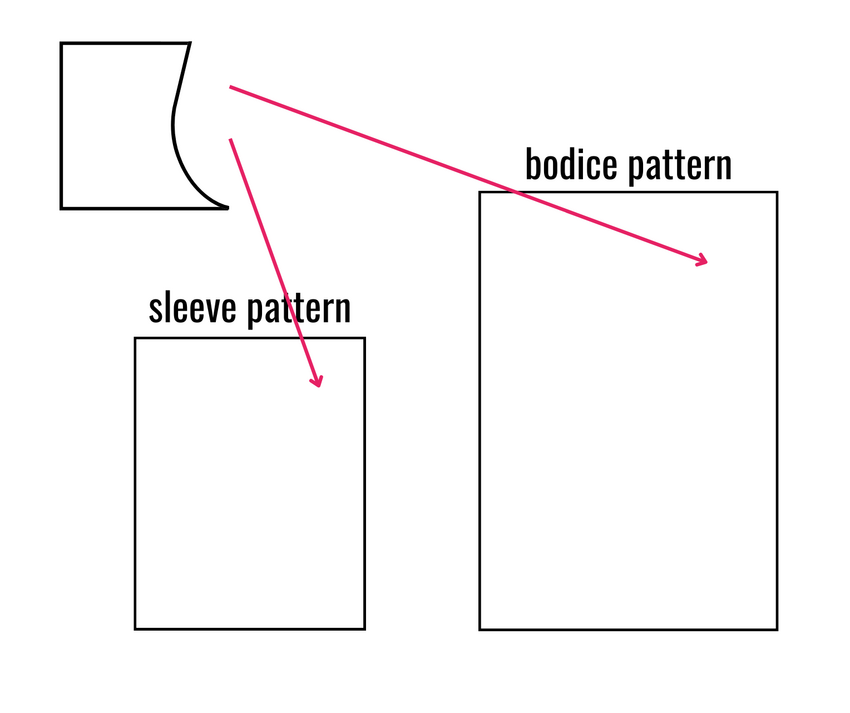
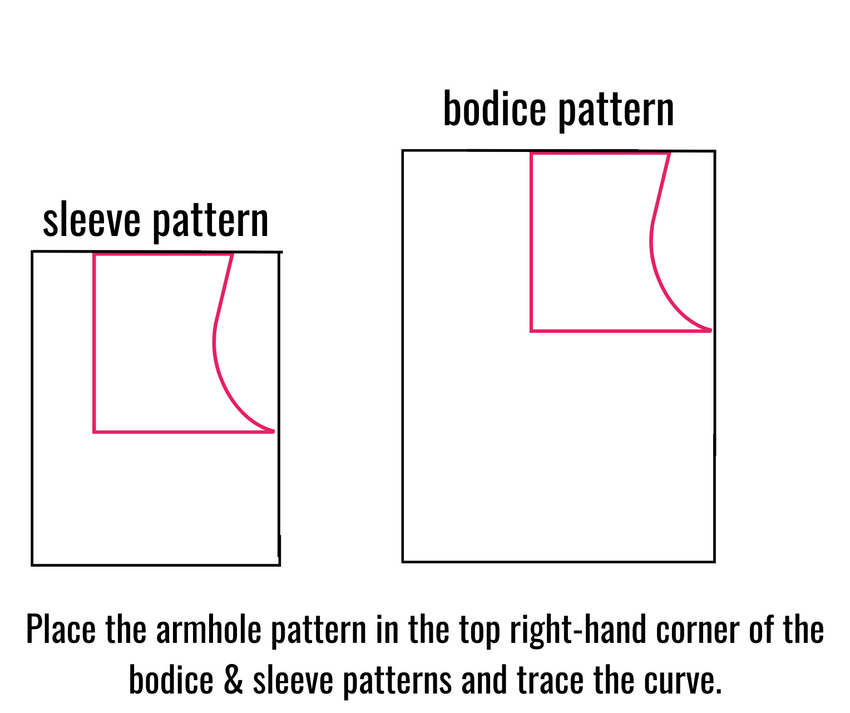
Place your armhole template in the top right-hand corner of both the bodice and sleeve rectangles. Trace the curve. Now you have your two main pieces!
Mark your pattern to show it should be cut “on the fold.” You will need 2 bodice pieces and 2 sleeve pieces (4 total).
Why the T-shirt shortcut works
This DIY method works because it solves the three unknowns: the size of the two rectangles (bodice and sleeve) and the shape of the armhole curve. By using a t-shirt as a template, you get the perfect starting point for all three, which you then simply “gauge” and adjust based on your fabric and style goals.
How to calculate your elastic length
Since peasant tops rely on gathers, the elastic length is actually more important than the fabric width for a good fit. Use this simple “minus 2” rule:
- For the neckline: Measure the circumference of the wearer’s shoulders (where you want the top to sit). Subtract 2 inches from that measurement.
- For the sleeves: Measure the arm circumference where the sleeve will hem (usually the mid-bicep). Subtract about 1 inch depending on how “puffy” you want the sleeve to look.
- For a paperbag waist (optional): Measure the waist and subtract 2 inches.
Pro tip: Don’t cut your elastic until you’ve threaded it through the casing with a safety pin. Pin the ends together and have the wearer try it on. This allows you to “gauge” the tension perfectly before you sew the elastic ends together and close the gap!
Tips for a professional finish
- The safety pin trick: Always use a sturdy safety pin to thread your elastic. If it’s a very narrow casing, a small bodkin tool works even better.
- Avoid the twist: Before sewing the elastic ends together, lay the garment flat to make sure the elastic hasn’t twisted inside the channel.
- Secure the ends: Use a wide zigzag stitch to join the elastic ends. Go back and forth several times (3-4 passes) to ensure it won’t snap during wear.
Best fabrics for a DIY peasant top
Peasant tops look best in lightweight, drapey fabrics. Try these:
- Cotton voile or batiste
- Double gauze or lawn
- Rayon challis
- Lightweight linen
- Silk or chiffon
Beginner tips for pattern drafting
- Use weights: If your pattern paper keeps curling, use large washers or canned goods as weights while you trace.
- Label everything: Write “Sleeve” and “Bodice” on your paper pieces immediately so you don’t mix them up later.
- Check your grainline: Ensure your pattern pieces are parallel to the selvage of the fabric to prevent the top from twisting.
Pattern drafting is a life-changing skill that brings so much satisfaction. It’s completely free and easy to learn once you know this t-shirt shortcut. Grab your supplies and start your DIY project today!
Let’s keep in touch! You can find me on Facebook, Instagram, and Pinterest.


Also how long am I supposed to make the elastic? I don’t see anything about how to measure that in relation to the pattern size.
What does cutting the pattern piece “down the middle of the armhole curve” mean?? I cannot make sense of how to down that. I don’t understand how to determine the length of either piece with that phrasing.
Very useful information
This would make a great easy pattern for a nightgown. Thank you! Have made several peasant dresses for my little granddaughter but never thought of adapting it for a nightdress. I like loose comfortable gowns that give ease of movement, and this is perfect!
Hi Janaki,
Thank you for your lovely words and for taking the time to leave a comment! I really appreciate it. And yes, you can definitely apply this method of drafting your own peasant top to make a beautiful and comfy nightgown. I might even borrow this idea for my own daughters too because I absolutely love it!
Thank you Violet! I also had a thought that if you dont have a T-shirt, whenI looked at your diagrams it occurred to me that one could just use a basic childs bodice block with reuired ease take it from there. My daughter lives overseas and unless one of us is visiting, I dont have my granddaughter’s clothes to use as a sample..I love your site and tutorials and its great to be taught “how to”rather than just copy from a pattern..
Hi Violet, thank you for this tutorial how to. I always prefer to learn how to make it than just blindly copy, so it is a great visual tutorial. I was looking for something else, but now the peasant to/ dress / night gown is on my list to do. Thanks again!
Awesome! Thank you so much for leaving a comment! I’m absolutely thrilled about this tutorial and I can’t wait for everyone to give this easy method a try and create their own adorable peasant tops and dresses!